Register a New Account
To create a new account with us, you can click on the Create a new account link and follow the on-screen process.
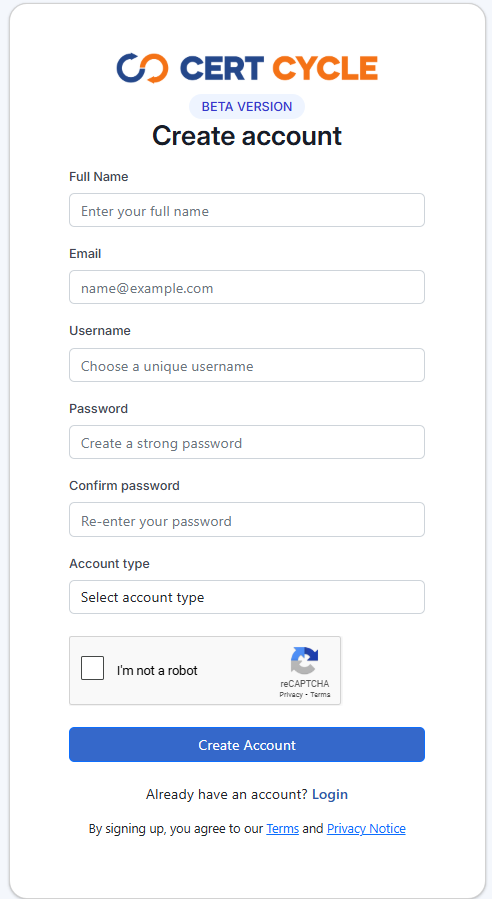
Please ensure all the information that you have entered are correct. When everything is OK, click on the Register button to complete the registration process.
You should receive an email in a short while that allows you to activate your account.
| Company name is unique throughout our system. If your company has been registered, you can ask the existing admin of your company to create an invitation for another admin. You may refer to here on how to invite an admin to your company. |
| Username can only contain alphabets, numbers, @, dot (.), and dash (-) symbols. |
| Please make sure that the email address that you entered is correct so that you can receive the activation email. |
Authenticate to the System
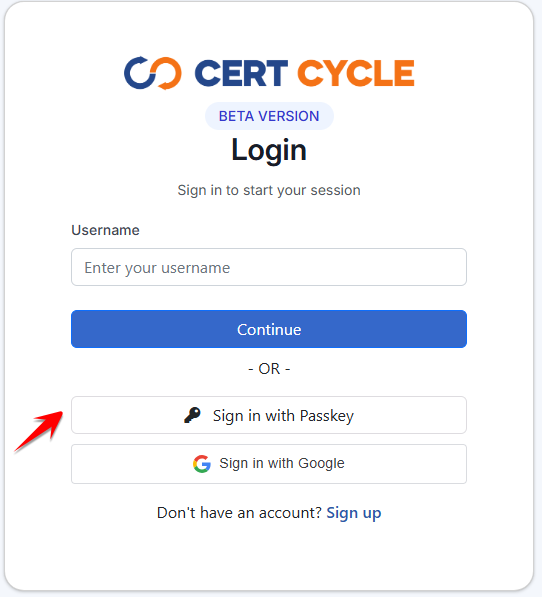
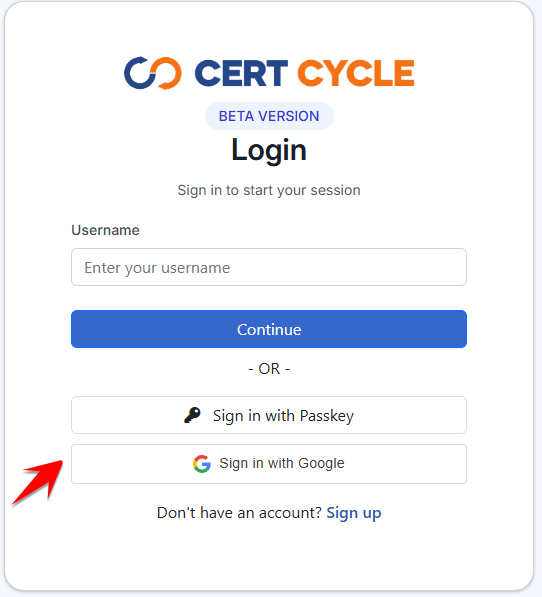
CertCycle allows you to authenticate using different mechanisms. You can use your own username and password/FIDO token/passkey, or you may as well use your social accounts (we support Google).
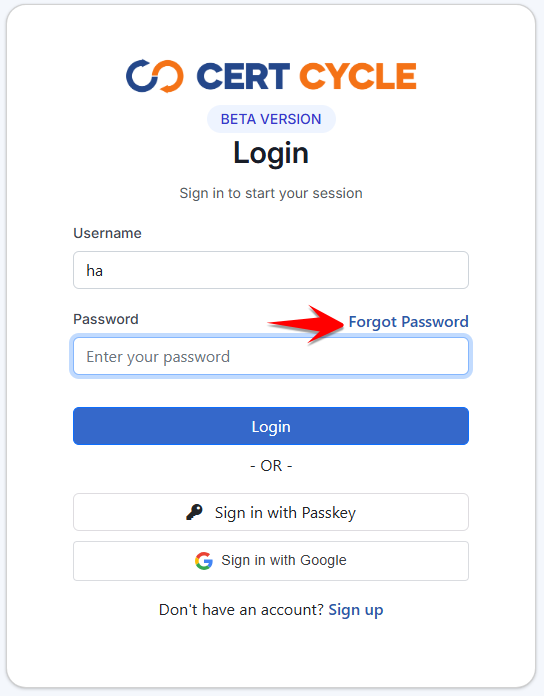
Authenticate using Username/Password
To authenticate using your username and password, you may enter your username into the username field and press on the Continue button. Additionally, you can also enter your email address.
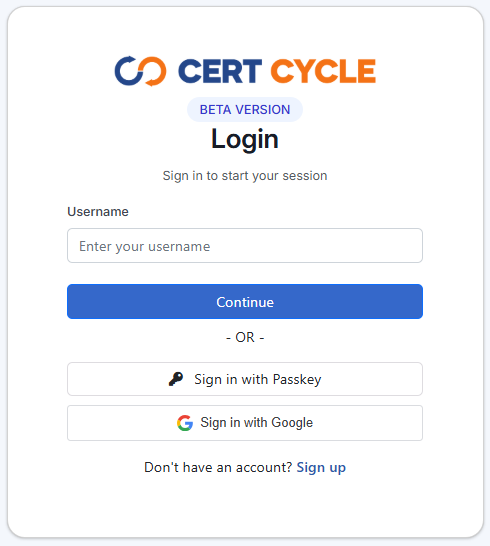
You will be presented with a password field to where you can enter your password.
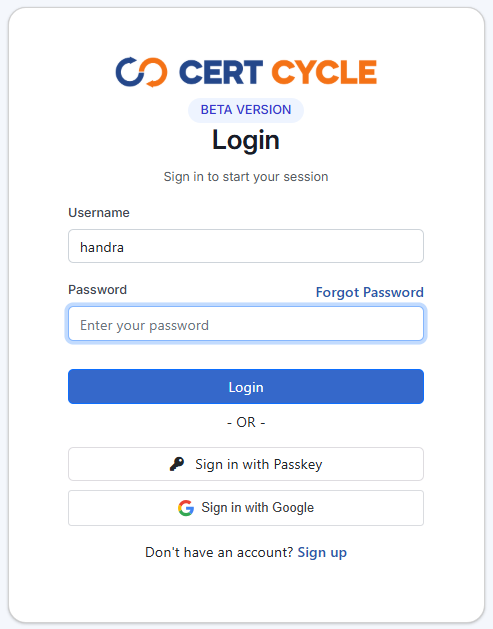
Press the Login button to complete your login process.
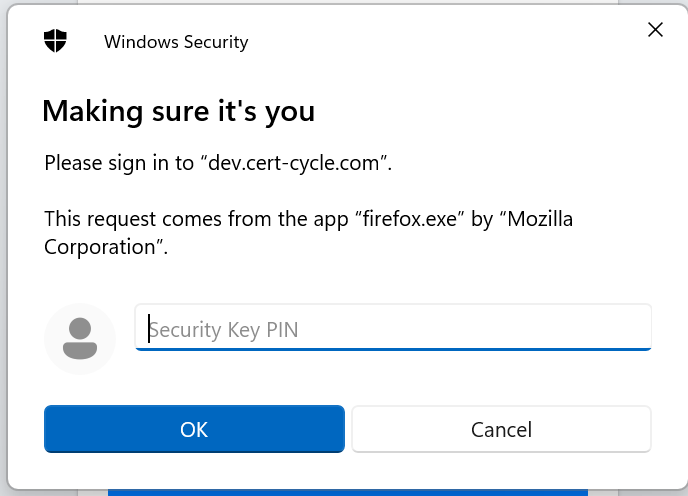
Authenticate using FIDO token
To authenticate using your FIDO token, you may enter your username into the username field and press on the Continue button.
You will be asked to enter the PIN to access your FIDO token.
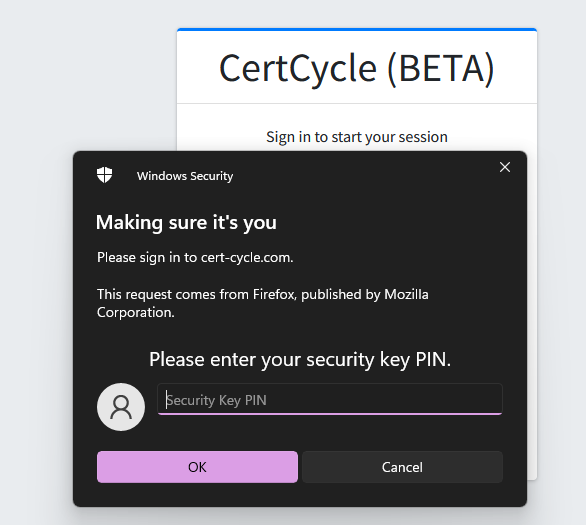
| If this is your first time, you will be asked to set the PIN for your FIDO token first. |
After that, depending on the type of the FIDO token that you have, you will be asked to confirm your presence. This can be by pressing your FIDO token or even your biometrics.
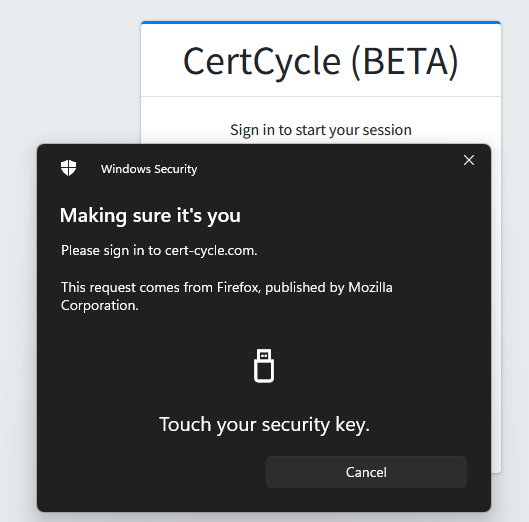
If authentication is successful, you will be able to access the system now.
| You need to have FIDO authentication enabled for your account before you are able to use this feature. You can check here on how to enable FIDO authentication for your account. |
| The screenshots here are taken on Linux. Different operating system might show different UI, but the steps are the same.t |
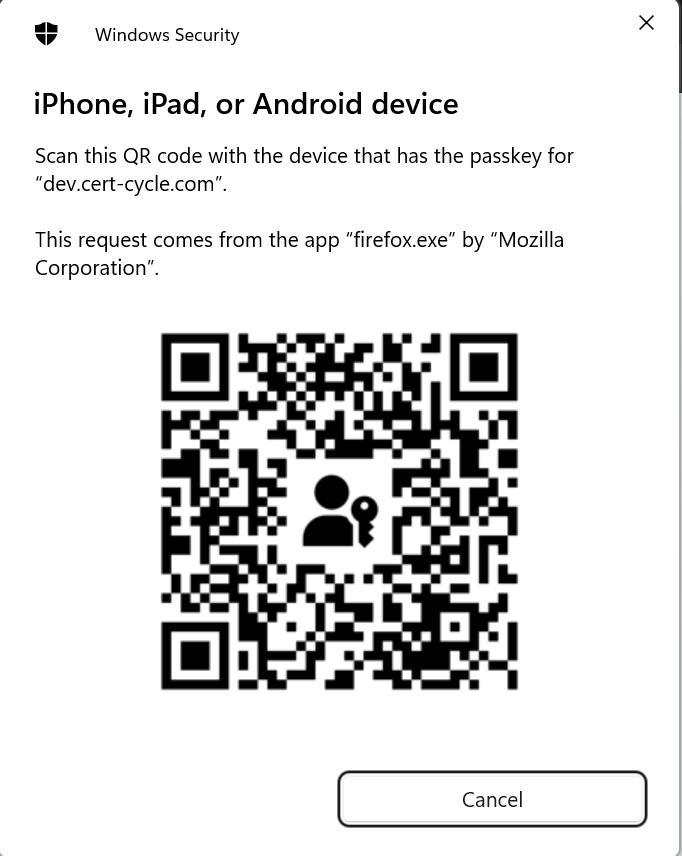
Authenticate using Passkey
To authenticate using Passkey, simply click the Sign in with Passkey button.
You will be prompted to authenticate using either mobile device or security key, depending on the option you selected during registration.
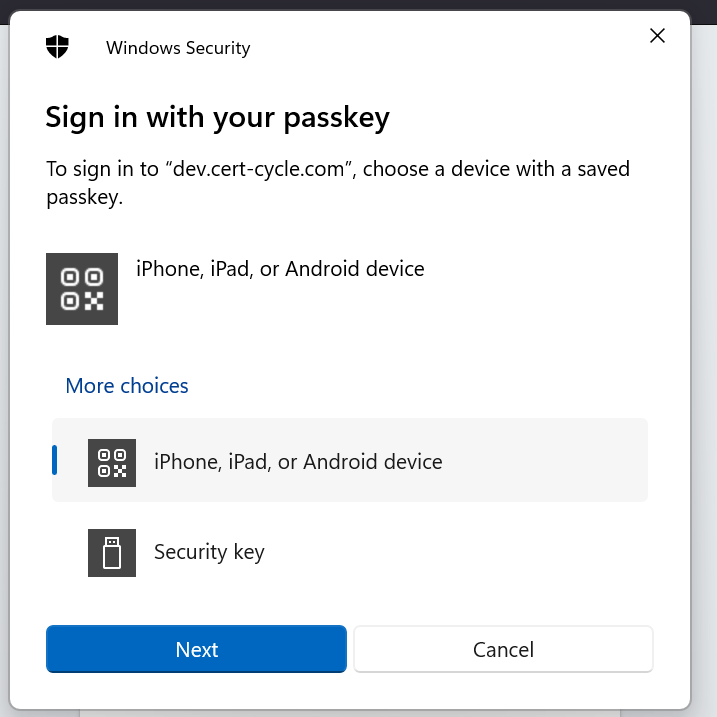
If you choose authenticate using mobile device, QR code will be displayed for you to scan with your registered mobile device. Once the authentication is successful, you will be able to access the system.
If you choose authenticate with security key, insert your hardware token and enter the PIN. Once the authentication is successful, you will be able to access the system.
| You need to have FIDO authentication enabled for your account before you are able to use this feature. You can check here on how to enable FIDO authentication for your account. |
Authenticate using Google
To authenticate using your Google account, simply click on the Sign in using Google button.
You will be presented with Google login page. Just login using your Google account and once completed you will be authenticated to CertCycle.
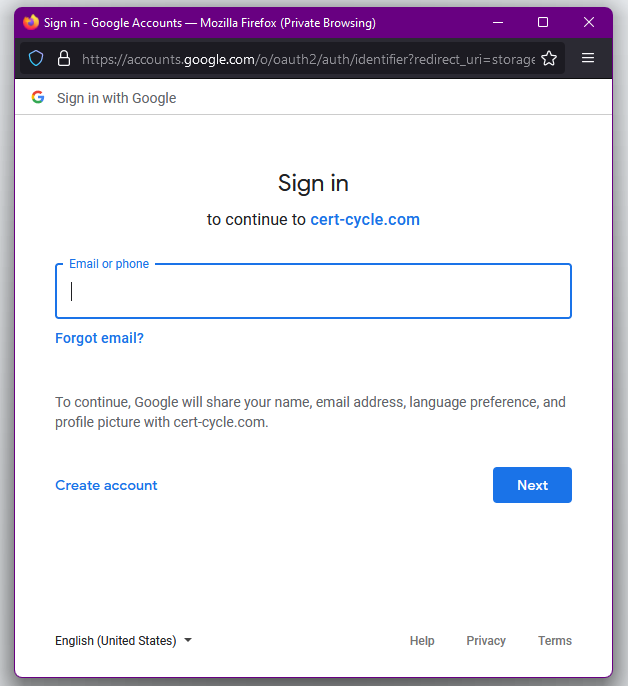
| If your Google’s email address has not been registered in the system, CertCycle will automatically create a new account for you. |
| You need to allow 3rd party cookie in your browser to use this feature. |
Authenticate using Recovery Key
If you are unable to use your FIDO/Passkey device, you can authenticate using one of your saved recovery keys that were provided to you when you disabled password authentication. You can check here for more details.

When the browser prompt for FIDO/Passkey login fails or is skipped, the system will ask for:
-
Username/Email address. Enter the username or email address associated with your Cert-Cycle account.
-
Recovery key. Enter any one of your saved recovery keys.
After successfully entering these credentials, click Login button, and you will be authenticated to Cert-Cycle.
| You need to have FIDO authentication enabled for your account before you are able to use this feature. You can check here on how to enable FIDO authentication for your account. |
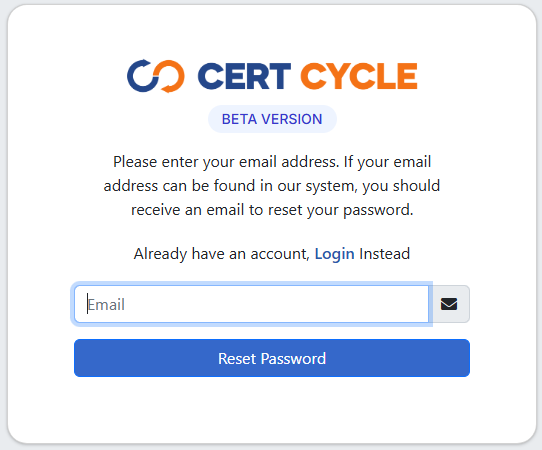
Forgot Password
In case you forgot your login password, you can always reset your password by going into the forgot password module. Click on the Forgot Password link.
You will be asked to enter your registered email address. Please enter your correct email address into the designated field and click on the Reset Password button.
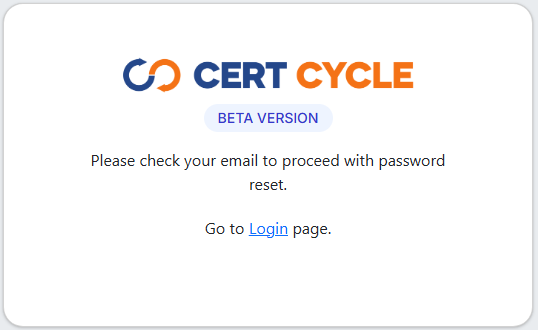
An email will be sent to your registered email address to guide you on the password reset steps.
Dashboard
Your dashboard is a place where you can have a bird view of the overall status of the certificates that you have uploaded to CertCycle. It provides you with some alerts and charts as detailed below.
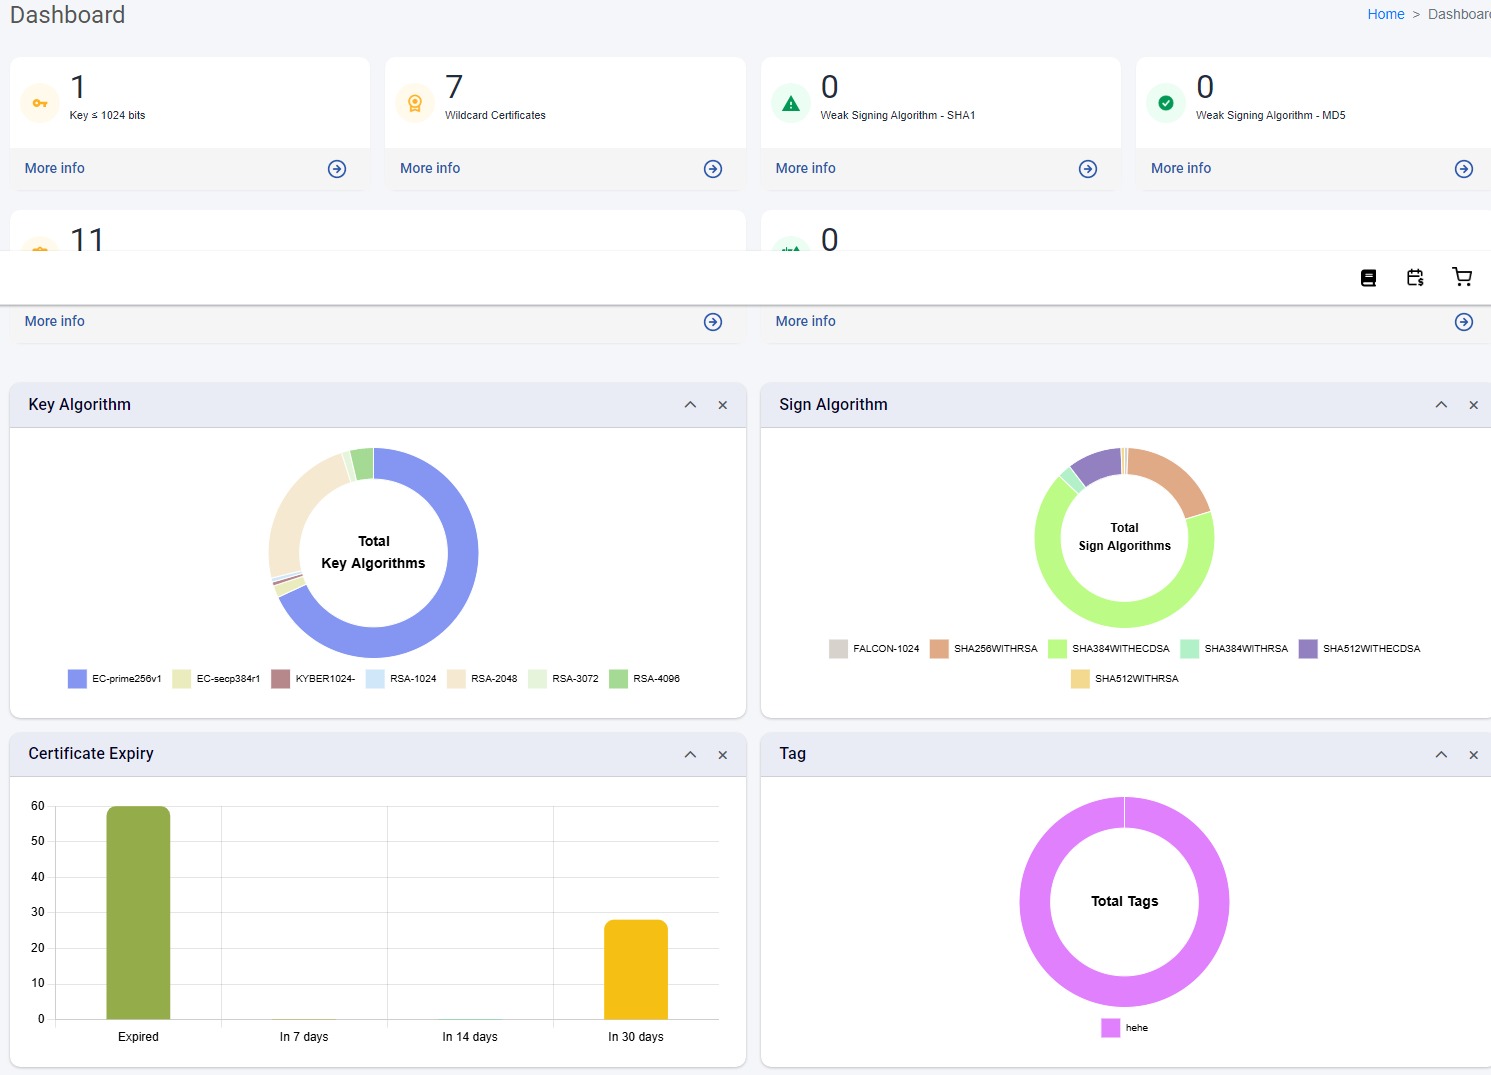
Alerts
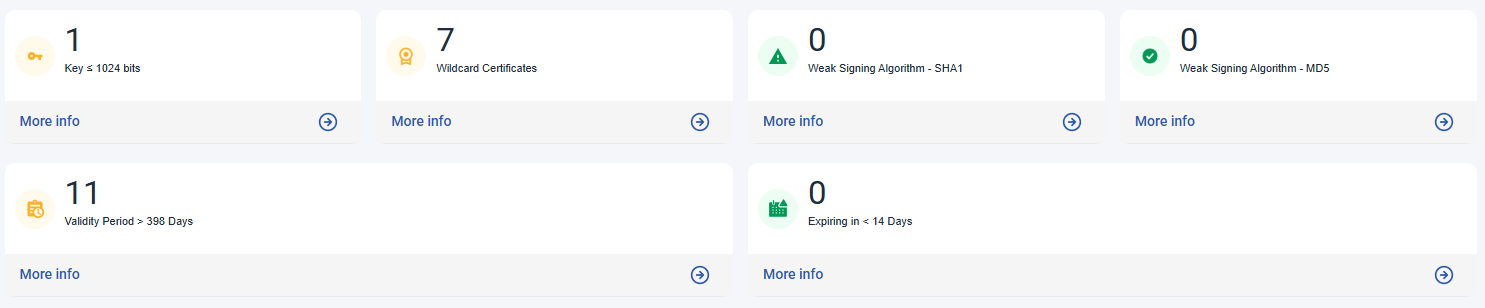
This section gives you number of certificates (if any) that are managed by you that fall under specific criteria.
-
Keys less than or Equal to 1024 bits. This criterion applicable only for RSA. RSA with key-size of 1024-bit or less are considered as no longer secure and should no longer be used.
-
Weak Signing Algorithm - SHA1. SHA1 is considered as no longer secure enough to be used in the industry, hence its usage is no longer recommended. If you still have certificates using SHA1, consider upgrading to SHA2 or stronger signing algorithms instead, unless you have specific reason such as to accommodate old-legacy systems.
-
Weak Signing Algorithm - MD5. Worse than SHA1, MD5 is not a secure hashing algorithm anymore and should not be used for digital certificates. Do consider using stronger hashing algorithm such as SHA2.
-
Validity Period More Than 200 days. CA/B forum now mandates that the validity of SSL certificate to be not longer than 200 days. As such, we consider certificates which has validity of more than 200 days as non-compliance and should be rectified unless you have your own specific reasons. You can read more about this from https://cabforum.org/working-groups/server/baseline-requirements/requirements/#632-certificate-operational-periods-and-key-pair-usage-periods.
-
Expiring in 14 Days or Less. This alert tells how many certificates are going to expire in 14 days or less. You should consider renewing your certificates as soon as possible to avoid disruptions from using expired TLS certificate for your websites.
-
Wildcard Certificates. A wildcard TLS certificate is a certificate that can be used to secure all first-level subdomains of single domain name. Wildcard certificates can be misused to aid in phishing attacks and hence not recommended.
-
Quantum Computer Vulnerable. This alert indicates the number of certificates currently employing cryptographic algorithms deemed insecure in the context of emerging post-quantum computing threats.
Key Algorithm
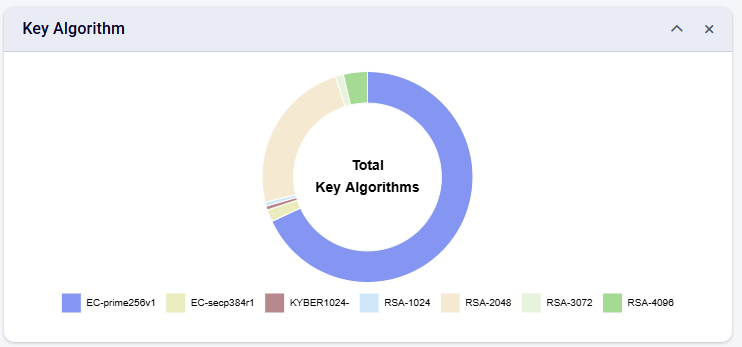
This chart provides the overall view of the key algorithm used in the certificates that you are managing inside CertCycle.
Sign Algorithm
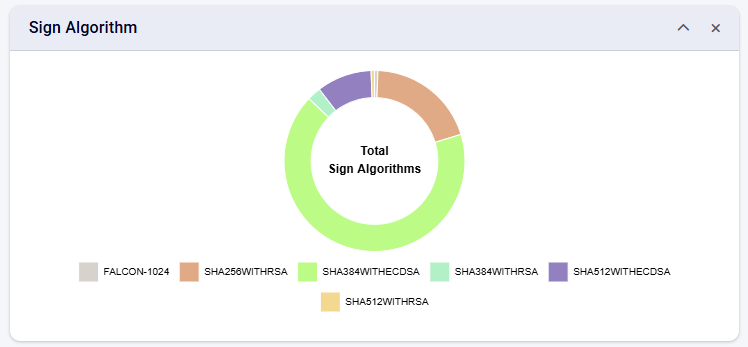
This chart provides the overall view of the signing algorithm used in the certificates that you are managing inside CertCycle.
Certificate Expiry
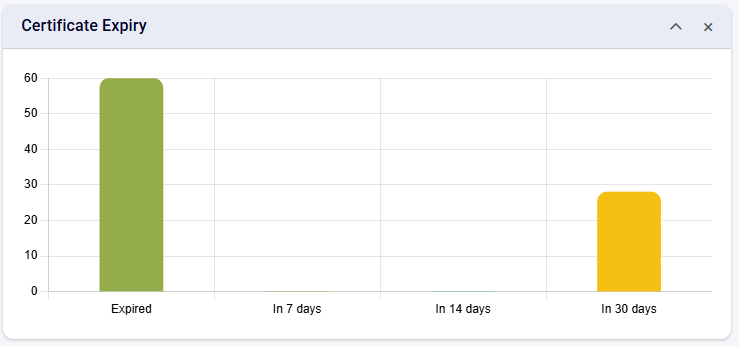
This chart provides the number of certificates that have expired and expiring in:
-
7 days
-
14 days
-
30 days
Certificate Tags
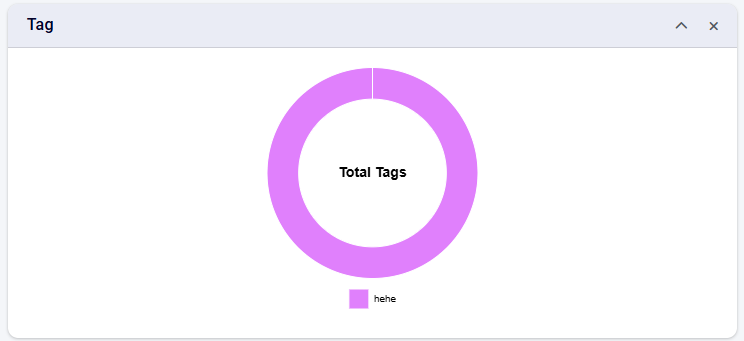
This chart provides the overall view of the tags applied to the certificates that you are managing inside CertCycle.
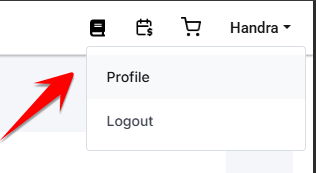
My Account
You can change your account details from the My Account page. To go to my account page, just click on your name at the navigation menu once you are authenticated.
My Profile
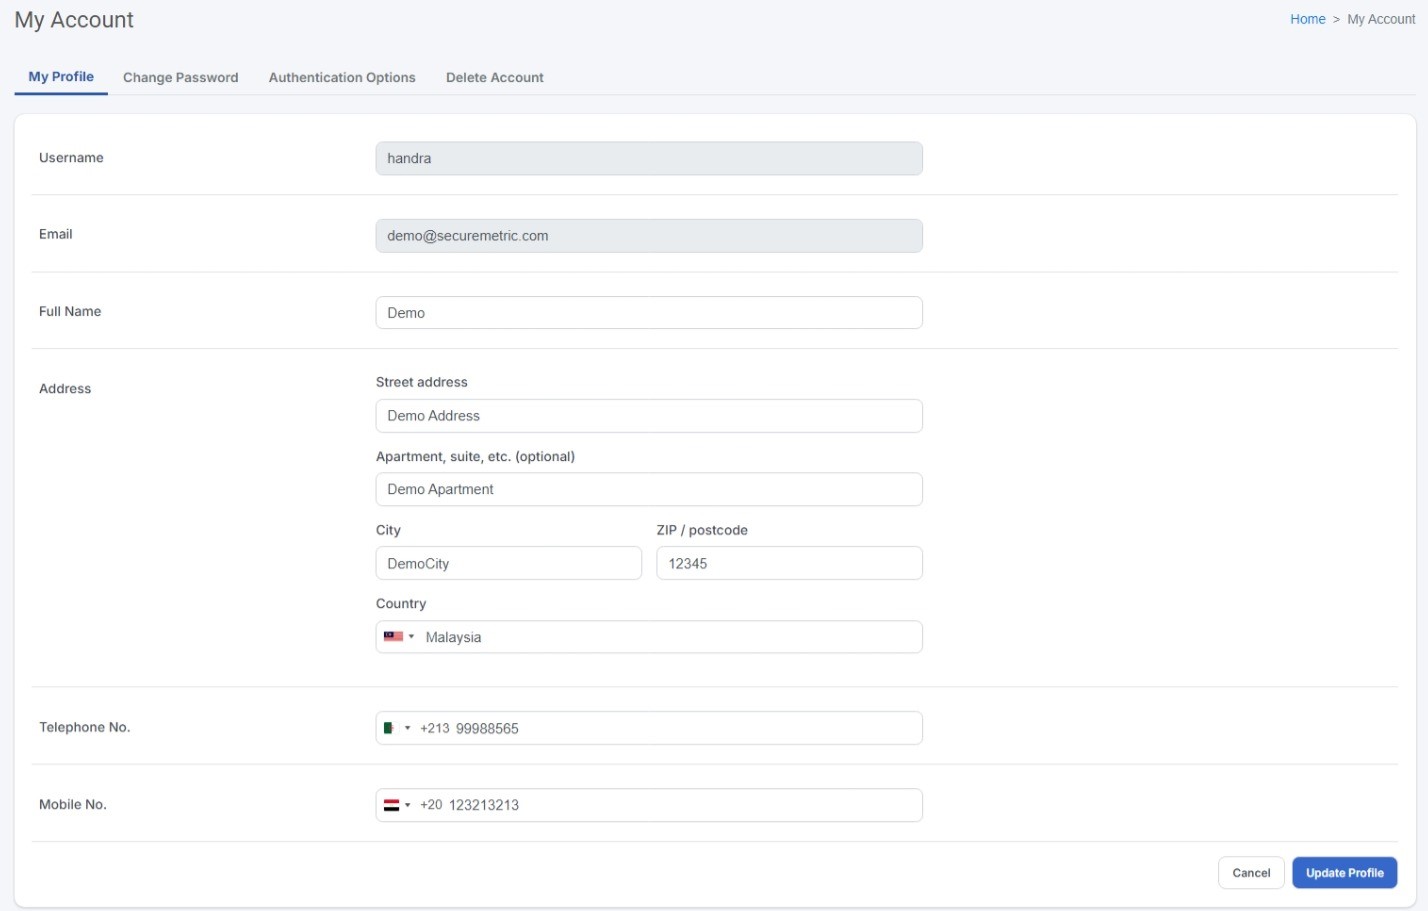
You can change your profile details from this page. This includes your full name, address, landline, and mobile number.
| Username and email cannot be changed once account is created. |
Change Password
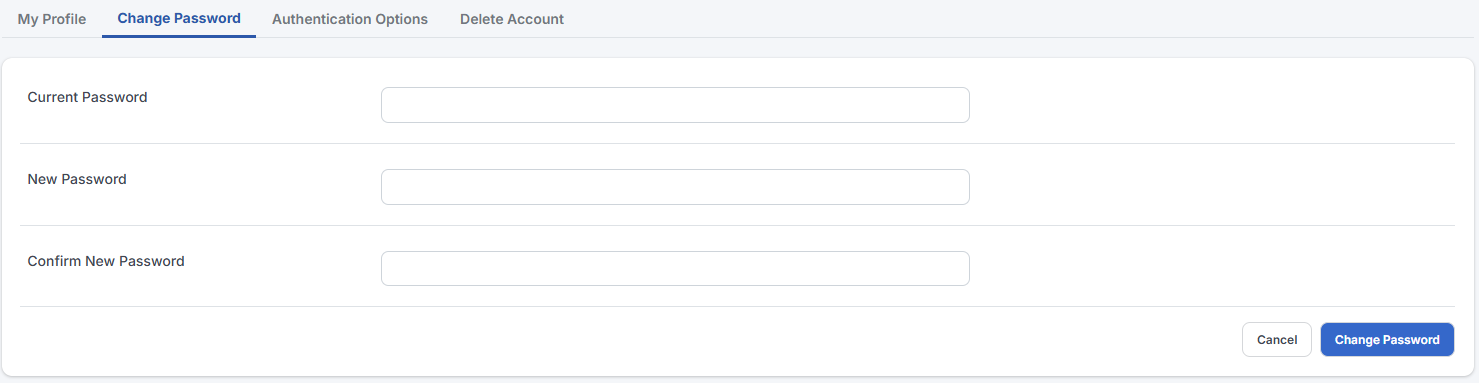
You can change your password here. For extra validation, you must enter your current password as well followed by your new password.
Authentication Options

You can enable/disable FIDO authentication for your account here.
| You must have FIDO token or passkey enabled devices before you can enable FIDO authentication. |
| FIDO authentication provides extra security and convenience without needing you to remember your password. Whenever possible, we encourage users to use FIDO for authentication. |
| With Passkey, you do not have to provide username and password to authenticate. |
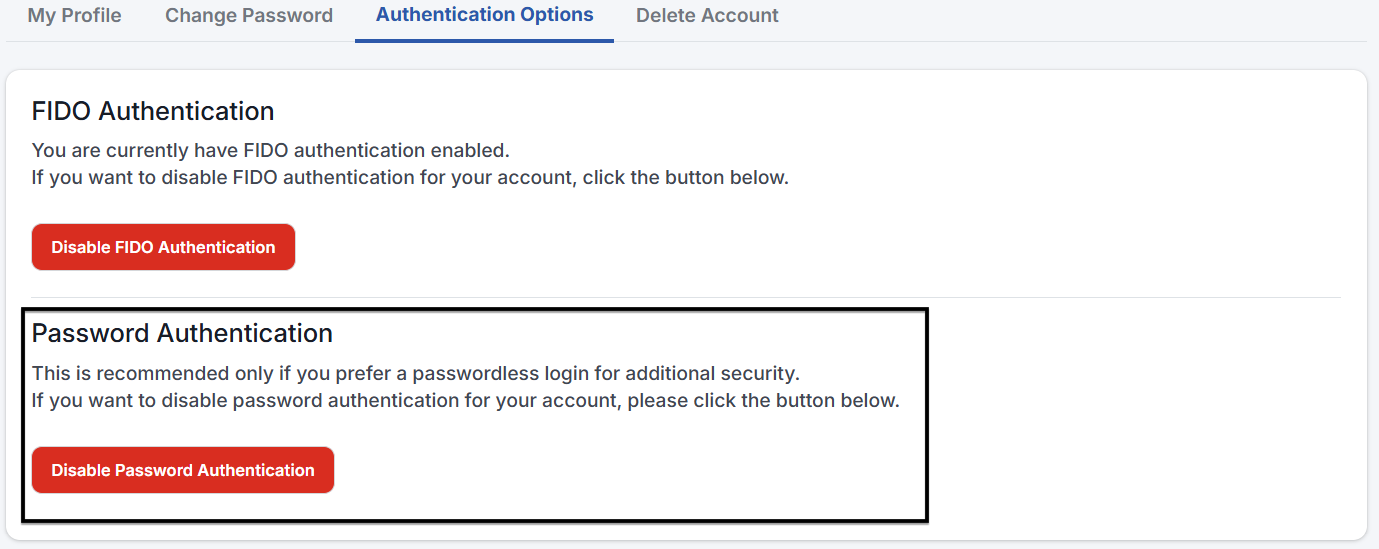
You can choose to disable your password authentication here for an additional layer of security.
| This feature is only available after you have enabled your FIDO Authentication. |
| After disabling password authentication, you will no longer be able to log in with your password. Your account will rely on FIDO/Passkey authentication. |

Once password authentication is disabled, you will be provided a list of one-time-use recovery keys, which can be used to access your account if you lose access to your FIDO/Passkey device.
| The recovery keys will be displayed only once and cannot be retrieved once you leave the page. Please save them securely before proceeding to other page. |
You can re-enable password authentication at any time if needed by clicking the Enable Password Authentication button.
Delete Account
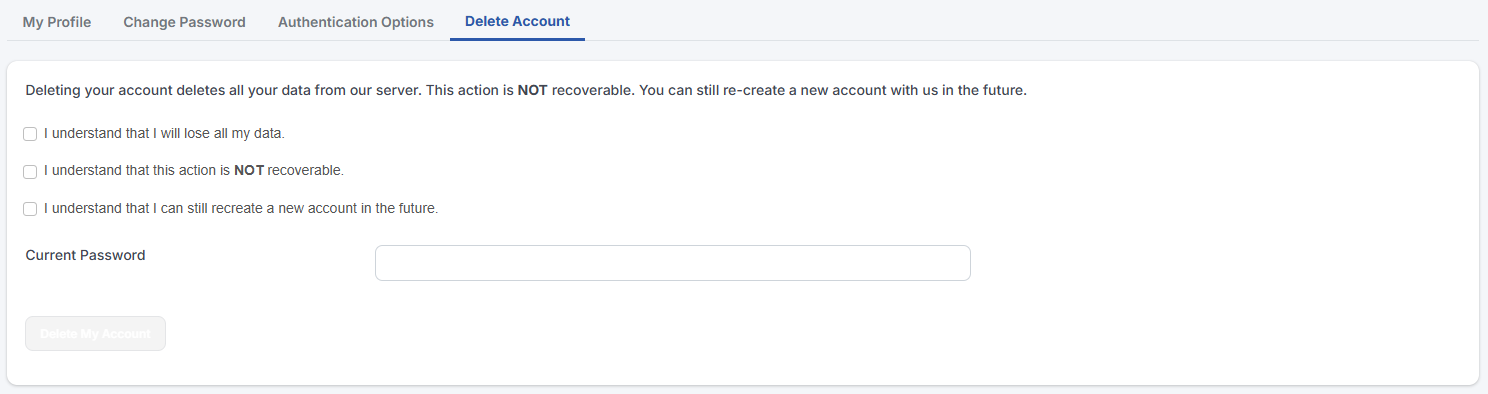
It is always sad to see someone goes away, but in case you need to, you can always delete your account here.
| Deleting your account is irreversible. You will lose all your data and cannot be recovered. Proceed only if you understand what you are doing. |
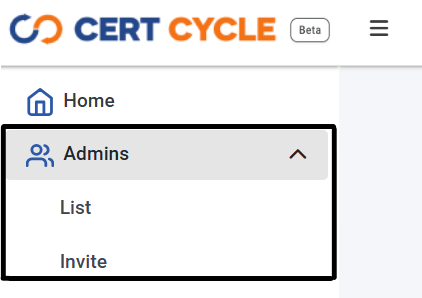
Admin
Through this module, you can manage the administrators allowed to access your company. It is available on the navigation panel to the left.
Admin List
| To access this page, you must have List Admins permission. |
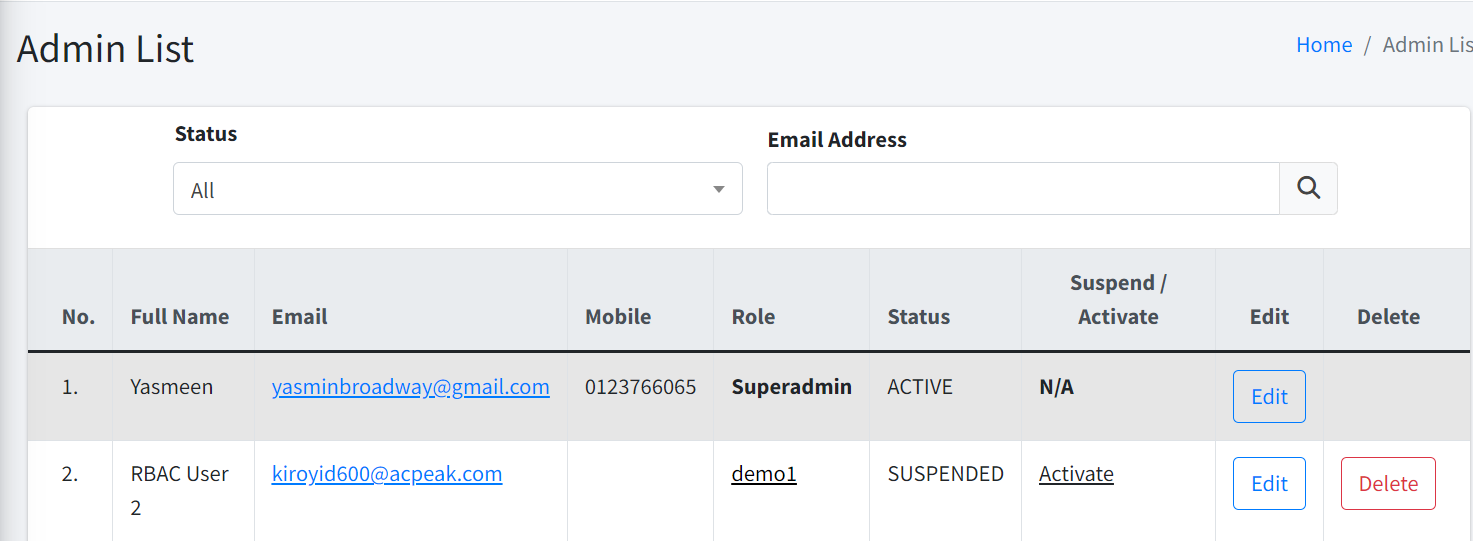
You can see all the admins who can manage the company in this page. You can filter the list by:
-
Full email address.
-
Status.
There are TWO (2) statuses for an admin, ACTIVE and SUSPENDED. If you want to temporarily disallow an admin from accessing the company, you can suspend him/her instead of deleting the admin.
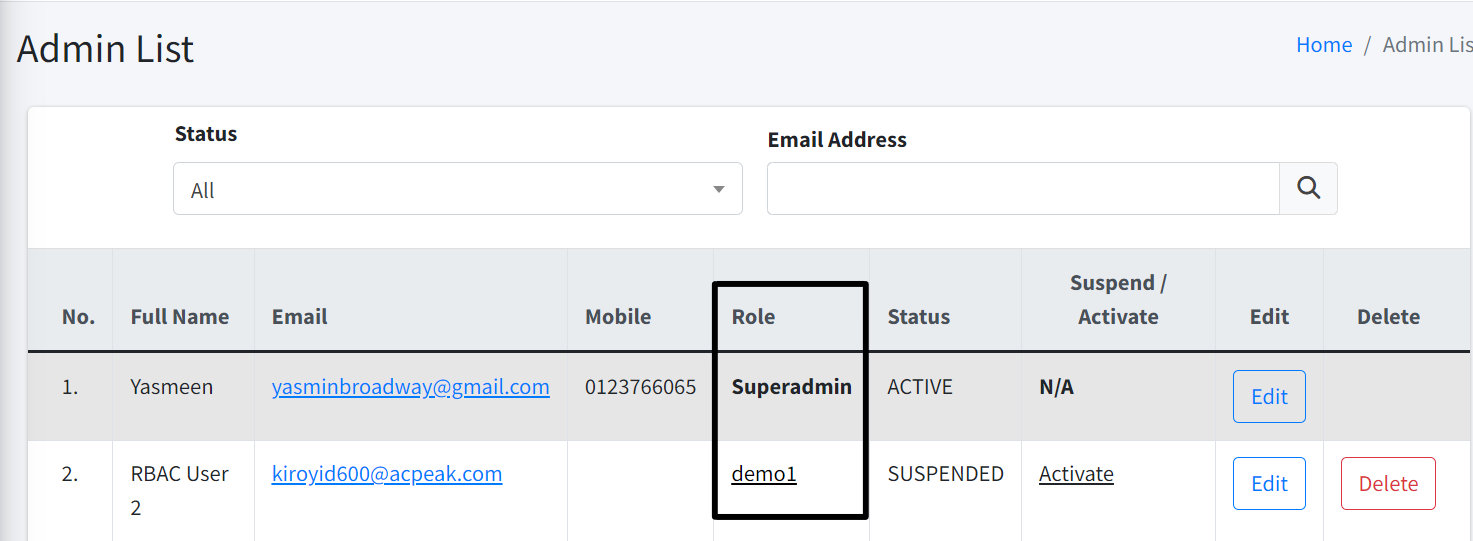
Assign Admin
| To reassign Admin, you must have both List Roles and Assign User permissions. |
To reassign an admin, click the link under the Role column, and you will be prompted to select a new role.
Activate/Suspend Admin
| To activate/suspend Admin, you must have Change Admin Status permission. |
To activate/suspend an admin, simply click on the Activate or Suspend link at the list page.
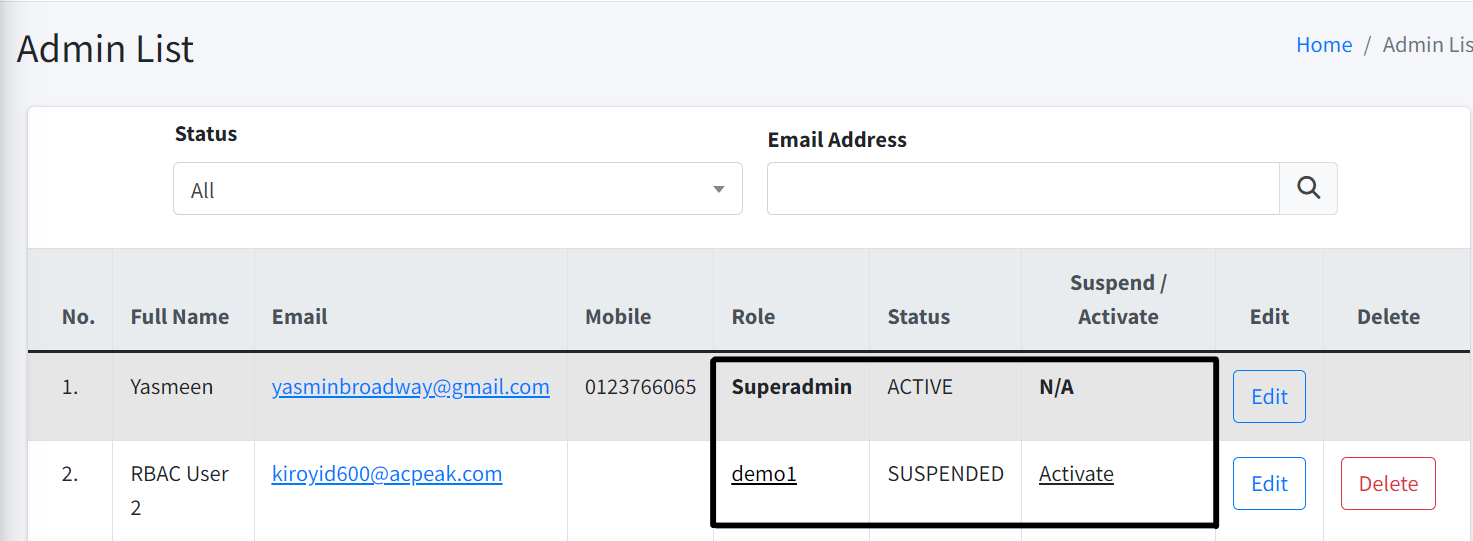
| If you see N/A, that is because you are not allowed to activate or suspend your own account. |
Delete Admin
| To delete Admin, you must have Delete Admin permission. |
To delete an admin, simply click on the Delete button at the list page.
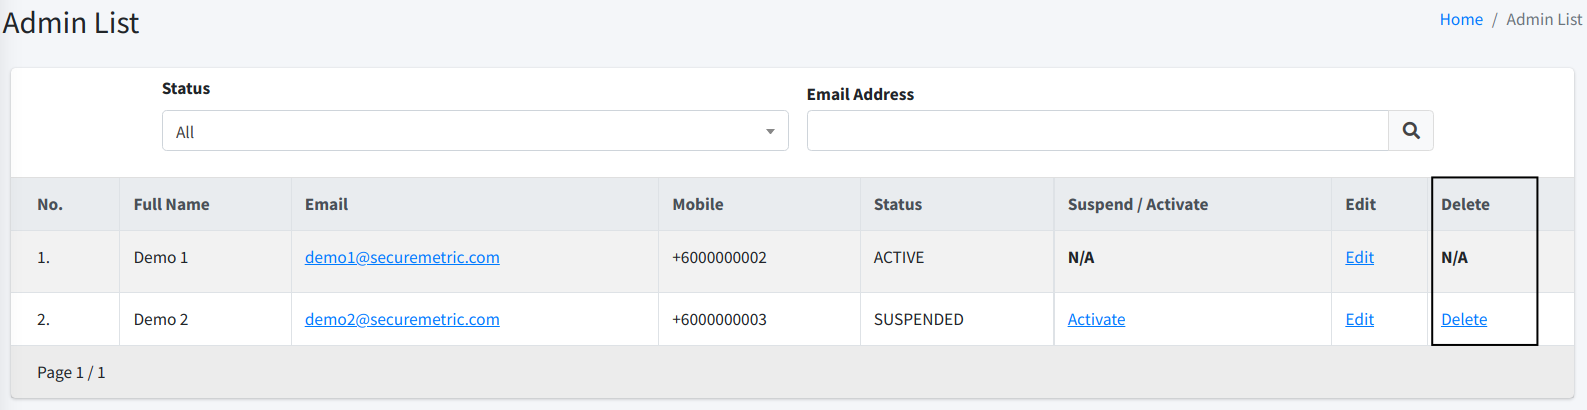
| This action is not reversible. |
| You will not lose the data that this admin has uploaded previously. |
Admin Invitation
| To invite admin, you must have both Invite Admin and List Roles permissions. |
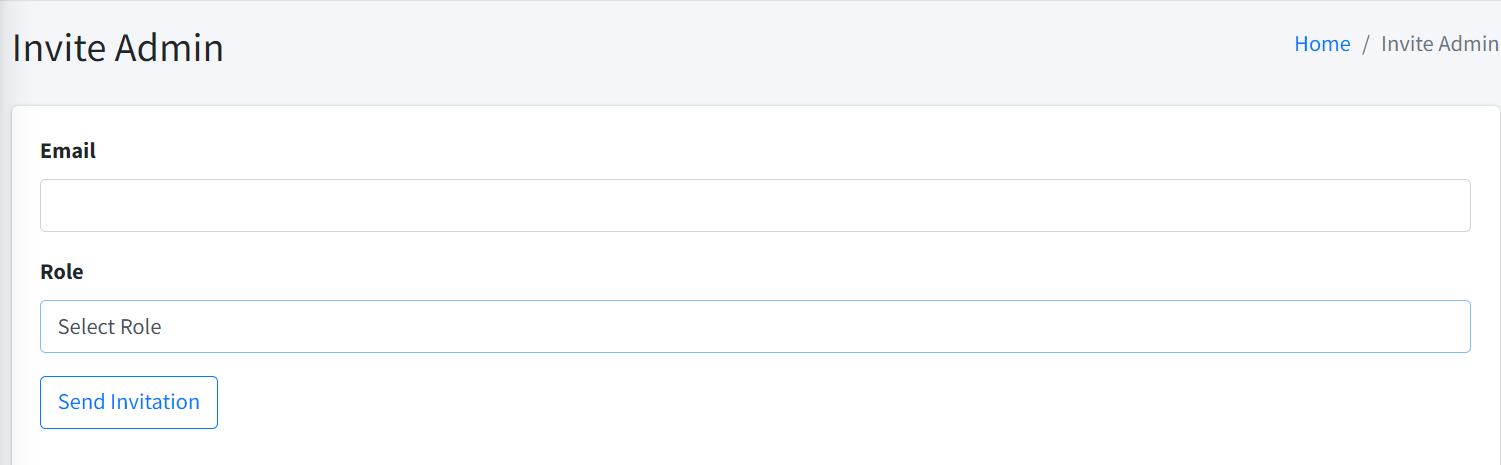
To invite a new admin, simply enter the email address of the new admin. Then, select the appropriate role you wish to assign to the new admin. An email will be sent allowing the new admin to proceed with the account registration and activation.
Once you have entered the email address, click on the Send Invitation button to proceed. The new admin will be automatically assigned the selected role upon accepting the invitation.
Access Control
Through this module, you can manage permission and assign access control to users based on their role in the organization.
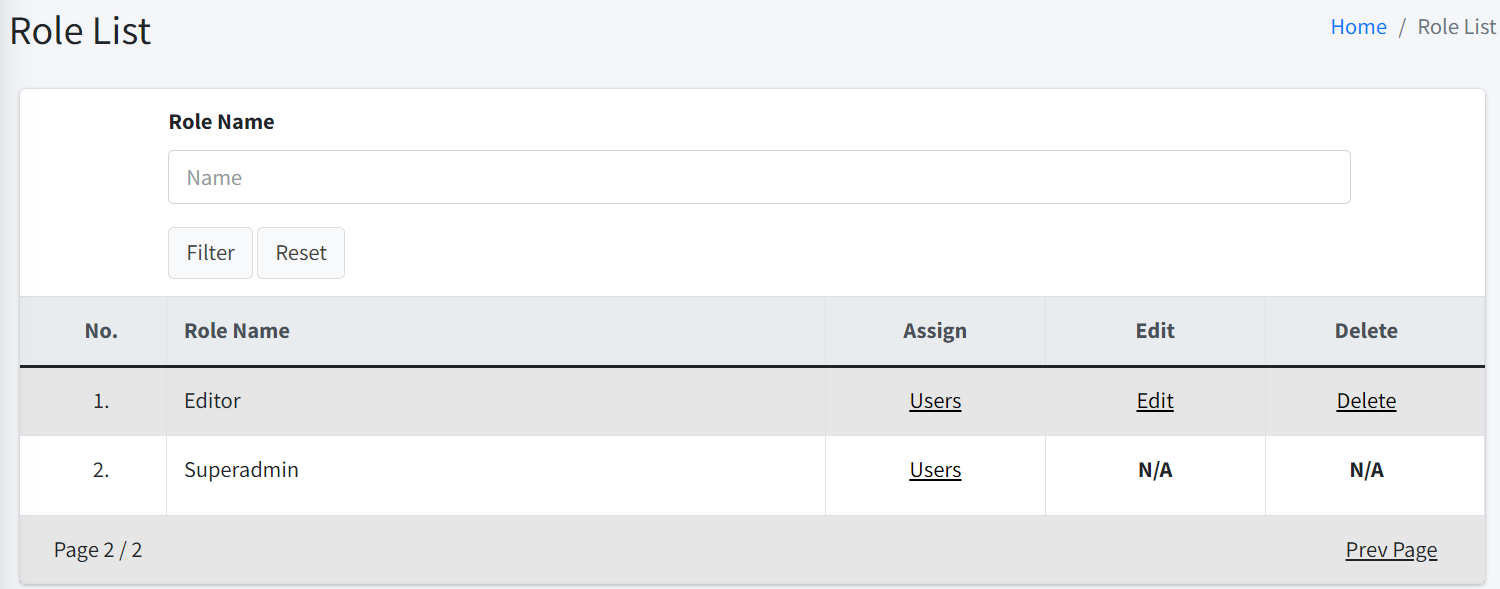
Access Control List
| To access this page, you must have List Roles permission. |
A list of roles are displayed together with columns: View, Assign, Edit, Delete.
View Role
| To view a role, you must have View Role permission. |
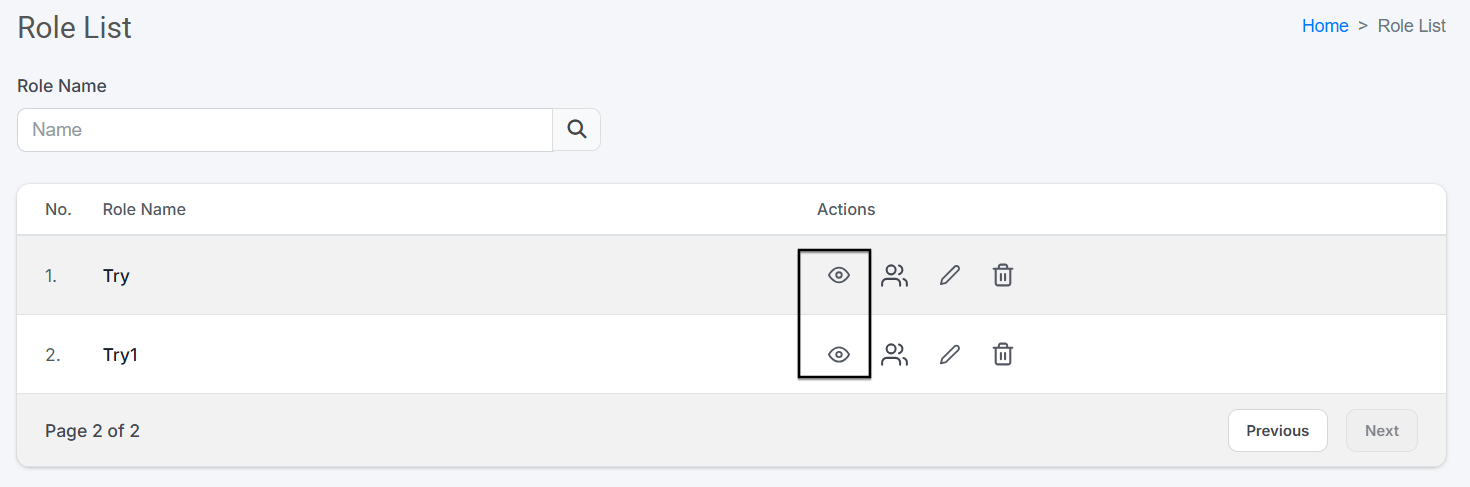
Click the () icon in the Actions column to view the details of a role. The role name, users assigned under it, and accessible modules will be displayed inside.
Assign User
| To reassign users to another role, you must have both List Admins and Assign User permissions. |
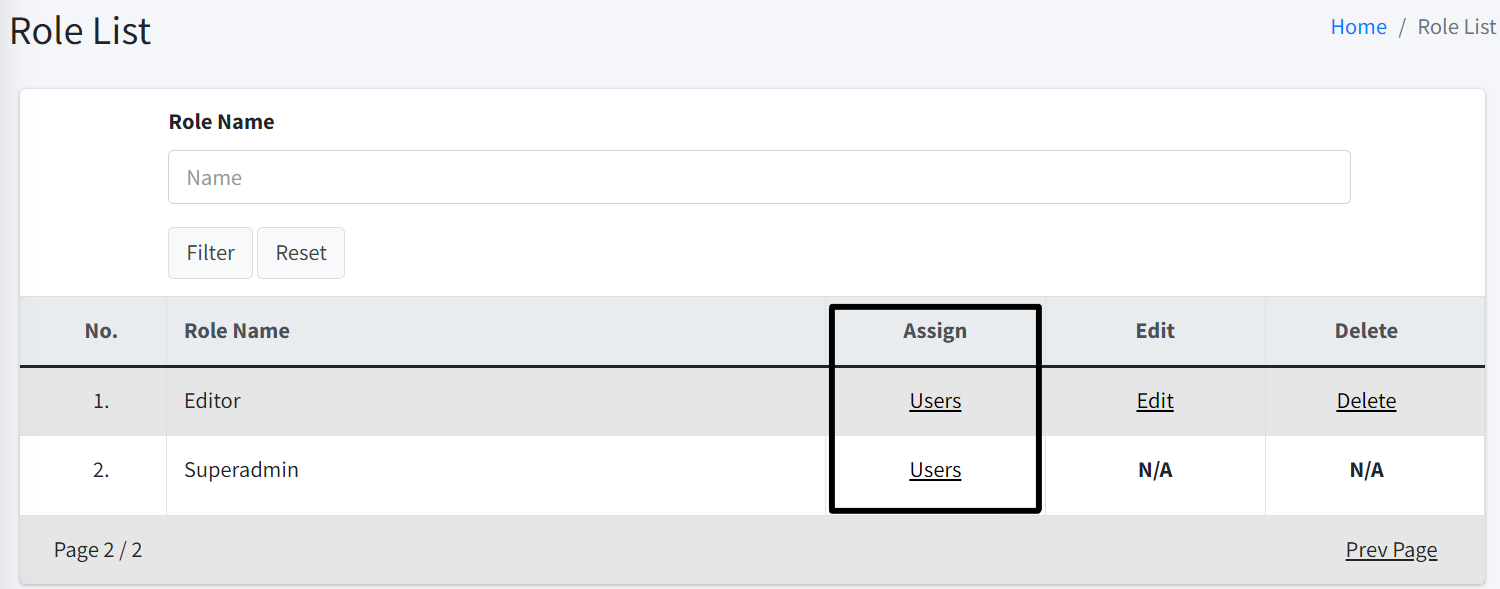
Click the () icon in the Actions column where you will be prompted to reassign users to a different role. After selecting the appropriate role, click Proceed to save the changes.
| Users cannot reassign their own role and the last superadmin. You need to have at least ONE (1) superadmin account. |
Edit Role
| To edit role, you must have Edit Role permission. |
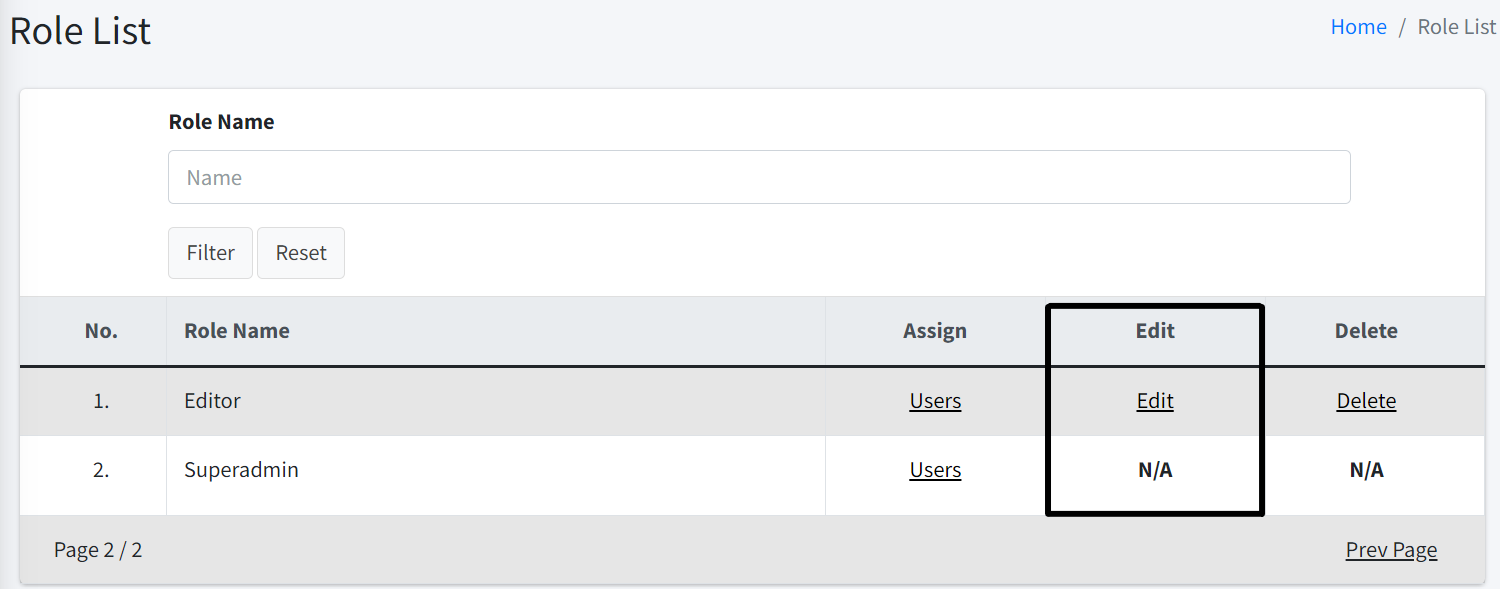
To edit a role, simply click the () icon. This action will redirect you to the Role Edit page, where you can change the role name and adjust the permissions accordingly.
| Users cannot edit their own role and Superadmin role. |
Delete Role
| To delete a role, you must have Delete Role permission. |
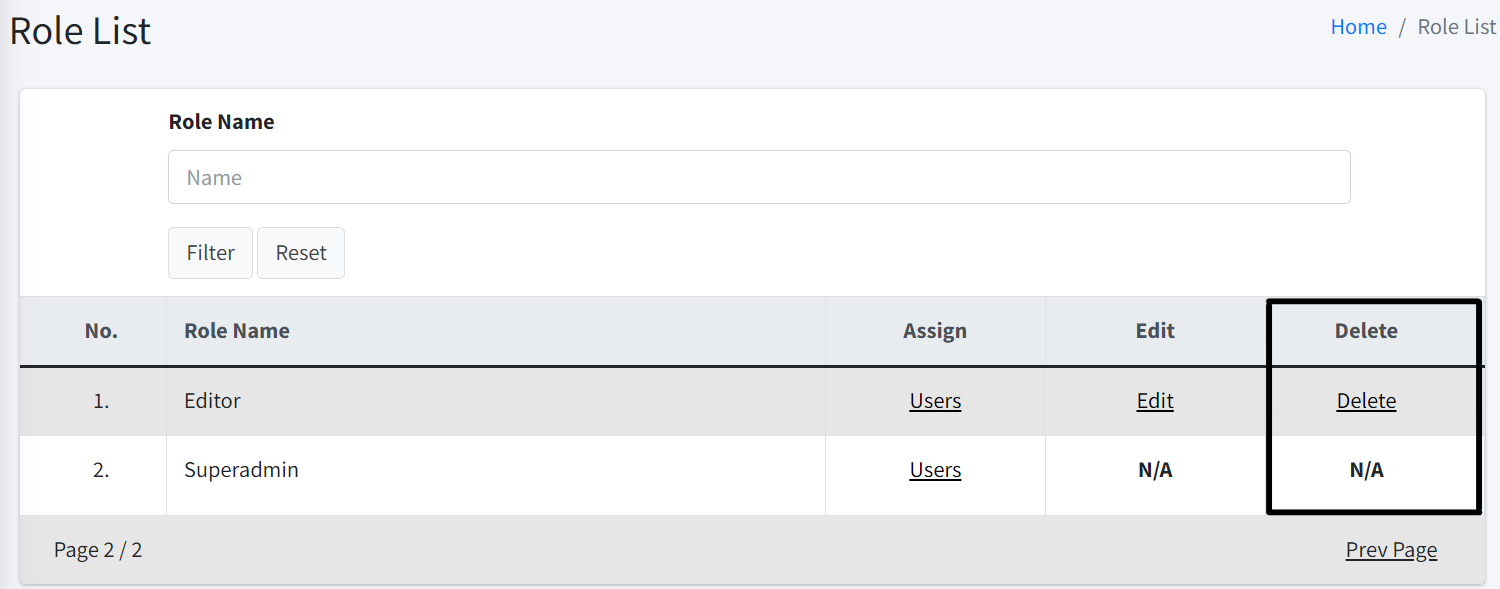
To delete a role, simply click the () icon.
| A role can only be deleted if there are no users assigned under that role. Users cannot delete their own role and Superadmin role. |
Access Control Add
| To add a role, you must have Add Role permission. |
The Add Role page allows administrators or those with permission to create new roles in the organization.
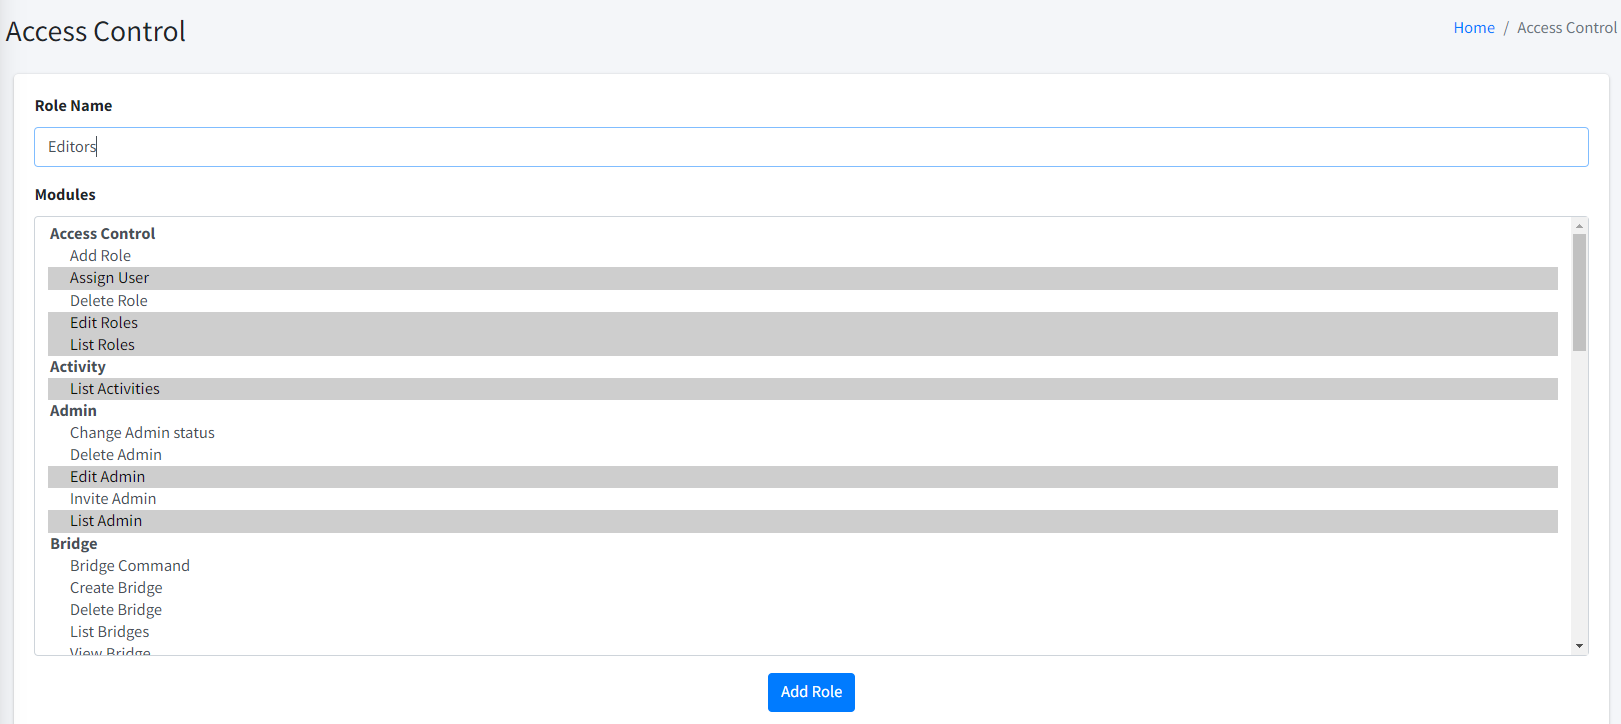
To create a new role, enter a suitable Role Name. You can select one or more relevant permissions from the list of available modules.
| The permissions define the specific tasks and features that users assigned to this role will be allowed to access. Administrator can modify these permissions later in List Roles page. |
Once you have filled in the Role Name and selected the appropriate permissions, click Add Role to finalize the process and make this role available for user assignment.
Company
This module allows you to view and modify your company information.
Company Details
| To access this page, you must have the View Company permission. |

The company details are populated upon registration in the CertCycle system.
-
Edit. Simply click the Edit button. This will redirect you to Edit Details page where you can edit the company information.
| To edit company details, you must have Edit Company permission. |
Company Settings
| To access this page, you must have the Company Settings permission. |
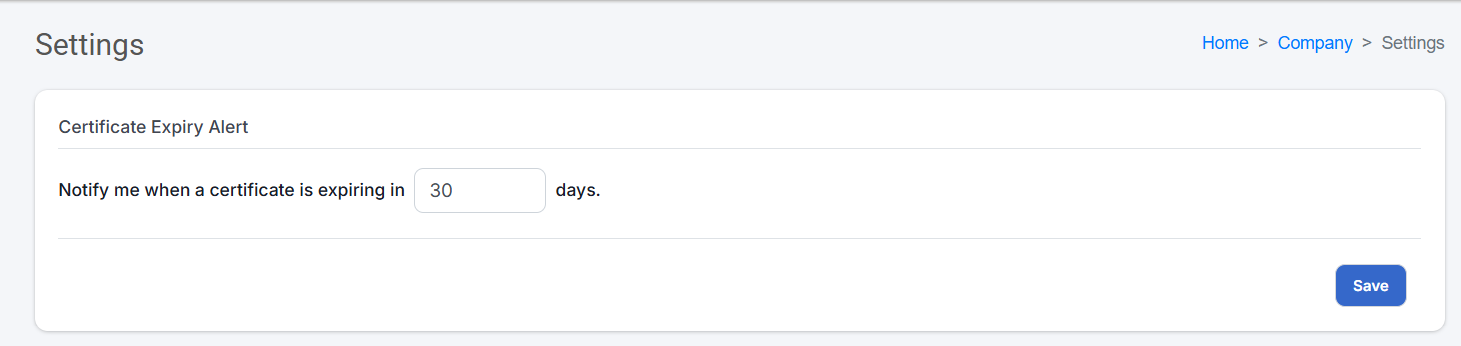
This page allows you to manage and configure the certificate expiry alert in your company.
By default, the certificate expiry alert is set to 30 days for your company. This means the system will notify relevant users 30 days prior to a certificate’s expiration date. To customize the alert threshold for your company, simply enter the preferred numbers of days in the input field. Click Save button to apply your changes.
| The value must be between 1 and 180 days. |
| Changes made here will be applied to all certificates and users within the company. |
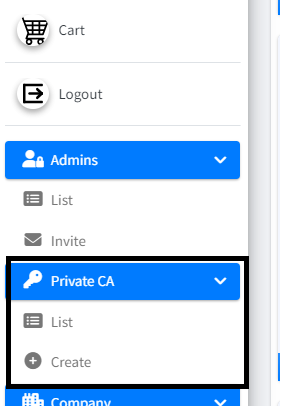
Private CA
This module allows you to create your own CA.
| All the CAs that you create here will not be automatically trusted by any browser or third party tools such as Adobe Reader. |
Private CA List
| To access this page, you must have List Private CAs permission. |
This page allows you to see the list of the CAs that you have created.
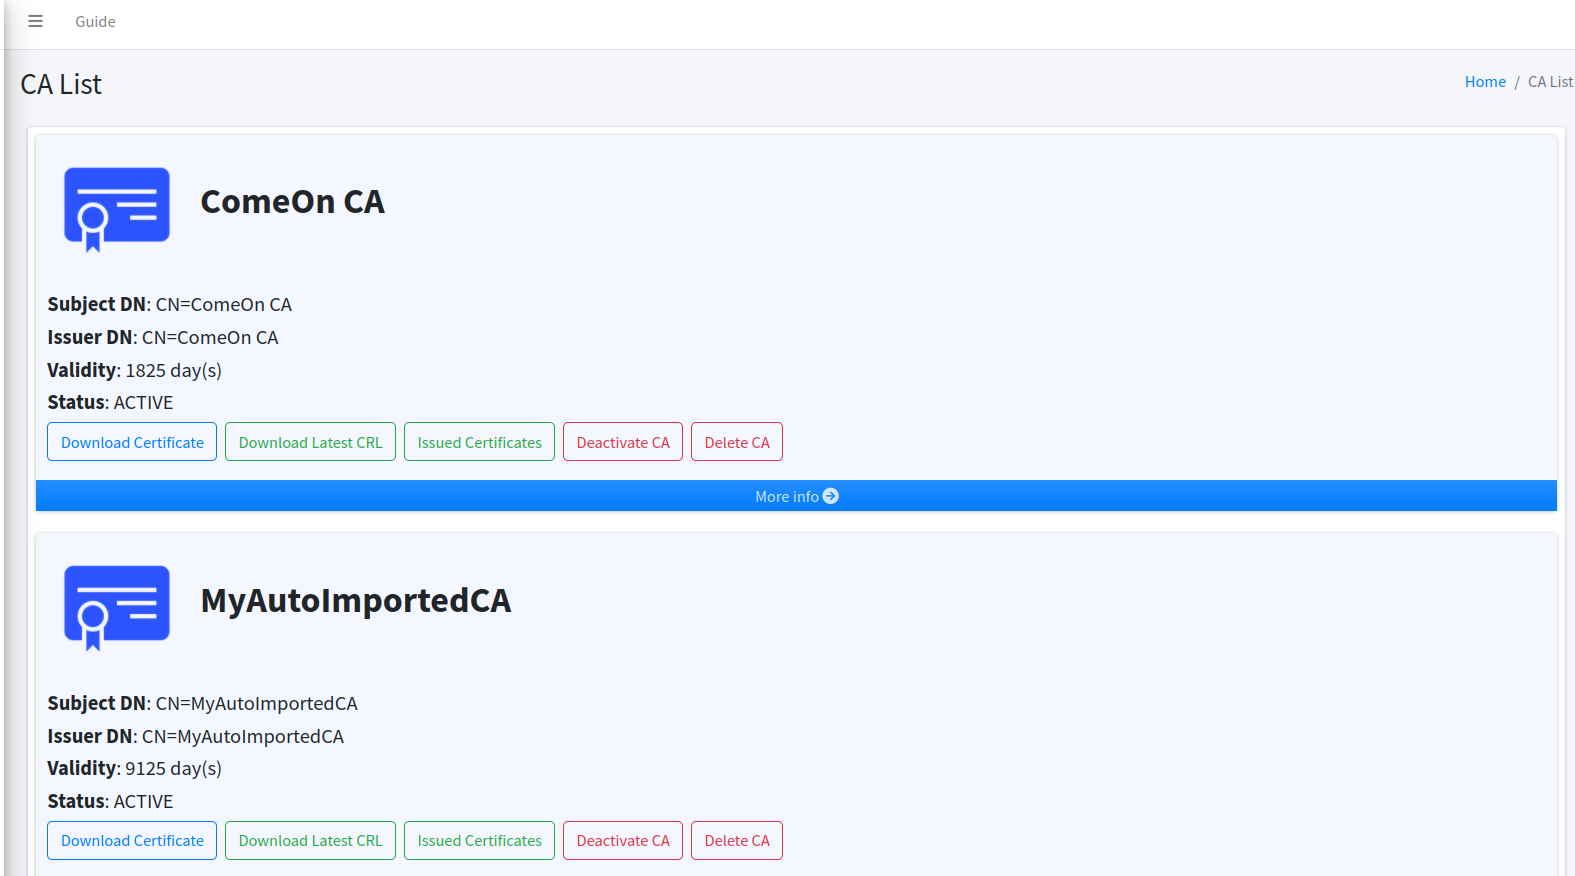
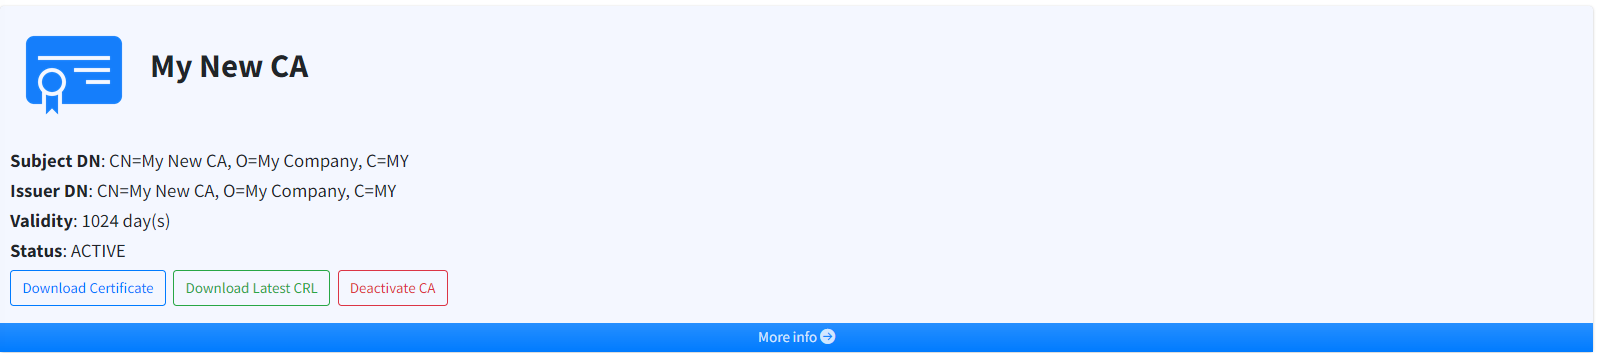
For each of the private CAs, you can do the following actions:
-
Download Certificate. This will download the CA certificate of the CA that you select. Just click on the Download Certificate button.
-
Download Latest CRL. This will download the latest CRL of the CA that you select. Just click on the Download Latest CRL button.
-
Issued Certs. This will redirect you to the certificate list page which automatically filter the list based on the subject DN of the CA that you have selected.
| To view issued certificates, you must have List Certificates permission. |
-
Deactivate. This will temporarily deactivate the CA that you select. This button will show only if your CA is active.
-
Activate CA. This will activate back the CA that you have deactivated. This button will show only if your CA is inactive.
-
Delete. This will permanently delete the CA that you select. This button will show only for CAs that do not have any sub CAs.
| To delete Private CA, you must have Delete Private CA permission. |
| Once a CA is deleted, you cannot undo the operation. You can still recreate a new CA with the same name and subject DN, but you will not get the same key as the previous CA. |
Create New Private CA
| To create Private CA, you must have Create Private CA permission. |
This page allows you to create a new private CA.
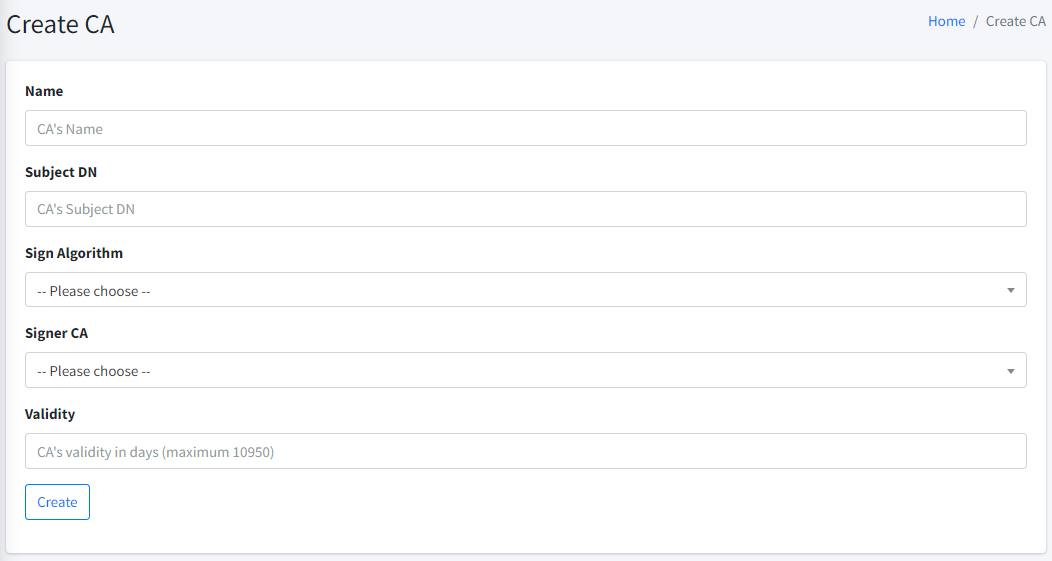
To add a new private CA, you need to provide the following information:
-
Name. The name of the CA. This must be unique in your company. This name is just an indicator you can refer to in the future.
-
Subject DN. The subject DN of the CA. This subject DN will be used in the certificate of the CA. Maximum length of the Subject DN is 4000 characters. This is typically more than enough for a CA.
-
Sign Algorithm. You can choose among the following supported signing algorithms:
-
SHA256withRSA. This means that the CA certificate is signed using RSA key-pair with SHA-256.
-
SHA512withRSA. This means that the CA certificate is signed using RSA key-pair with SHA-512.
-
SHA256withECDSA. This means that the CA certificate is signed using ECDSA key-pair with SHA-256.
-
SHA512withECDSA. This means that the CA certificate is signed using ECDSA key-pair with SHA-512.
-
ML-DSA-44. This means that the CA certificate is signed using ML-DSA-44 key-pair.
-
ML-DSA-65. This means that the CA certificate is signed using ML-DSA-65 key-pair.
-
ML-DSA-87. This means that the CA certificate is signed using ML-DSA-87 key-pair.
-
KAZ-SIGN. This means that the CA certificate is signed using KAZ-SIGN key-pair.
-
-
RSA Key Size. If you choose either SHA256withRSA or SHA512withRSA, you will need to choose the RSA key-size. Cert-Cycle supports the following RSA key-sizes:
-
2048.
-
3072.
-
4096.
-
-
ECC Curve Name. If you choose either SHA256withECDSA or SHA512withECDSA, you will need to choose the ECC curve-name. Cert-Cycle supports the following ECC curve-names:
-
P-256.
-
P-384.
-
P-521.
-
-
KAZ-SIGN Key Specification. If you choose KAZ-SIGN, you will need to choose the KAZ-SIGN key specification. Cert-Cycle supports the following KAZ-SIGN key specification:
-
KAZ-SIGN-128.
-
KAZ-SIGN-192.
-
KAZ-SIGN-256.
-
-
Signer CA. You can choose from Self Signed, or if you have previously created one or more private CA(s), those CA(s) will be listed there as well.
-
Validity. This is the validity of the CA in the number of days. Maximum CA validity is 10950 days (30 years).
Once you have filled-in all the required information, simply click on the Create button. Your CA request will be sent to our server and a process will be triggered to create your CA.
When your CA is being created, you will see that your CA status is In Progress.
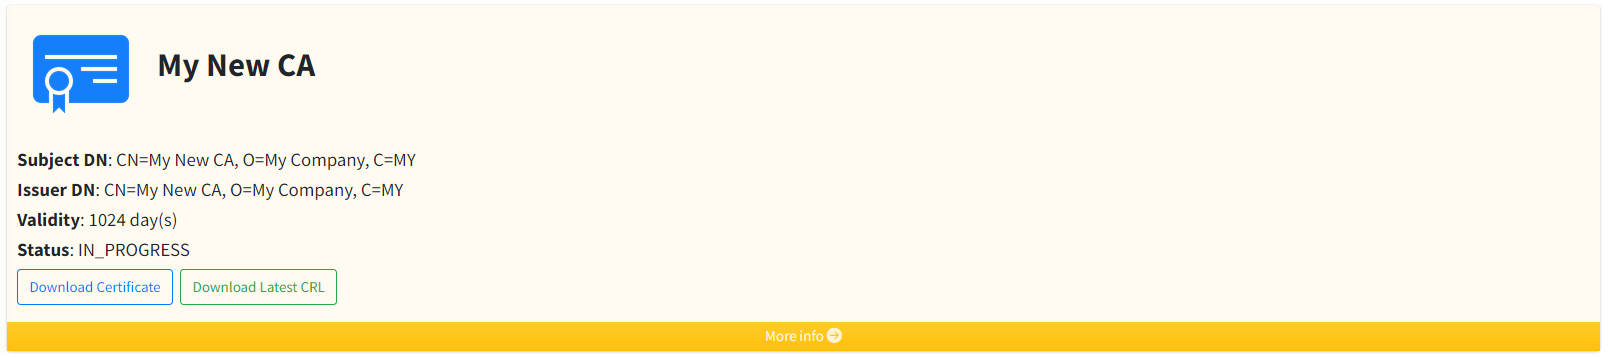
Once the CA creation completes, your new CA status will be changed to Active.
CA Connect
The CA Connect module allows administrators to configure and maintain connections between Cert-Cycle and your internal Certificate Authorities (CAs). It currently only support Microsoft CA. This ensures that Cert-Cycle can securely communicate with and issue certificates from your configured CAs.
| To access this page or manage connections, you must have the Manage CA Connection permission. |
CA Connection List
This page allows you to view the list of your configured CA connections.
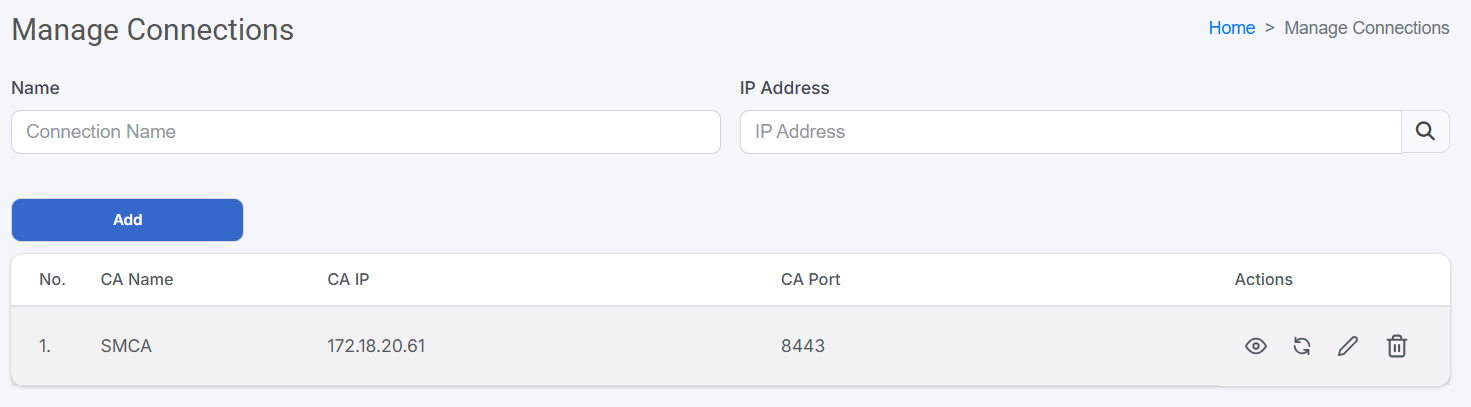
The main page displays a table with the following details:
-
No.: Sequence number of the connection in the table.
-
CA Name: The descriptive name assigned to the connection.
-
CA IP: The IP address of the specific CA.
-
CA Port: The network port used for communication (e.g., 8443).
For each connection, you can perform the following actions:
-
View (): Opens a read-only view showing the full connection details, including the assigned Bridge Group and masked API key information.
-
Edit (): Opens the configuration form to update existing connection settings, such as updating the server address or providing a new API key.
-
Sync (): Triggers a synchronization process for the CA connection. This ensures that the connection status and internal template data are up-to-date with the CA server.
-
Delete (): Permanently removes a connection from Cert-Cycle. You will be prompted for confirmation before the deletion occurs.
| Once a connection is deleted, it cannot be undone. You will need to add another connection to connect back to your existing CAs. |
Add New CA Connection
To add a new connection, click the Add button above the connection table. You will need to provide the necessary configuration to establish the connection.
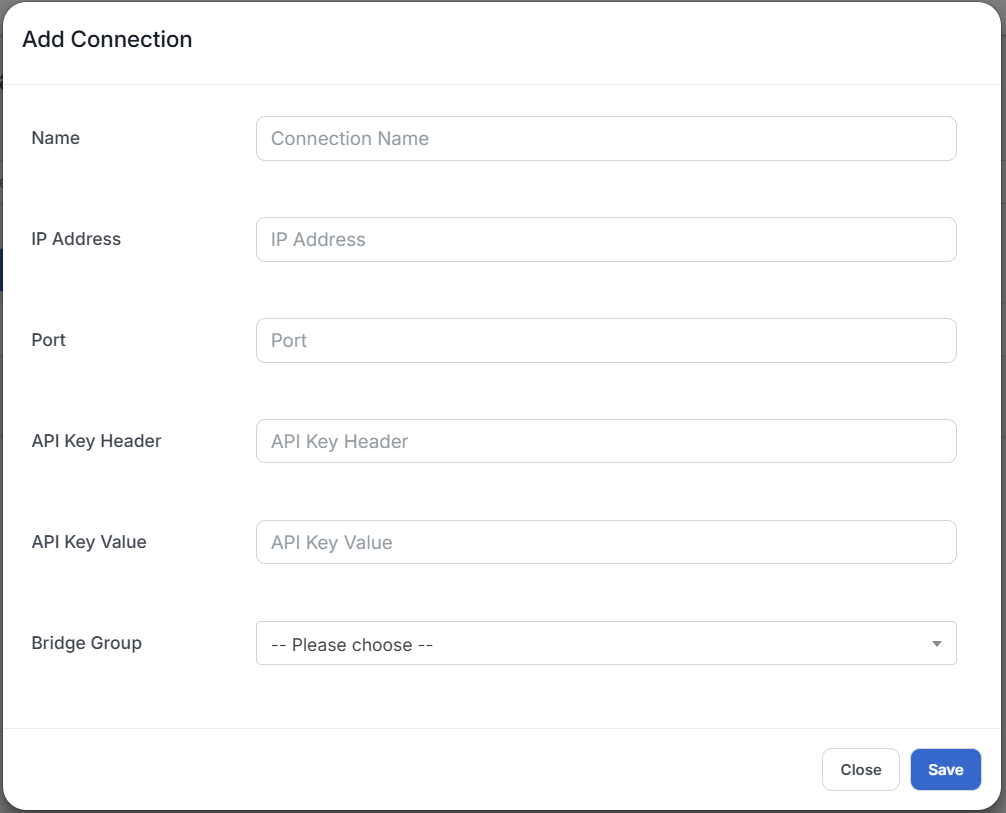
To add a new connection, you need to provide the following information:
-
Name: The name of the connection. Maximum length is 50 characters. This field is required.
-
IP Address: The network IP of the CA server. This field is required.
-
Port: The port number used for API communication. It must be a valid number.
-
API Key Header: The specific HTTP header name required by the Cert-Cycle link for authentication.
-
API Key Value: The secret key or token used for authentication.
-
Bridge Group: A dropdown selection to assign the connection to a specific Bridge Group for communication. Options listed are bridge groups that have enabled bridges. This field is required.
| To assign or modify a Bridge Group, you must also have the List Bridge Group and Bridge Command permissions. |
Once you have filled-in all the required information, click the Save button to add the connection.
Certificate
You can upload certificates and manage the certificates that you have uploaded in this module.
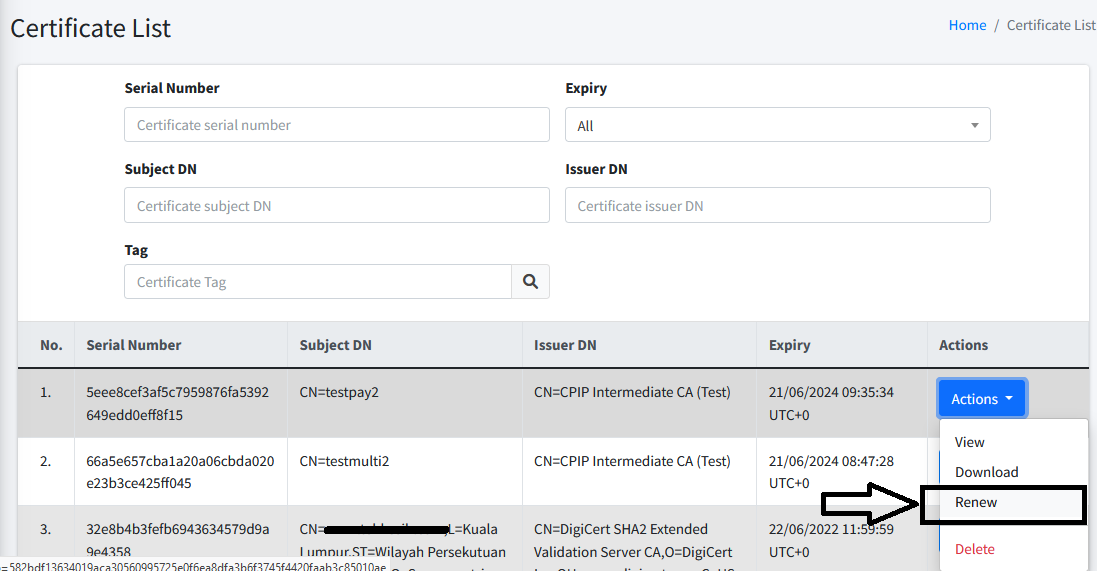
Certificate List
| To access this page, you must have List Certificates permission. |
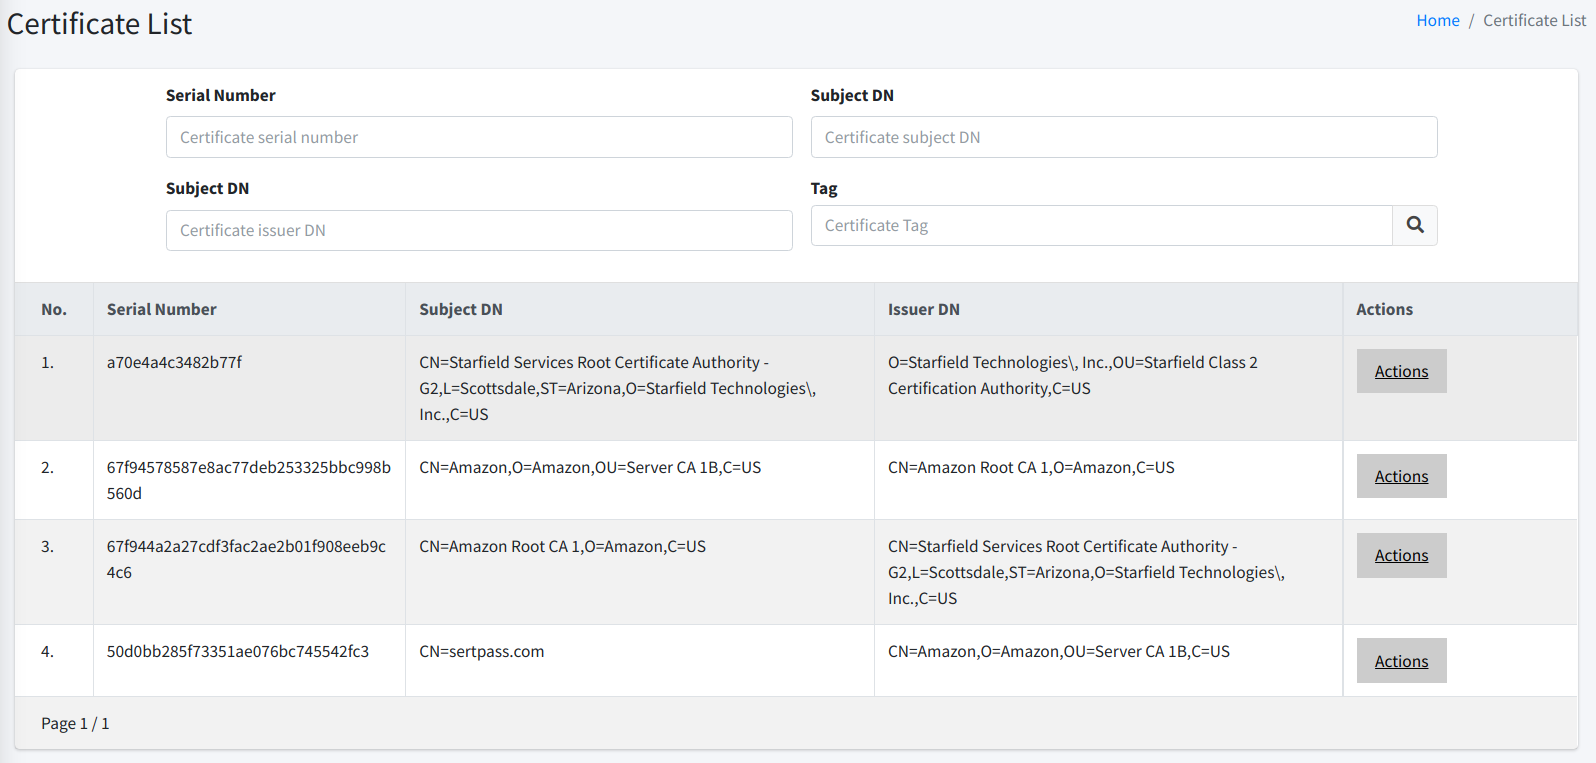
As the name suggests, this page lists the certificates you have uploaded into CertCycle. You can filter the list by the following criteria:
-
Serial Number. You must enter the full certificate serial number here. Clicking on the search button will filter the list based on the serial number that you input here.
-
Subject DN. You can enter partial text from the Subject DN of your certificates. Clicking on the search button will filter the list based on the subject DN that you input here.
-
Issuer DN. You can enter partial text from the Issuer DN of your certificates. Clicking on the search button will filter the list based on the issuer DN that you input here.
-
Tag. You can choose from the dropdown list here. Everytime you tag a certificate, the tag will be shown here. Clicking on the search button will filter the list based on the tag you choose here.
-
Expiry. You can choose the date on when a certificate is going to expire. Clicking on the search button will filter the list based on the expiry date that you choose here.
| Certificate tag can only contain alphanumeric. |
To the right of each item, you may choose among SIX (6) different actions:
-
View. Clicking on the View link brings you to another page that shows the details of the certificate. This includes the certificate chain (if available) and the certificate owner.
| To view the certificate, You must have List Certificates permission. |
| To view the certificate owner, you must have both List Certificates and List Certificate Owners permissions. |
-
Download. Clicking on the Download link will download the certificate. Depending on your browser settings, you may be able to choose where you want to save the file to.
-
Renew. Clicking on the Renew link will redirect you to New Certificate Request page. This page will allow you to issue a new request for the certificate renewal.
| To renew certificate, you must have both Renew Certificate, New Certificate Request permissions. |
-
Revoke. This is only for the certificate that is associated with Private CA. Clicking on the Revoke link will opens a new popup allowing you to confirm the revocation process. Select the Revoke Reason and click Confirm to submit your request.
| To revoke certificate, you must have Revoke Certificate permission. |
| Once you confirm the revocation of a certificate, it cannot be undone. |
-
Associate. Clicking on the Associate link opens a new popup allowing you to choose the endpoint(s) you want to associate the certificate with. You can choose multiple endpoints if you think the certificate is associated with multiple endpoints. For more detail about endpoint, please refer to Endpoints.
| To associate certificate, you must have both Associate Certificate, List Endpoints permissions. |
-
Delete. Clicking on the Delete link allows you to delete the certificate from the system. Note that this operation is not recoverable. If you need to re-add the certificate, you need to re-upload the certificate again.
| To delete a certificate, you must have Delete Certificate permission. |
Upload Certificate
| To upload a certificate, you must have Upload Certificate, List Certificate Owners OR Add Certificate Owner permissions. |
There are THREE (3) ways for you to upload a certificate to CertCycle.
Single Certificate Upload
The first tab allows you to upload a single certificate file. The supported file formats are pem, cer, and crt and the certificate must be stored as a PEM format.

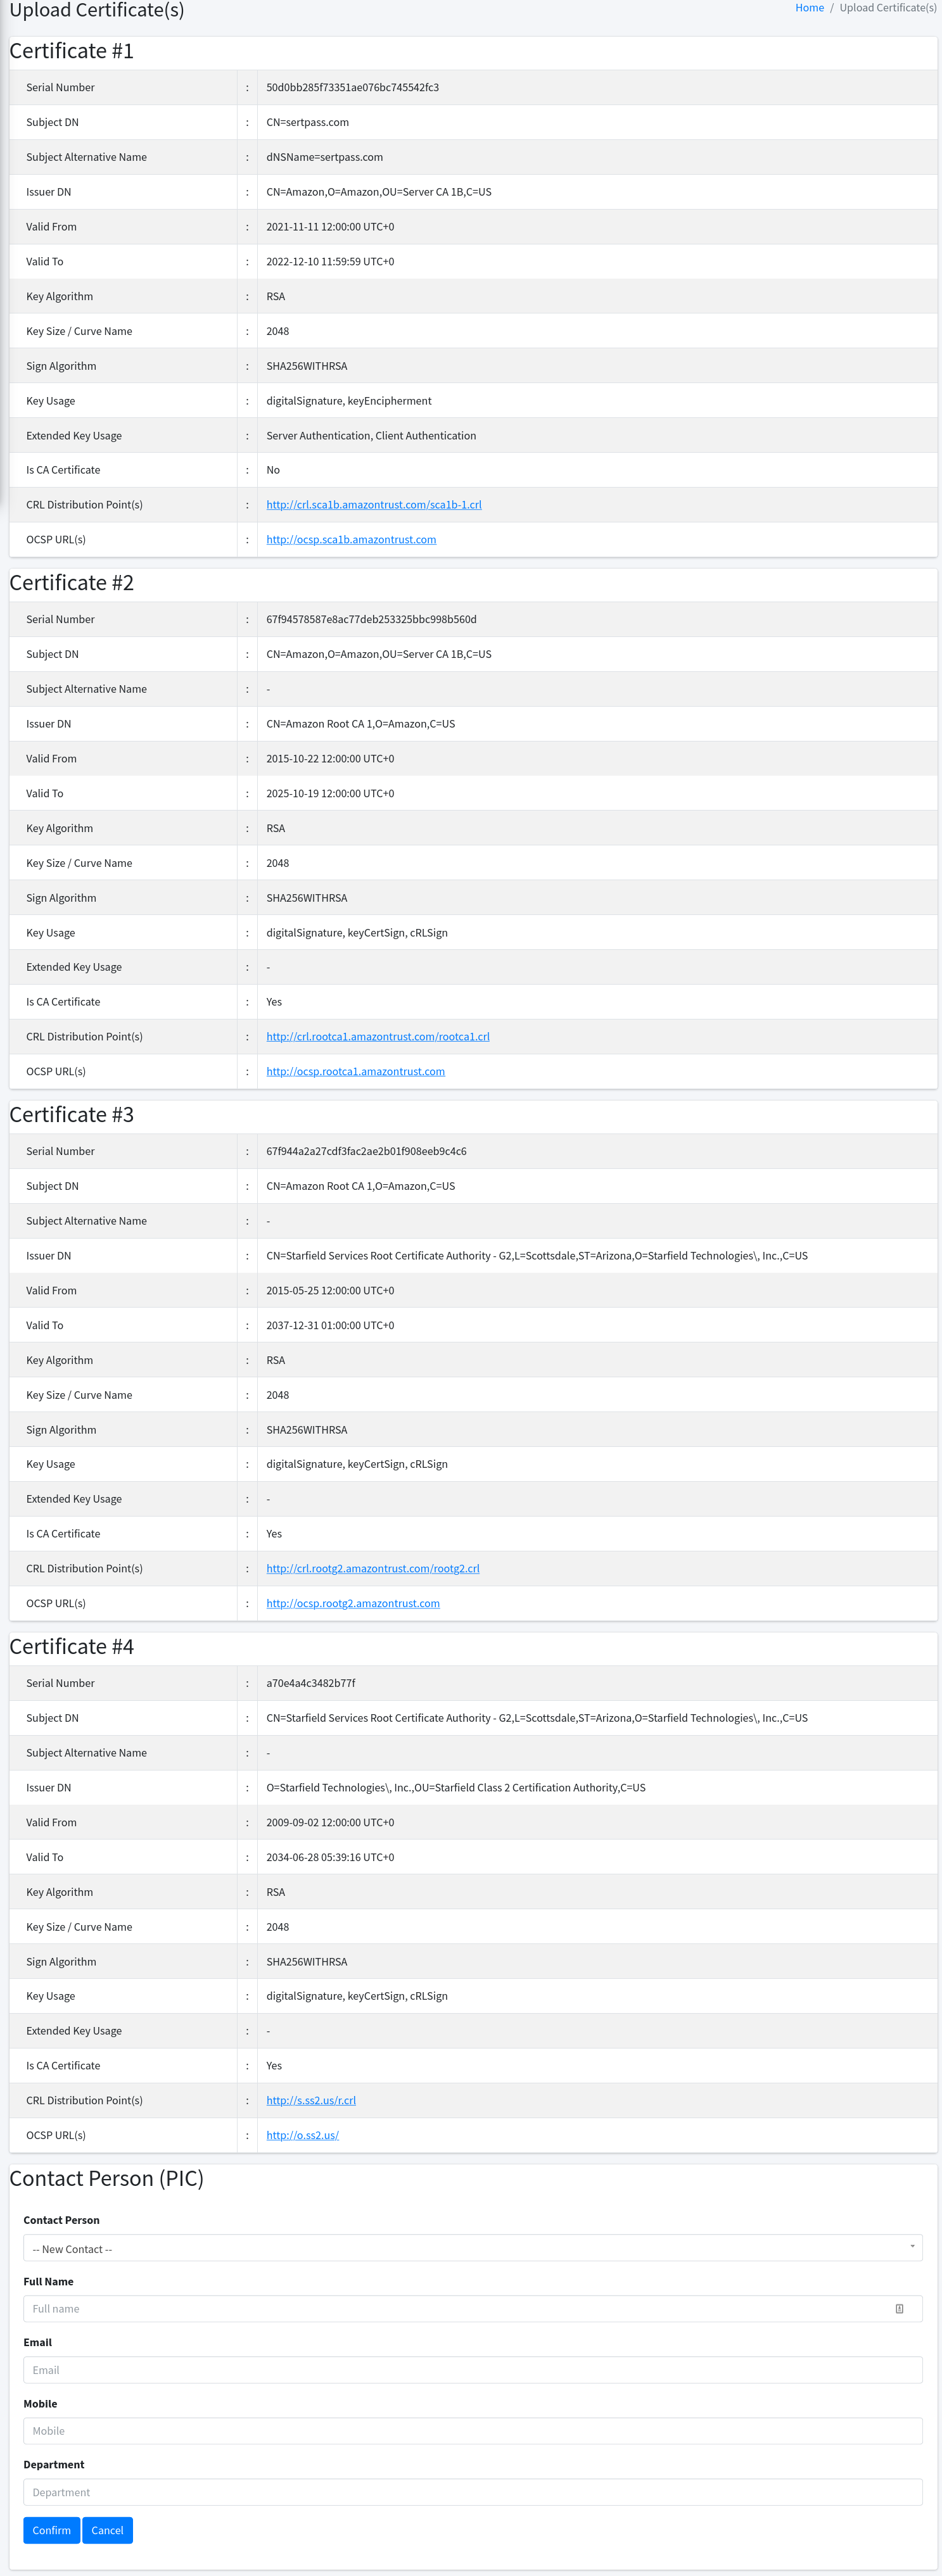
Once you uploaded the file, a confirmation page will be shown containing the details of your certificate.

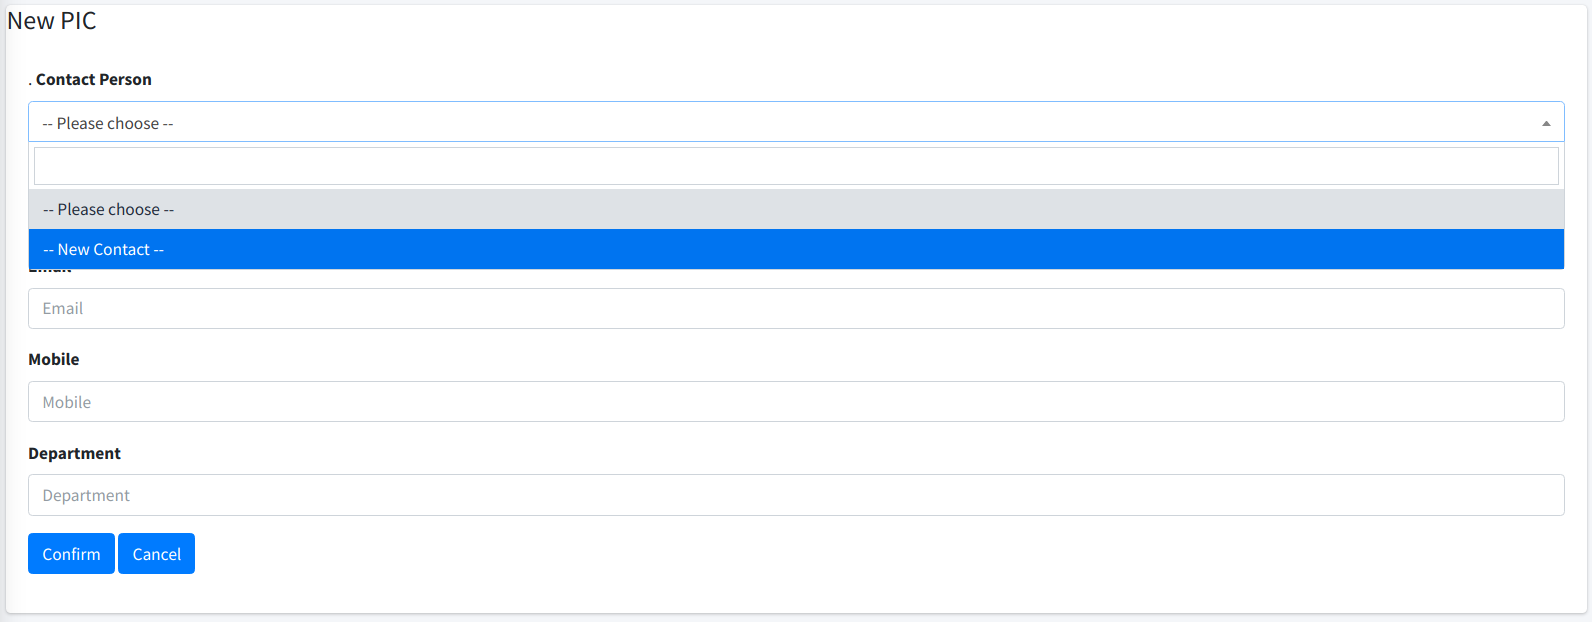
The bottom section displays the owner to whom you want to assign this certificate. If you have no certificate owner yet in the system, you can enter the new details at the Certificate Owner section. Otherwise, you can as well select from existing owners in the same section.
| All fields are required for the certificate owner. |
| Certificate owner is different with admin. Certificate owner by itself cannot login to the system. |
For more details please refer to Certificate Owner reference.
To cancel, just click on the Cancel button, otherwise click on the Confirm button to proceed with the certificate upload.
Multiple Certificate Upload
The second tab allows you to upload a zip of certificates. The supported certificate file formats are pem, cer, and crt and the certificate must be stored as a PEM format. All other files inside the zip file that are not recognised will be ignored.
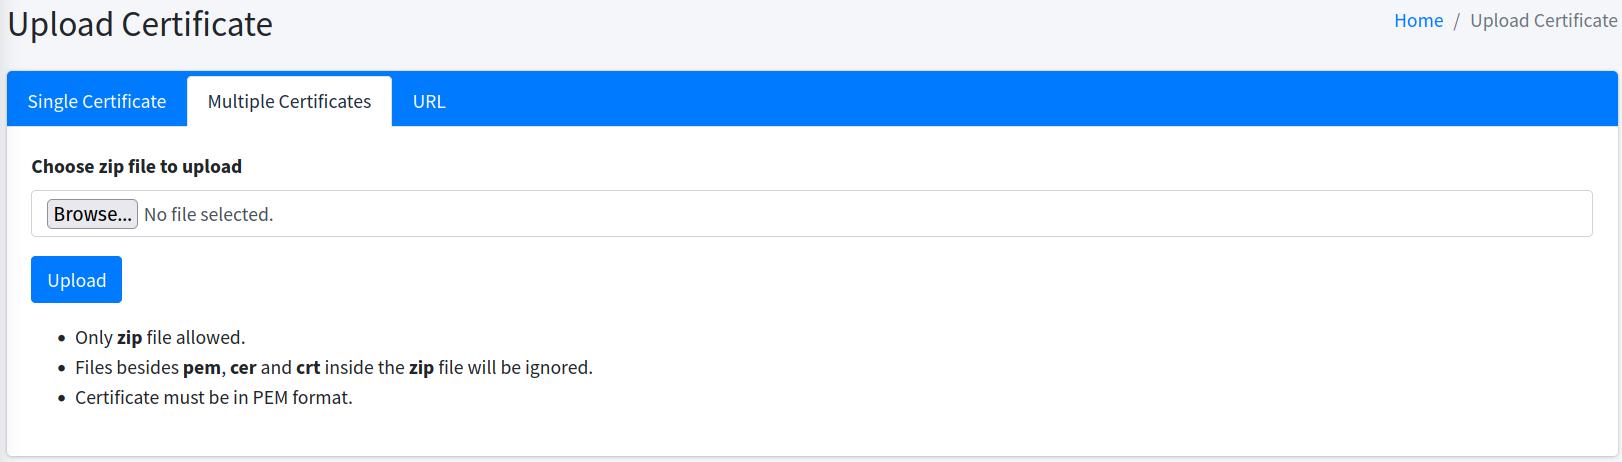
Once you uploaded the file, a confirmation page will be shown containing the details of your certificate(s).

The bottom section displays the owner to whom you want to assign this certificate. If you have no certificate owner yet in the system, you can enter the new details at the Certificate Owner section. Otherwise, you can as well select from existing owners in the same section.
| All fields are required for the certificate owner. |
| Certificate owner is different with admin. Certificate owner by itself cannot login to the system. |
For more details please refer to Certificate Owner reference.
To cancel, just click on the Cancel button, otherwise click on the Confirm button to proceed with the certificate upload.
URL Upload
The third tab allows you to upload a certificate via URL. The URL must be in HTTPS. CertCycle will connect to the URL and download the SSL certificate of the given domain.
| Please always ensure that you own the domain you are entering. |
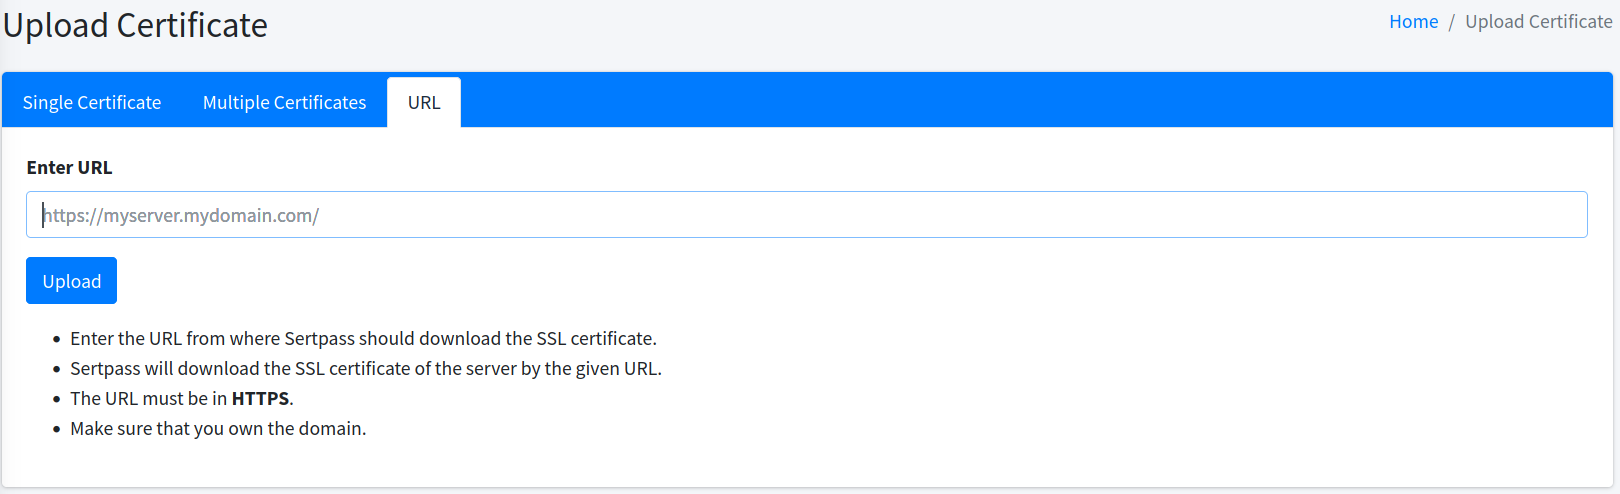
Once the URL is entered, and you click on the Upload button, a confirmation page will be shown containing the details of your certificate(s).
The bottom section displays the owner to whom you want to assign this certificate. If you have no certificate owner yet in the system, you can enter the new details at the Certificate Owner section. Otherwise, you can as well select from existing owners in the same section.
| All fields are required for the certificate owner. |
| Certificate owner is different with admin. Certificate owner by itself cannot login to the system. |
For more details please refer to Certificate Owner reference.
To cancel, just click on the Cancel button, otherwise click on the Confirm button to proceed with the certificate upload.
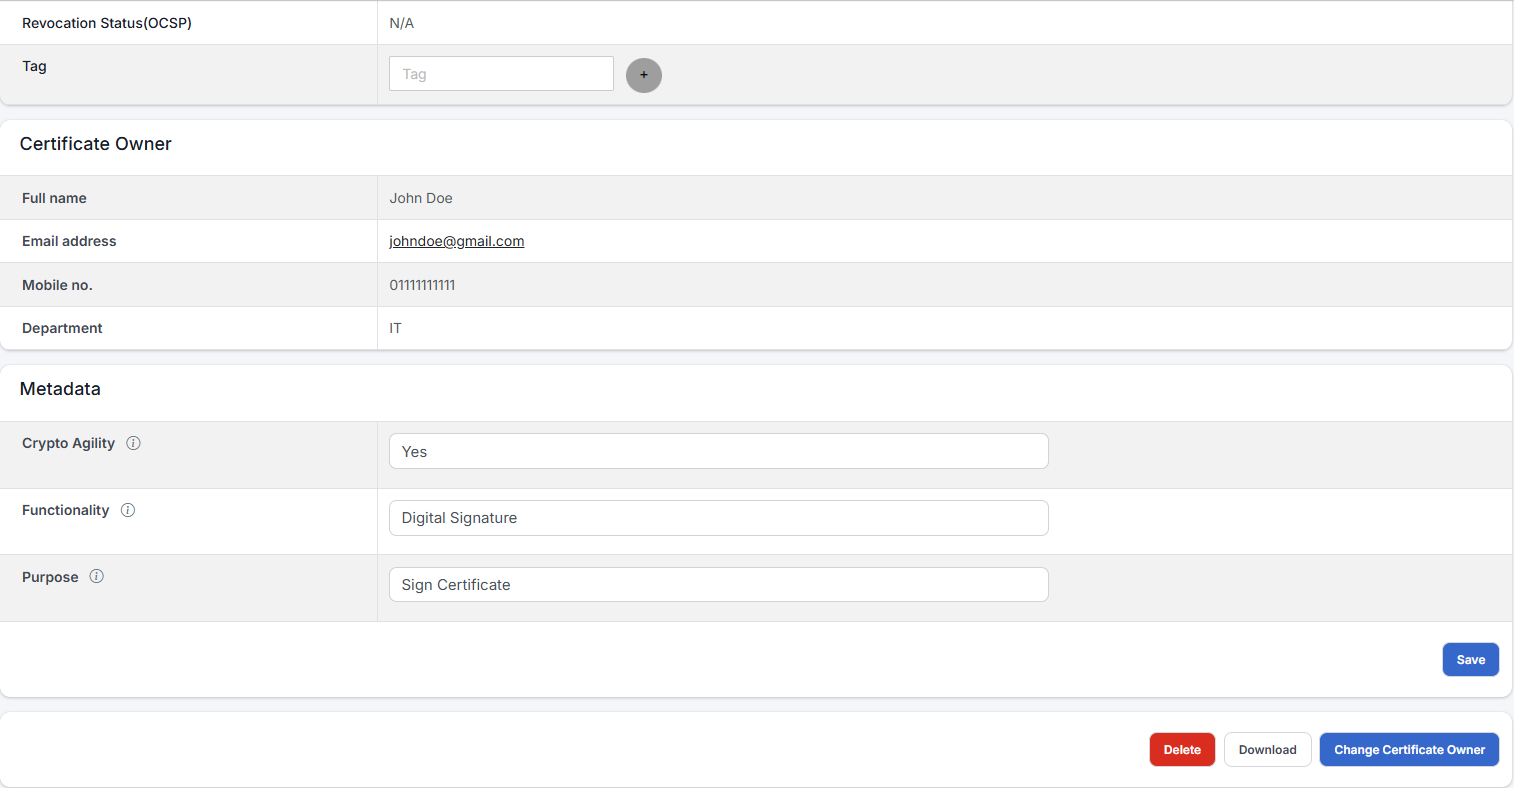
Change Certificate Owner
| To change certificate owner, you must have List Certificate Owners and Transfer Certificate Owner permissions. |
Sometimes you might want to change the owner of a certificate to someone else. You can easily do it from the certificate details page.
As shown in the above screenshot, you can click on the Change Owner button. This will allow you to change the owner either by selecting existing one or creating a new one.
If you want to create a new owner, just choose -- New Contact -- option from the dropdown list as shown below. You can then enter the new owner information.
To cancel, just click on the Cancel button. Clicking on the Confirm button confirms the changes.
Certificate Owner
The Certificate Owner section allows you to manage owners of your certificates. A certificate owner has no access to the system, unless he/she has an admin account as well. If you want to invite another admin, you can refer to Admin Invitation.
Certificate Owner Add
| To add a certificate owner, you must have Add Certificate Owner permission. |
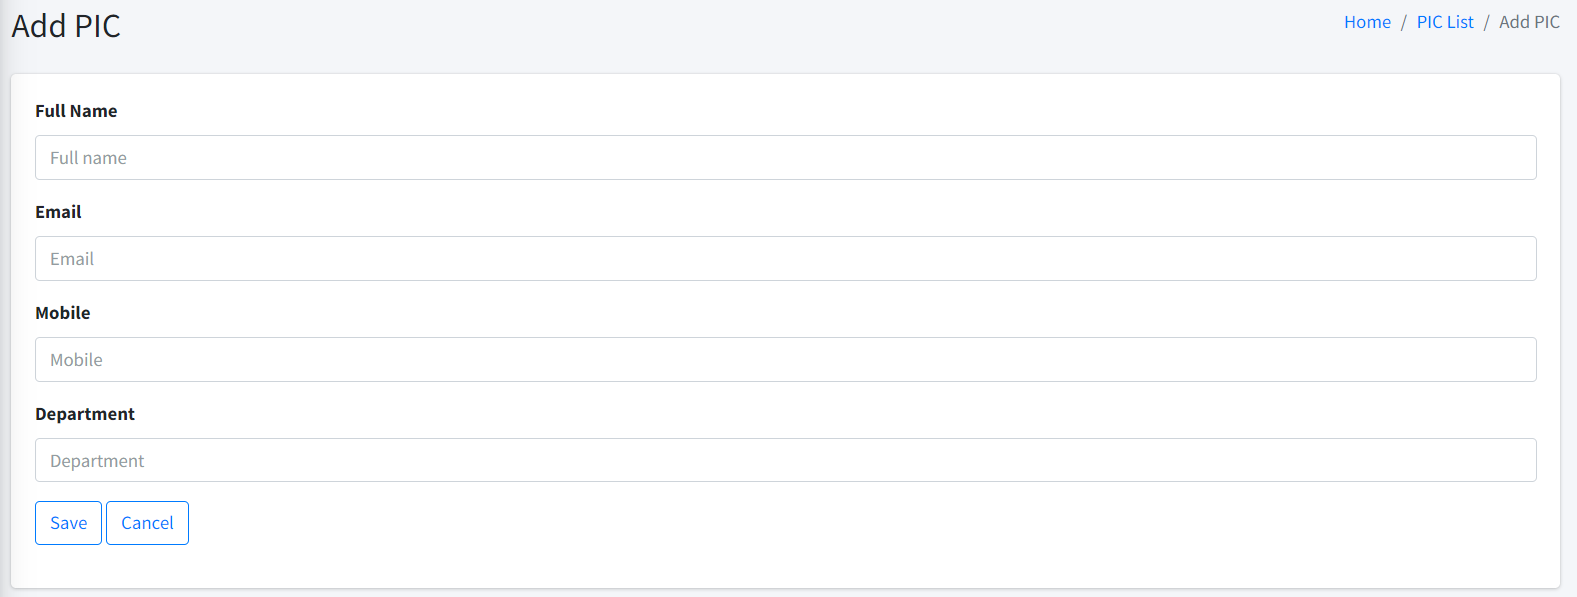
This page lets you add a new certificate owner. Once the details are added, click Add and the add certificate owner request will be processed in a moment. The created certificate owner can be seen in the Certificate Owner List for further operations.
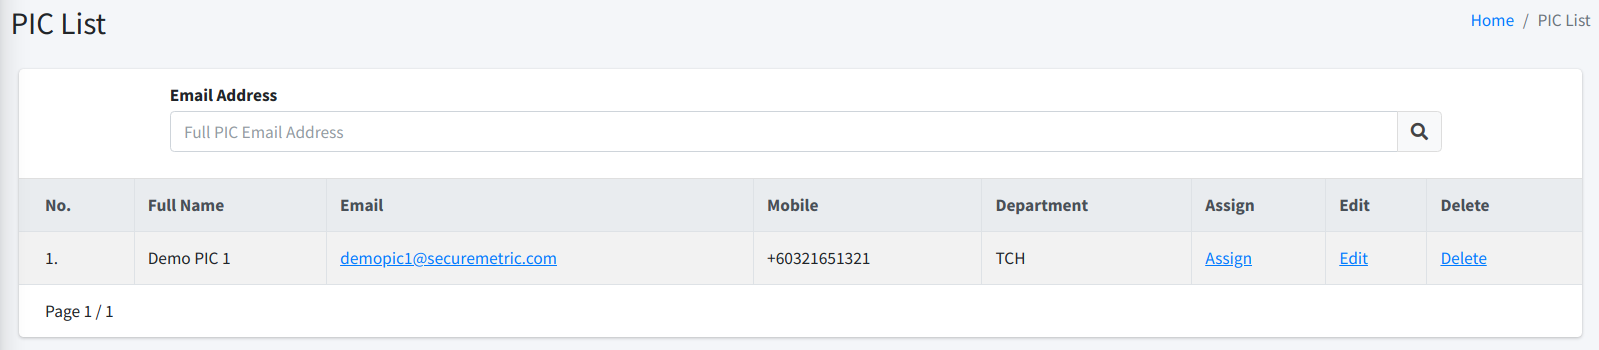
Certificate Owner List
| To access this page, you must have List Certificate Owners permission. |
This page allows you to see the list of the certificate owners that you have.
At the top section, you can see the filtering section that can help you filter the list. This page allows you to filter your certificate owner by the full email address.
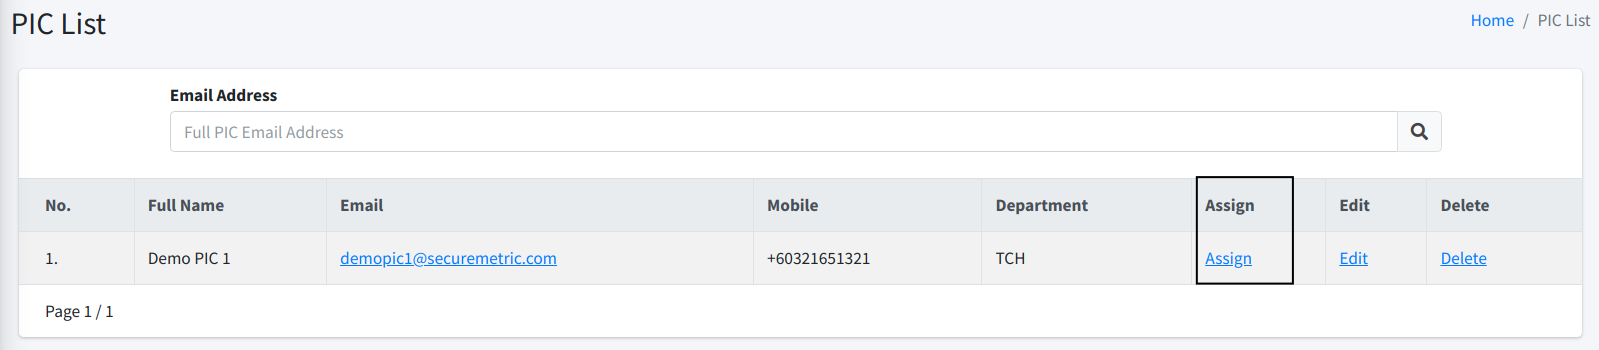
Assign Certificate Owner
| To assign a certificate owner, you must have Assign Certificate Owner and List Certificates permissions. |
To assign an owner with a certificate, you can click on the Assign link associated with the certificate owner that you want to deal with.
Once you click on the Assign link, you will be directed to another page from where you can assign a new certificate.
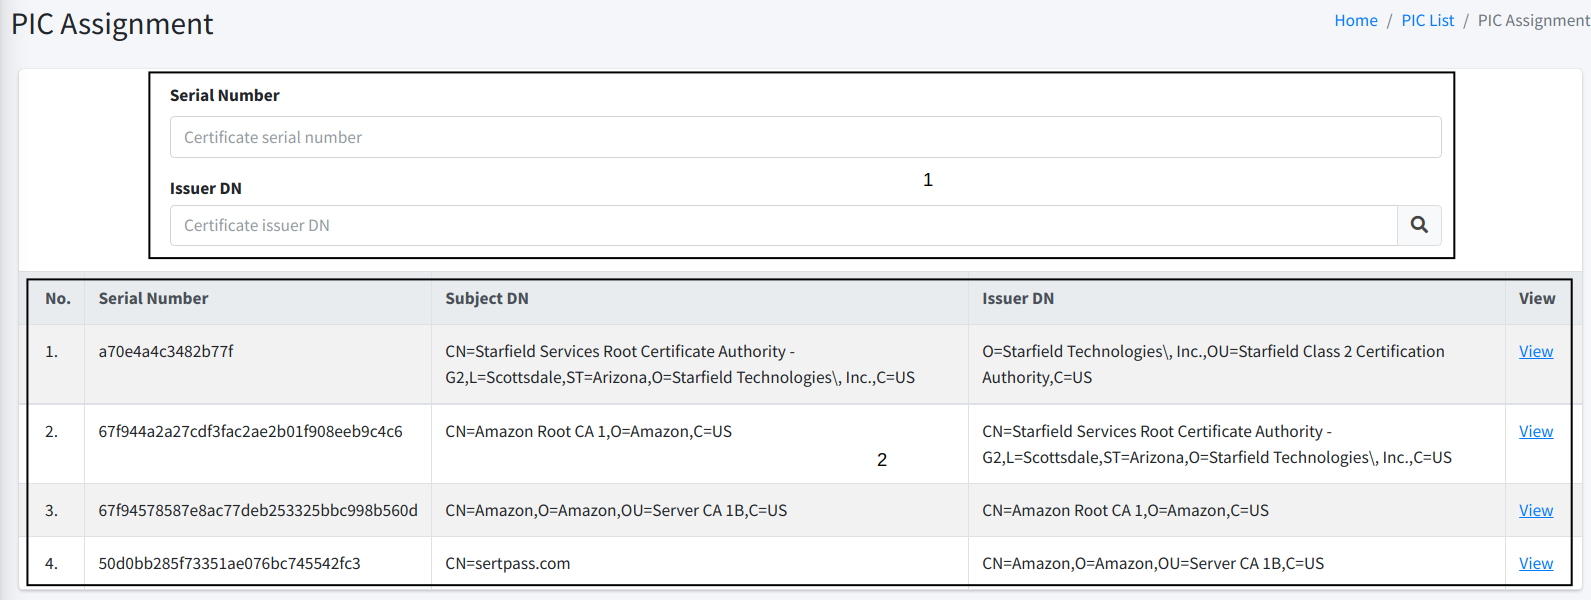
As can be seen from the screenshot above, section 1 is where you can enter the certificate serial number and issuer DN of the certificate that you want to assign to this owner. Once OK, just click on the Loop button.
At the section 2, you should be able to see the list of certificates currently assigned to this owner.
| The certificate that you assign to a new owner will be automatically un-assigned from the previous owner. |
Edit Certificate Owner
| To edit a certificate owner, you must have Edit Certificate Owner permissions. |
To edit a certificate owner, you can click on the Edit button associated with the certificate owner that you want to edit.

Once you click on the Edit button, you will be directed to another page from where you can enter the new information.
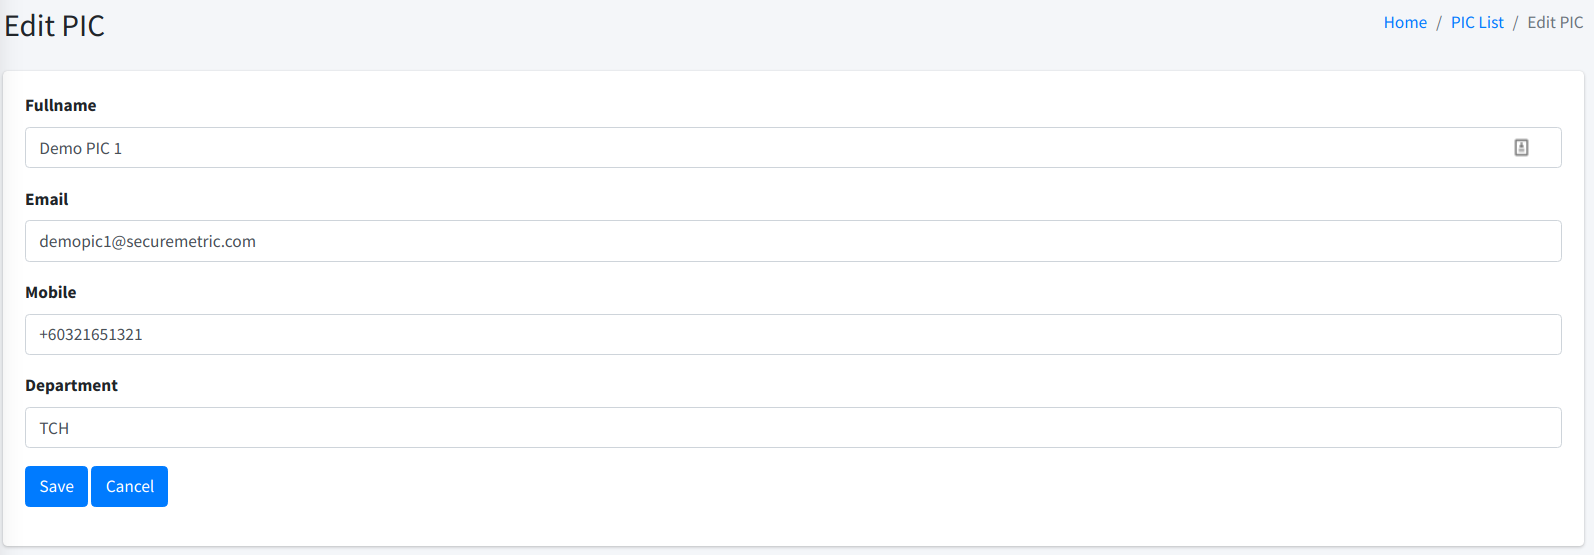
From this page, you can enter the new information. Click on the Save button when you are happy with the new information.
Delete Certificate Owner
| To delete a certificate owner, you must have Delete Certificate Owner permission. |
To delete a certificate owner, you can click on the Delete button associated with the certificate owner that you want to delete.
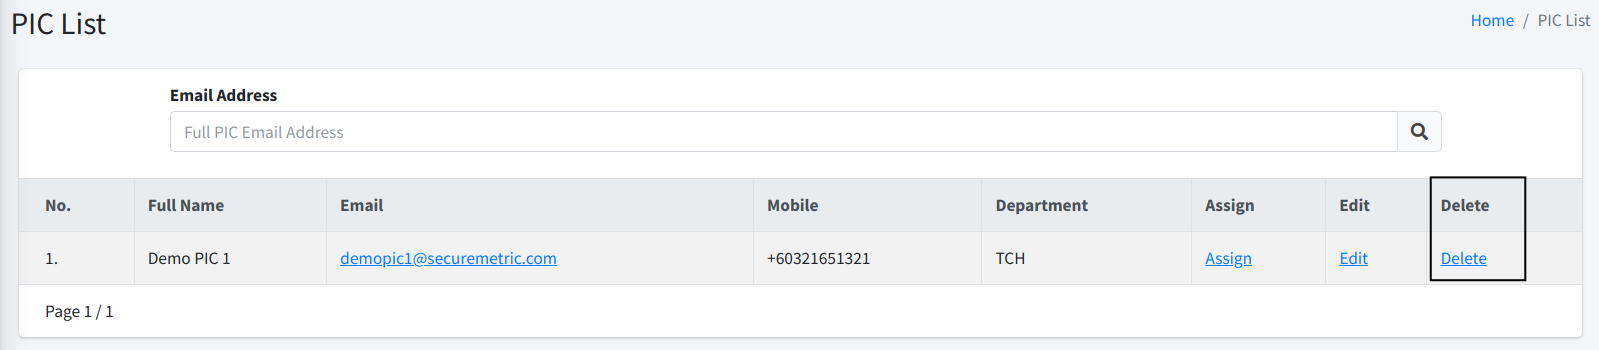
| You cannot delete a certificate owner that is currently managing any certificate. |
| This action cannot be reversed. You will need to re-create the certificate owner again if you delete it by mistake. If you just want to change the information, consider editing the certificate owner data instead. |
Transfer Certificate Owner
| To transfer a certificate owner, you must have List Certificate Owners and Transfer Certificate Owner permissions. |
People come and go out of our company. Hence, sometimes you might want to transfer ownership of certificate(s) from one owner to another. You can do that using this feature.
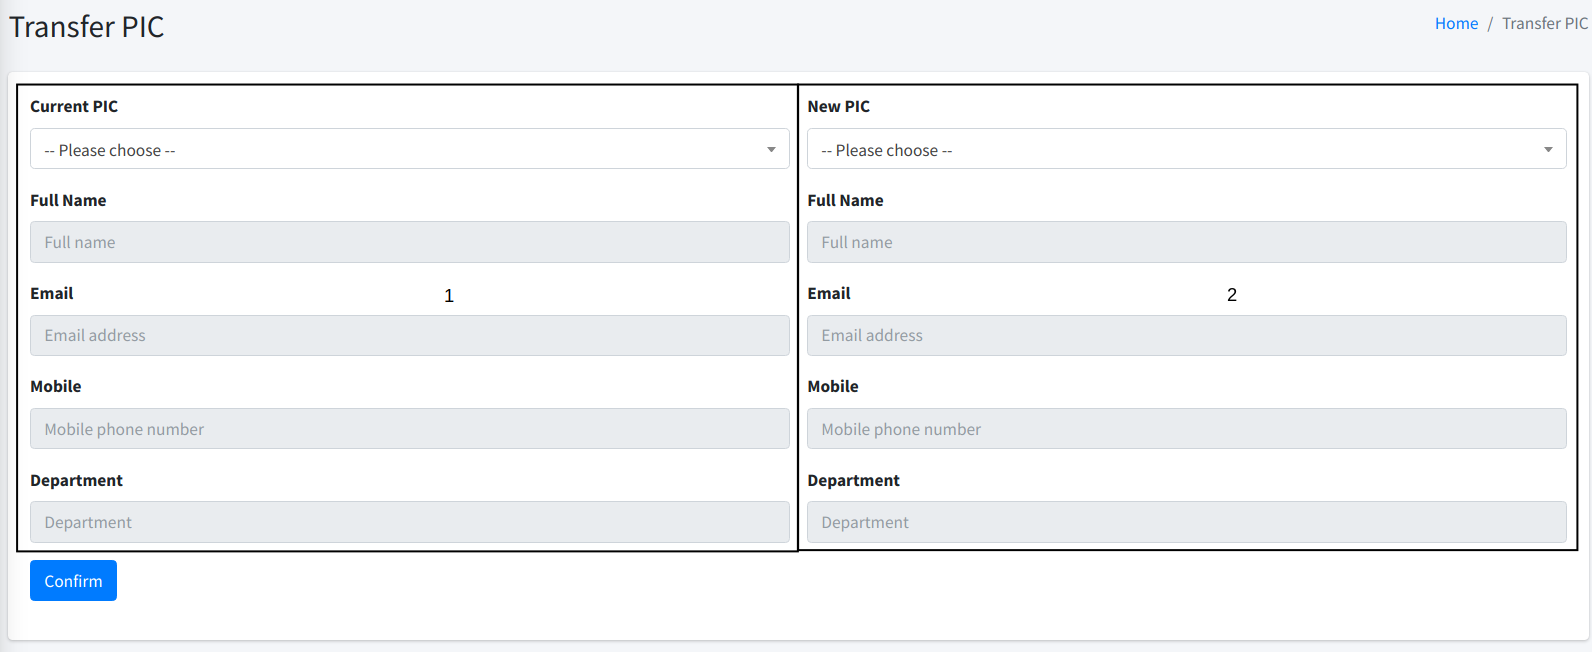
At section 1 above, you can choose the current certificate owner. At section 2, you choose the new certificate owner. Simply speaking, all certificates managed by the current owner (section 1) will be transferred to the new owner (section 2).
Once OK, click on the Confirm button to proceed with the certificate owner transfer.
Certificate Request
You may purchase new certificate from various CAs supported by this platform. Certificate issued via this platform will be added automatically into certificate list.
Certificate Request List
| To access this page, you must have List Certificate Requests permission. |
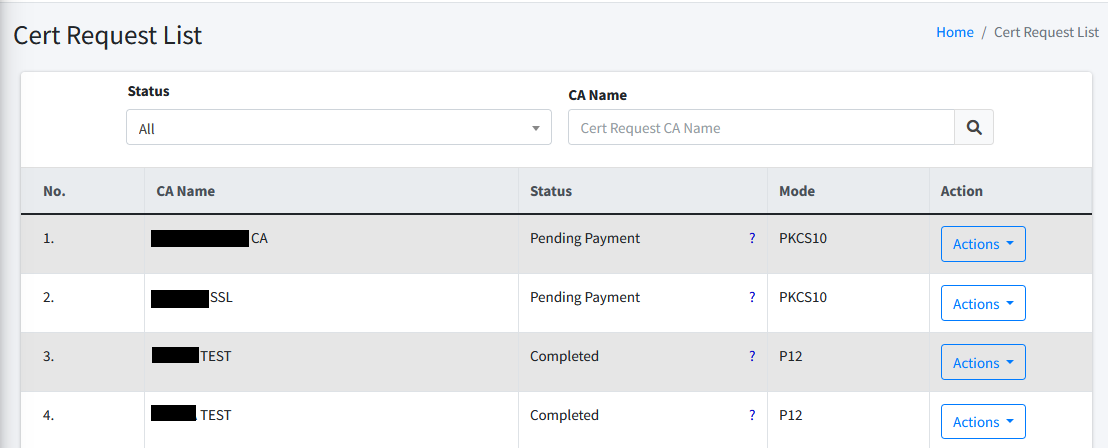
This page lists the new certificate requests that you have made at CertCycle. You can filter the list by the following criteria:
-
Status. You may filter any status of the certificate request here. Clicking on the search button will filter the list based on the status that you have selected. List of status here.
-
CA Name. You may enter the full CA Name of the selected CA during the certificate request. Clicking on the search button will filter the list based on the CA Name that you input here.
To the right of each item, you may choose to perform several actions. Available actions depend on the status of each request.
-
View. Clicking on the View link brings you to another page that shows the details of the certificate request.
-
Edit. Clicking on the Edit link brings you to another page that allows you to edit the request. This page is same as the input page when the request is first made.
-
Checkout. Clicking on the Checkout link brings you to Shopping Cart list page.
-
Download. Clicking on the Download link will download the newly enrolled certificate. Depending on your browser settings, you may be able to choose where you want to save the file to.
-
Validation Text. Clicking on the Validation Text option will trigger a pop-up message that show the required action from user in order to complete the certificate enrollment.
-
Complete Validation. Clicking on the Complete Validation link will submit a request to CertCycle to continue the certificate issuance process. Upon successful certificate issuance, the status will be changed to Complete.
-
Check Status. Clicking on the Check Status link will submit a request to CertCycle to check the status from the issuing CA. Upon successful certificate issuance, the status will be changed to Complete.
-
Send Password. Clicking on the Send Password link will request for password to be sent to owner for the issued keystore (for mode PKCS12 or JKS).
Certificate Request Status
The certificate request and enrollment process will involve several stages represented by different status. Issuance process might vary depending on issuing CA. Available stage/status are as below:
-
Pending Payment. Status for new request. Request can still be edited at this stage. In order to continue the certificate issuance, user will need to complete checkout and payment process. Refer to Checkout process for details.
-
In progress. Status for request that has been checked out. Cert-cycle is processing the request and will submit to corresponding CA based on user input during request.
-
Pending Issue. Status for request that has been submitted and CA is processing the request. User may request to check status at the Action menu Check Status to check if CA already completed the certificate issuance.
-
Require Validate. Status for request that has been submitted and CA requires some validation in order to complete the request. User can check the validation required at the Action menu Validation Text.
-
Completed. Status for request that certificate is already issued.
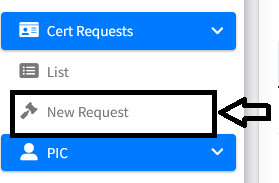
New Certificate Request
| To request certificate, you must have New Certificate Request permission. If you want to have access to request Private CA certificate, you must include List Private CAs permission. |
New request can be initiated at the Certificate request section or from certificate list via Renew action.
| To Renew from the Certificate List, you must have List Certificates, Renew Certificate, New Certificate Request permissions. |
Select CA
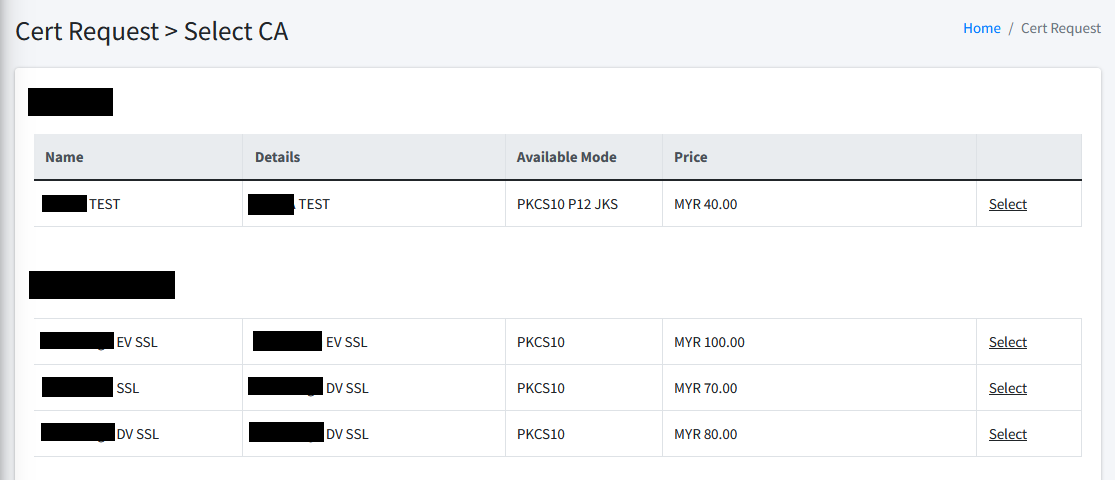
First step of certificate request is to select the Certificate Authority (CA) you wish to issue your required certificate.
Upon selecting any CA, you will be directed to a next step which is to fill in required information for the certificate request.
Form
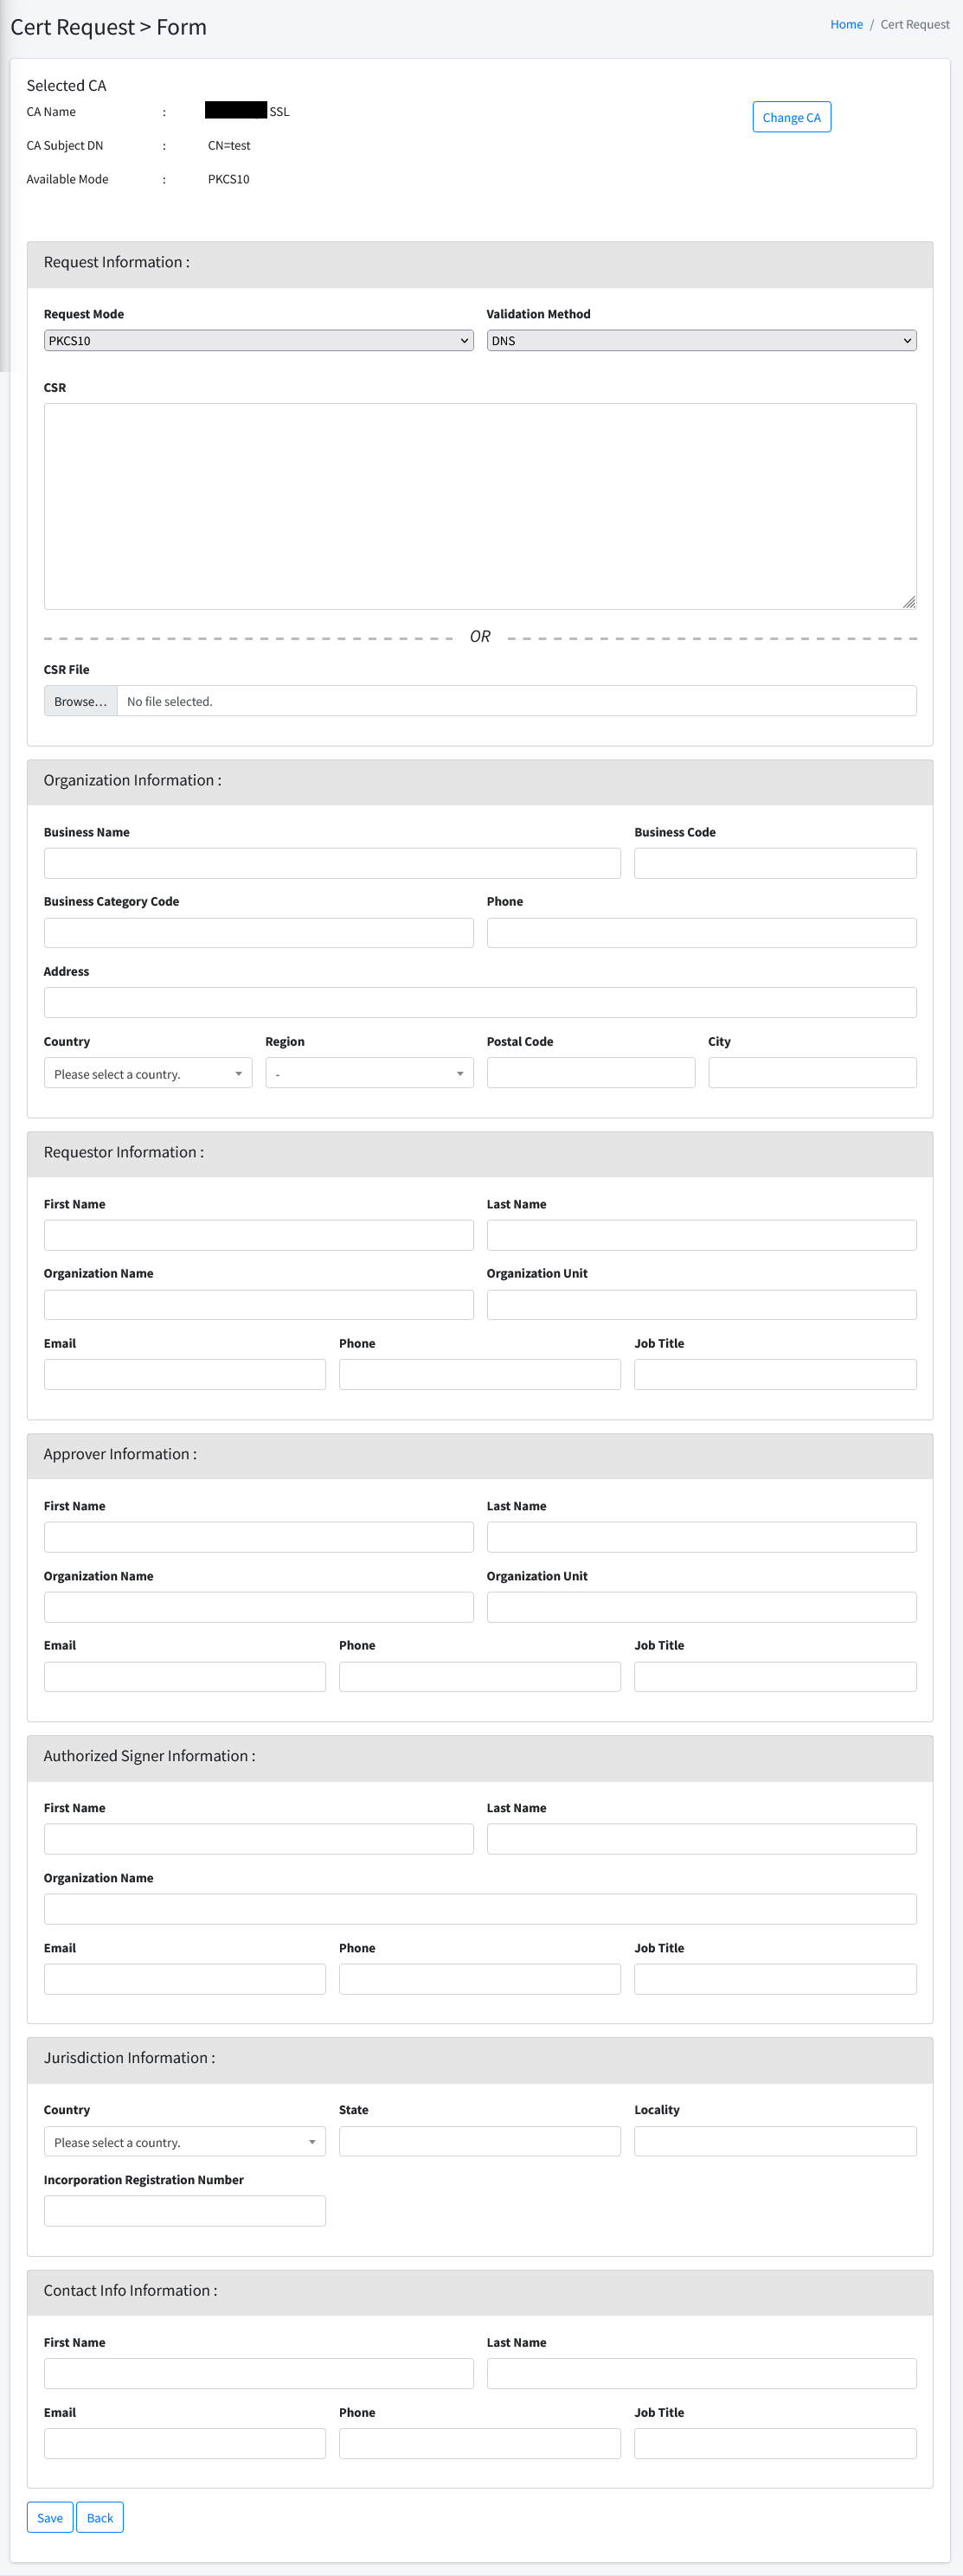
Second step of certificate request is to fill in required information. All field are mandatory.
Upon completing the information insertion. Click Save at the bottom of the page to continue the certificate request process. A successful request will create an entry at Certificate Request List with status Pending Payment.
| To continue the certificate issuance, proceed to check out at Cart page. Refer to Shopping Cart section for more details. |
Generate CSR
This page allows you to generate a CSR and a private key.
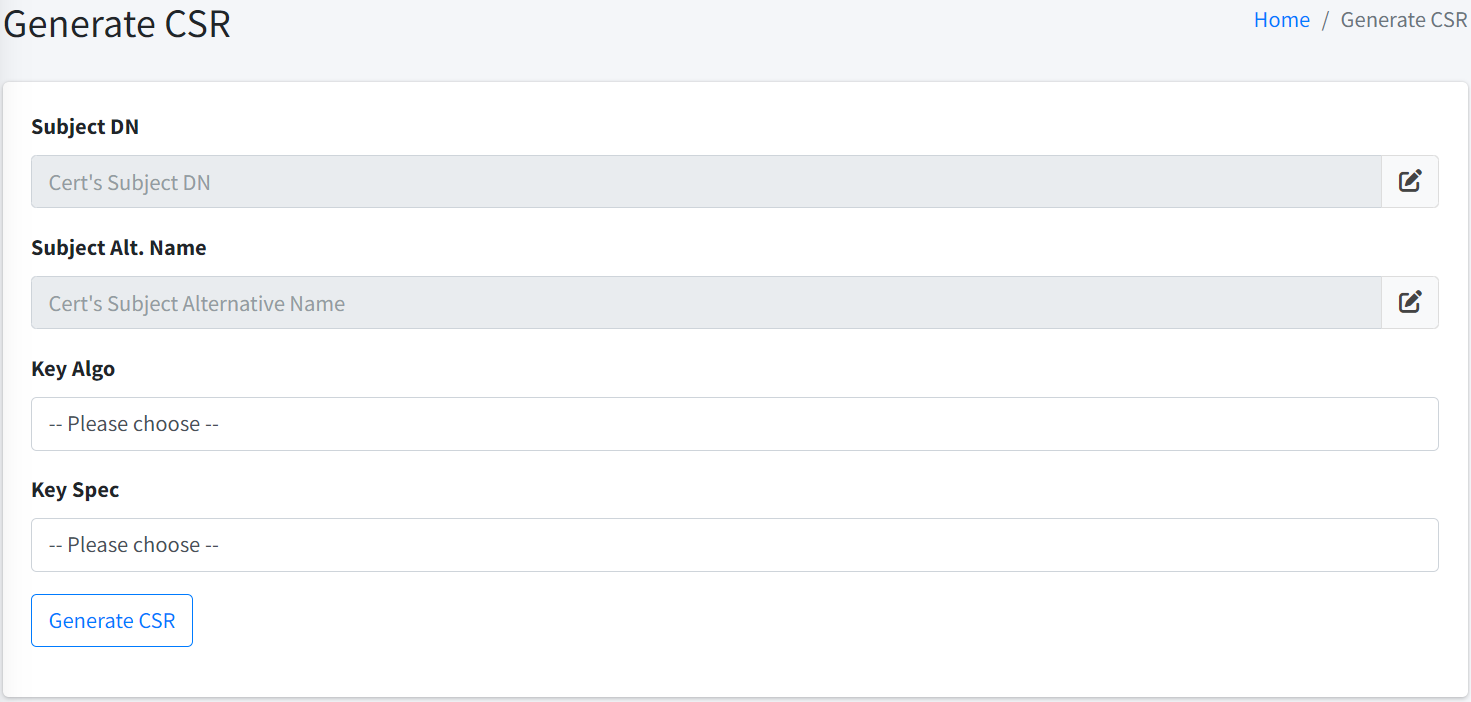
To generate a CSR, you need to provide the following information:
-
Subject DN. This is the subject DN to be contained in the CSR. Maximum length of the Subject DN is 2000 characters.
-
Subject Alternative Name. This is an optional parameter. If provided, it will be included in the CSR as the Subject Alternative Name. The maximum length of the Subject Alternative Name is 2000 characters.
-
Key Algorithm. You can select from the available key algorithms:
-
RSA
-
ECC
-
ML-DSA
-
SLH-DSA
-
KAZ-SIGN
-
-
Key Specification. Choose the key specification based on your selected key algorithm.
-
RSA Key Size. If you opt for RSA, you need to choose the RSA key size. Cert-Cycle supports the following RSA key sizes:
-
2048
-
3072
-
4096
-
-
ECC Curve Name. If you opt for ECC, you need to choose the ECC curve name. Cert-Cycle supports the following ECC curve names:
-
P-256
-
P-384
-
P-521
-
-
ML-DSA Key Spec. If you opt for ML-DSA, you need to choose the ML-DSA key specification. Cert-Cycle supports the following ML-DSA key specifications:
-
ML-DSA-44
-
ML-DSA-65
-
ML-DSA-87
-
ML-DSA-44-WITH-SHA512
-
ML-DSA-65-WITH-SHA512
-
ML-DSA-87-WITH-SHA512
-
-
SLH-DSA Key Spec. If you opt for SLH-DSA, you need to choose the SLH-DSA key specification. Cert-Cycle supports the following SLH-DSA key specifications:
-
SLH-DSA-SHA2-128F
-
SLH-DSA-SHA2-128S
-
SLH-DSA-SHA2-192F
-
SLH-DSA-SHA2-192S
-
SLH-DSA-SHA2-256F
-
SLH-DSA-SHA2-256S
-
SLH-DSA-SHAKE-128F
-
SLH-DSA-SHAKE-128S
-
SLH-DSA-SHAKE-192F
-
SLH-DSA-SHAKE-192S
-
SLH-DSA-SHAKE-256F
-
SLH-DSA-SHAKE-256S
-
SLH-DSA-SHA2-128F-WITH-SHA256
-
SLH-DSA-SHA2-128S-WITH-SHA256
-
SLH-DSA-SHA2-192F-WITH-SHA512
-
SLH-DSA-SHA2-192S-WITH-SHA512
-
SLH-DSA-SHA2-256F-WITH-SHA512
-
SLH-DSA-SHA2-256S-WITH-SHA512
-
SLH-DSA-SHAKE-128F-WITH-SHAKE128
-
SLH-DSA-SHAKE-128S-WITH-SHAKE128
-
SLH-DSA-SHAKE-192F-WITH-SHAKE256
-
SLH-DSA-SHAKE-192S-WITH-SHAKE256
-
SLH-DSA-SHAKE-256F-WITH-SHAKE256
-
SLH-DSA-SHAKE-256S-WITH-SHAKE256
-
-
KAZ-SIGN Key Spec. If you opt for KAZ-SIGN, you need to choose the KAZ-SIGN key specification. Cert-Cycle supports the following KAZ-SIGN key specifications:
-
KAZ-SIGN-128
-
KAZ-SIGN-192
-
KAZ-SIGN-256
-
-
-
Sign Algorithm. Choose the signing algorithm according to the key algorithm you selected:
-
For RSA, supported sign algorithms include:
-
SHA256withRSA
-
SHA512withRSA
-
-
For ECC, supported sign algorithms include:
-
SHA256withECDSA
-
SHA512withECDSA
-
-
For ML-DSA, sign algorithm will be the same as the key specification.
-
For SLH-DSA, sign algorithm will be the same as the key specification.
-
For KAZ-SIGN, sign algorithm will be KAZ-SIGN.
-
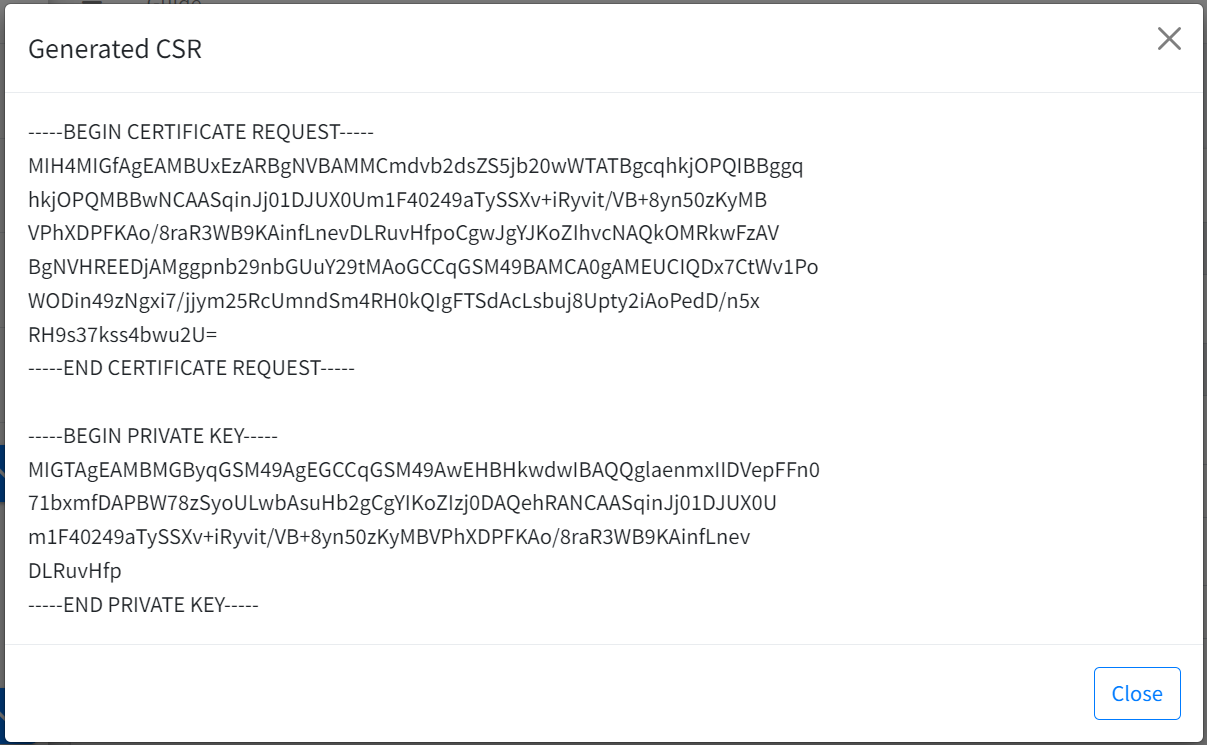
Once you have filled-in all the required information, simply click on the Generate CSR button. Your request will be sent to the server, which will then display a modal dialog containing the generated CSR values and the private key.
Private CA Enrolment
| To learn more about Private CA, please visit here. |
When you are trying to enrol a certificate using our Private CA feature, you can choose among different certificate purposes. By default, Cert-Cycle allows you to enrol certificate for the following purposes:
-
Client Authentication (1 and 2-year active period).
-
Code Signing (1 and 2-year active period).
-
Document Signing (1 and 2-year active period).
-
Email Protection (1 and 2-year active period).
-
SSL (1 and 2-year active period).
Authentication Certificate Profile
To enrol an authentication certificate, you can only provide the following DN components during the process:
-
CN (Common Name). This field is required.
-
OU (Organisational Unit). This field is optional.
-
O (Organisation). This field is optional.
-
C (Country). This field is optional.
Code Signing Certificate Profile
To enrol a code signing certificate, you can only provide the following DN components during the process:
-
CN (Common Name). This field is required.
-
OU (Organisational Unit). This field is optional.
-
O (Organisation). This field is optional.
-
C (Country). This field is optional.
Document Signing Certificate Profile
To enrol a document signing certificate, you can only provide the following DN components during the process:
-
CN (Common Name). This field is required.
-
OU (Organisational Unit). This field is optional.
-
O (Organisation). This field is optional.
-
C (Country). This field is optional.
Email Protection Certificate Profile
To enrol an email protection certificate, you can only provide the following DN components during the process:
-
CN (Common Name). This field is required.
-
E (Email address in DN). This field is required.
-
OU (Organisational Unit). This field is optional.
-
O (Organisation). This field is optional.
-
C (Country). This field is optional.
Additionally, the following subject alternative name attributes can be provided:
-
RFC822Name (Email address). This field is required.
SSL Certificate Profile
To enrol an SSL certificate, you can only provide the following DN components during the process:
-
CN (Common Name). This field is required.
-
O (Organisation). This field is optional.
-
businessCategory (Organization type). This field is optional.
-
Jurisdiction Locality [EV Certificate]. This field is optional.
-
Jurisdiction State or Province [EV Certificate]. This field is optional.
-
Jurisdiction Country (ISO 3166) [EV Certificate]. This field is optional.
-
serialNumber, Serial number (in DN). This field is optional.
-
streetAddress. This field is optional.
-
OU (Organizational Unit). This field is optional.
-
organizationIdentifier (Organization identifier). This field is optional.
Additionally, the following subject alternative name attributes can be provided:
-
DNS Name. This field is optional. You can add maximum of 3 DNS Name fields.
-
IP Address. This field is optional. You can add maximum of 2 IP Address fields.
Certificate Metadata
You can manage metadata types and provide additional information to your certificate through metadata. The metadata types field can be created dynamically based on user requirements. As of now, only String data type is supported.
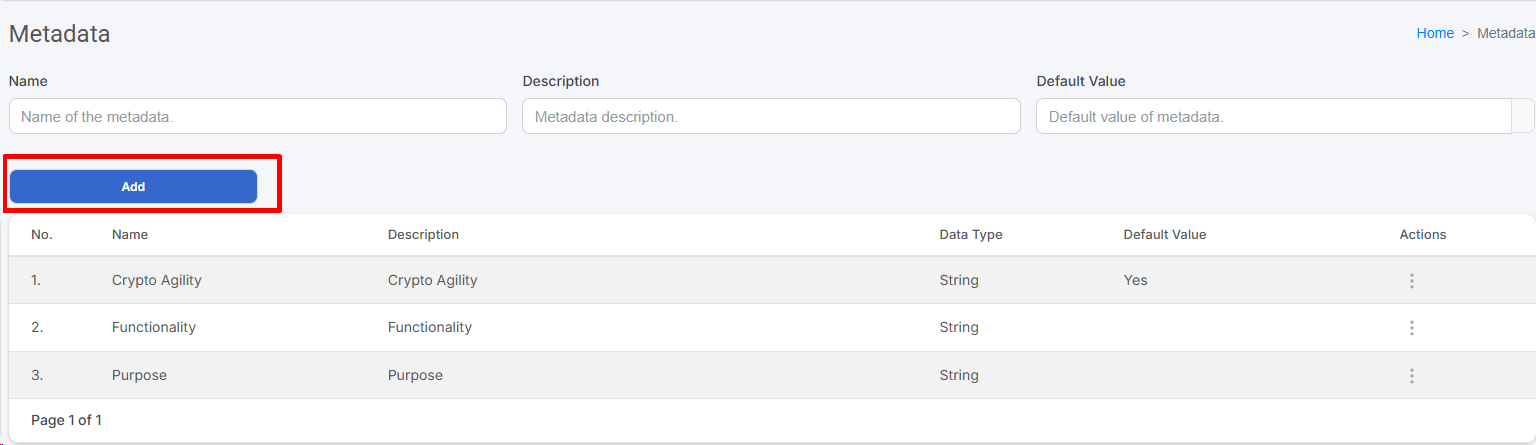
Metadata Types List
| You must have List Metadata Types permission to access this page. |
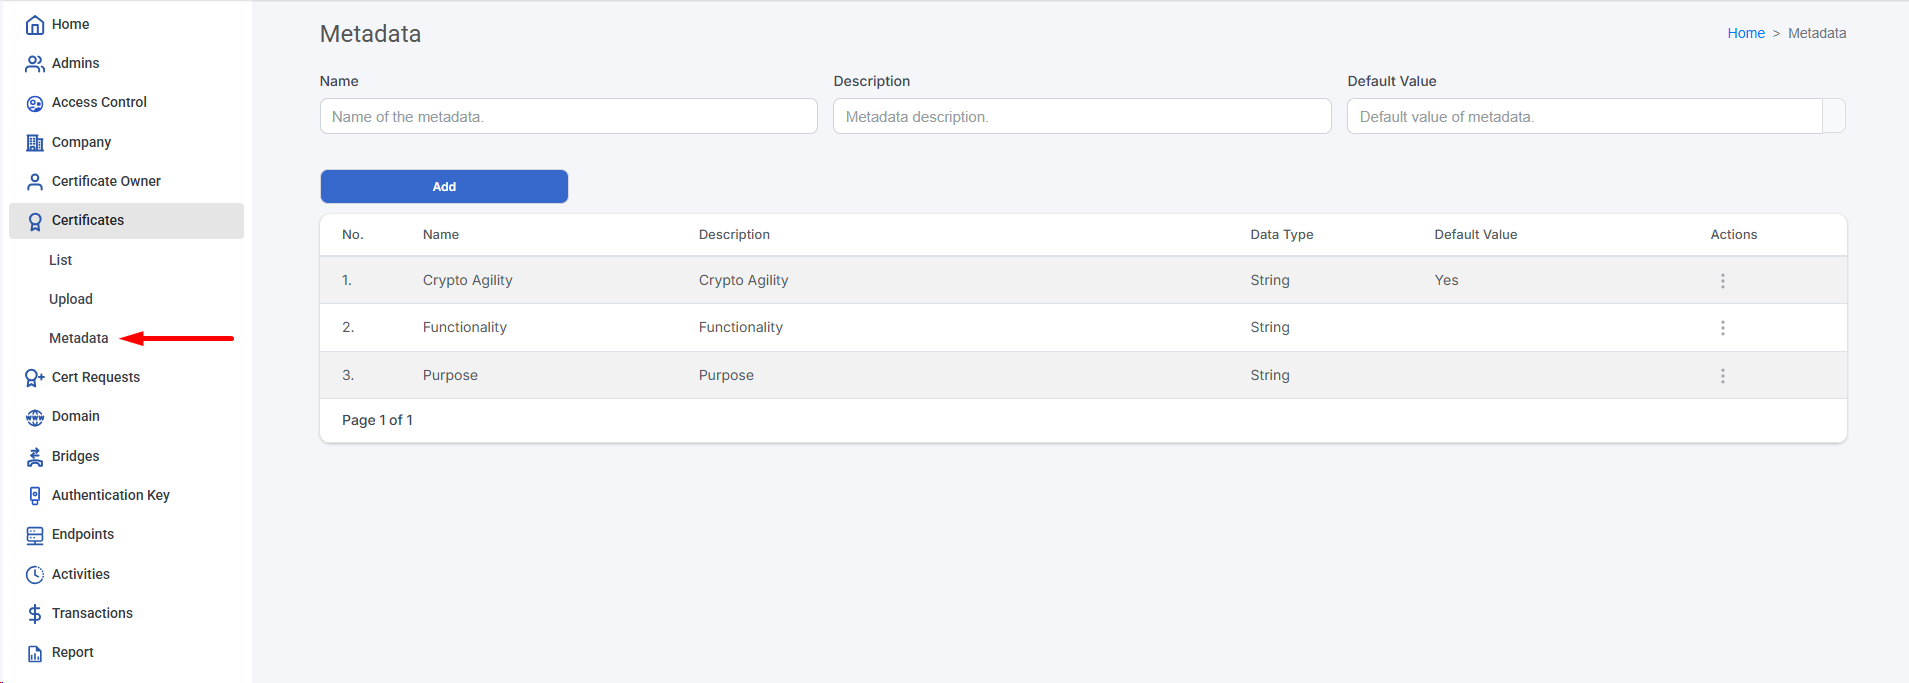
This page list the metadata types created by the user or admin of the company. You can filter the list by the following criteria:
Name. You may enter the partial name of the metadata that you want to search for
Description. You may enter the partial description of the metadata that you want to search for.
Default Value. You may enter the partial default value of the metadata that you want to search for.
Add Metadata Types
| You must have Add Metadata Types permission to add the metadata type |
| You must press the Add button in the metadata types list to add the metadata types |

This page lets you add a new metadata types to be used by the certificate. The users need to fill in the following information:
Name. The name of metadata types. It will be displayed on the certificate metadata and certificate reports
Description. Describe the functionality of the metadata types. It is used to provide the details of the metadata types.
Data Types. The metadata data types. Currently only support String
Default Value. The default value of the metadata. Every new certificate entry will use this default value if provided.
After providing all the information, you need to click Save button. To cancel, click Close button.
Edit Metadata Types
| You must have List Metadata Types and Edit Metadata Types permission to edit the metadata types |
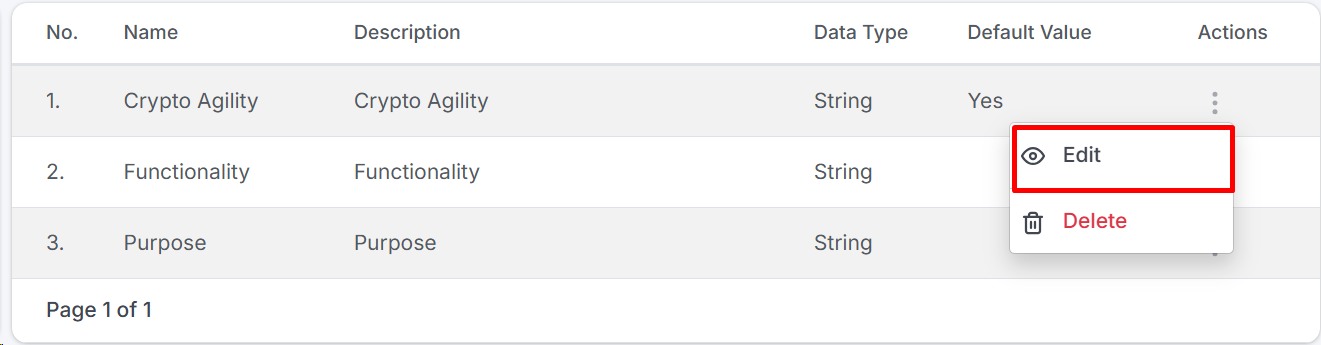
Once you click on the Edit button, edit metadata screen will be shown
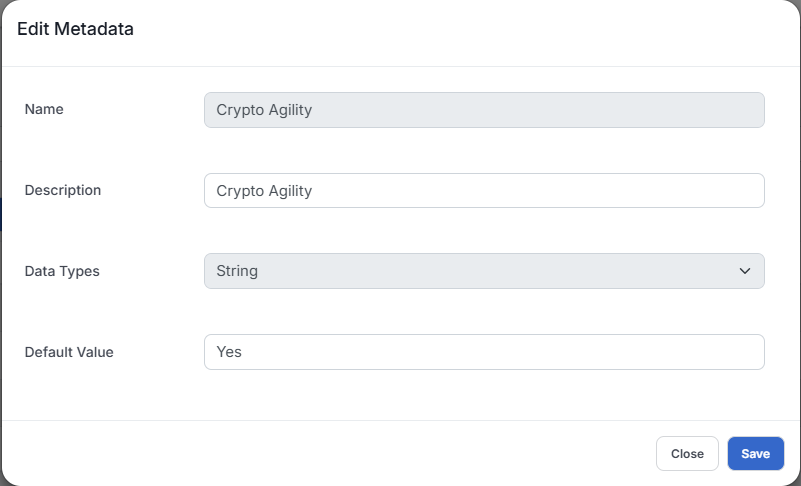
As can be seen from the picture above, you can only edit description and default value. Click Save to edit the metadata types.
| When you edit the default value, the existing data will not be changed |
Delete Metadata Types
| You must have List Metadata Types and Delete Metadata Types permission to delete the metadata types. |

Once you click on the Delete button, the confirmation popup will be shown

Click Delete button to delete the chosen metadata types.
Insert Metadata information to certificate
|
The following permissions are required for this feature:
|
You have several ways to insert the metadata information to the certificate
First, you can add the metadata information when you upload the certificate.
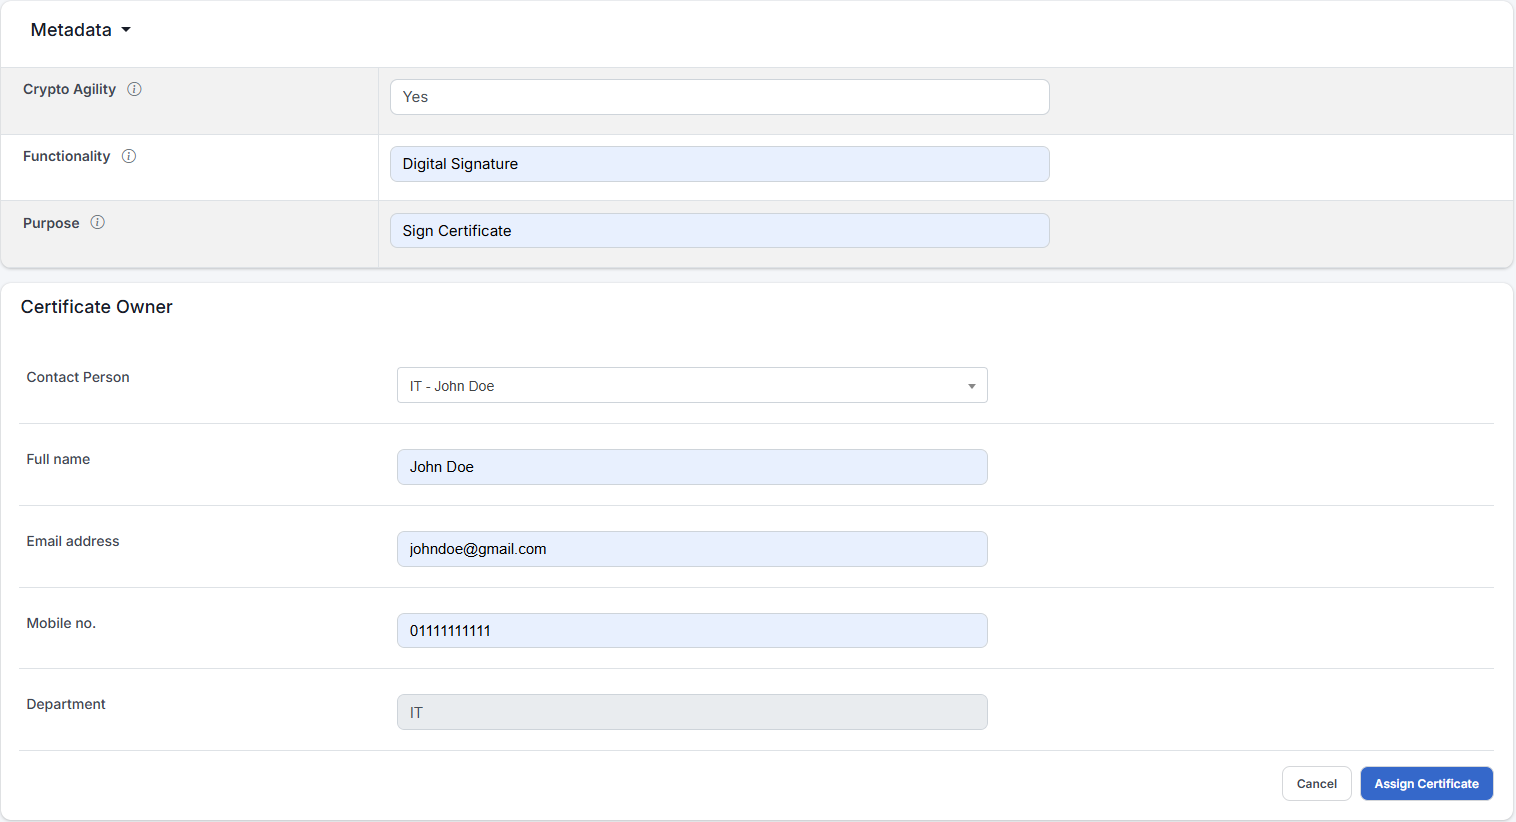
As you can see, you can add additional information to the certificate during the upload process.
Metadata for existing certificate can be edited and viewed through the certificate details page. To modify the metadata, update the fields as needed and click the Save button
Shopping Cart
Cart page is a list of incomplete certificate request which allow user to perform check out and complete the certificate request purchase.
Cart List
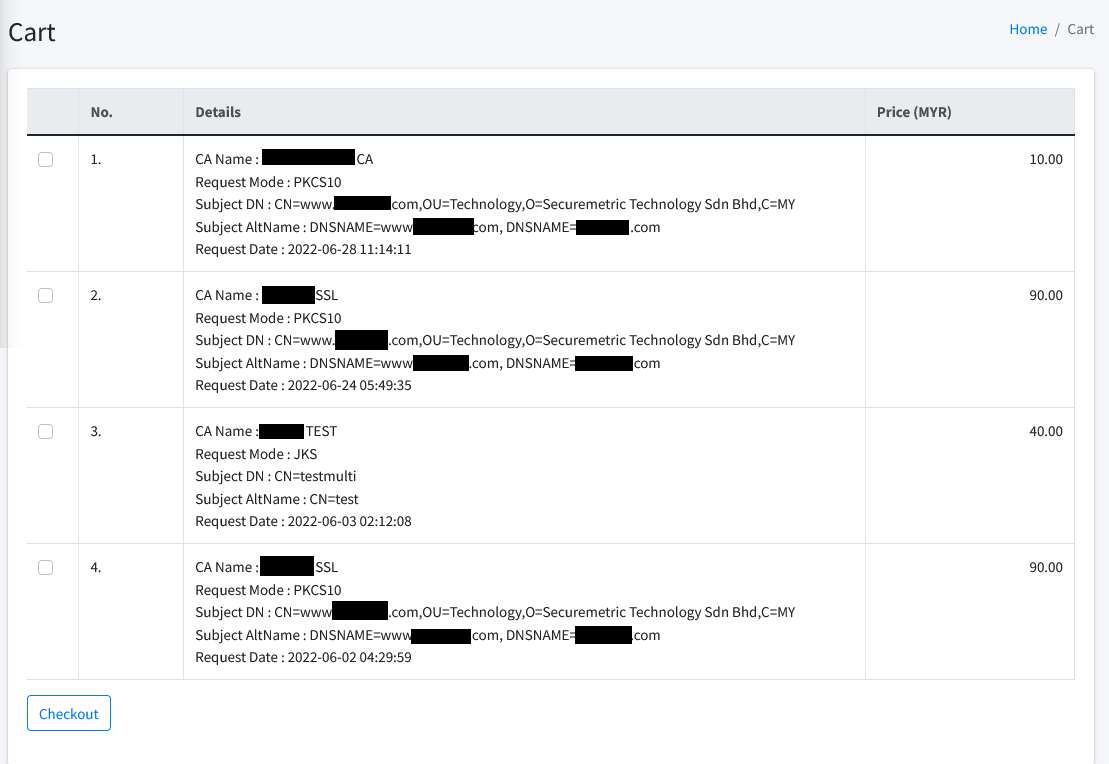
This page lists the incomplete certificate requests with status Pending Payment that you have requested earlier. You may select any certificate request (at least 1) to proceed with the purchase checkout process.
At the bottom of the page, there is a button Checkout which will bring user to the next checkout page.
Cart Checkout
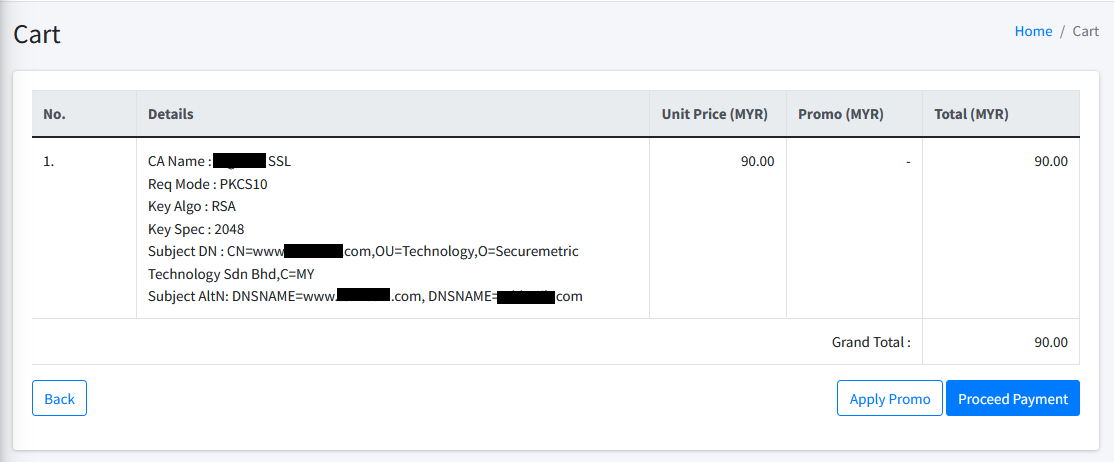
The checkout page is a continuity of the certificate request checkout process from Cart List page. This page provides the summary of item(s) selected prior to the payment process. User may perform the following action at this page:
-
Back. Clicking on Back button will navigate user back to Cart List page.
-
Apply Promo. Clicking on Apply Promo button will open up a pop-up window for user to input promotion code. Refer promo section for more info.
-
Proceed Payment. Clicking on Proceed Payment button will open up a pop-up window for user to input payment details and complete the purchase. Refer payment section for more info.
| Promotion Code must be entered before payment in order for the code to take effect. Each transaction allows ONE(1) active promotion code to take effect. |
Promotion
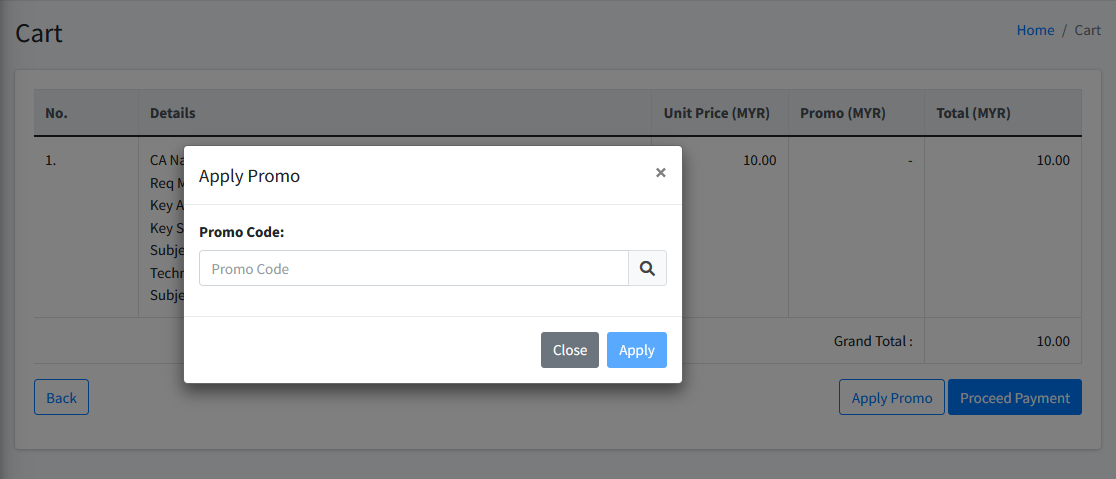
Cert-cycle will release promotion from time to time to offer special rate during certificate purchase. This window allows user to insert promotion code for current checkout/purchase. User may perform the following action at this window:
-
Back. Clicking on Back button will close the pop-up window. User may also click on area out of the pop-up window to archive the same result.
-
Apply. Clicking on Apply button will apply the successfully verified promotion code and recalculate the total chargeable amount. This button is disabled by default until a code is successfully verified.
-
Search . Clicking on search button will validate the promotion code entered. If the code is valid, Apply button will be activated.
Payment
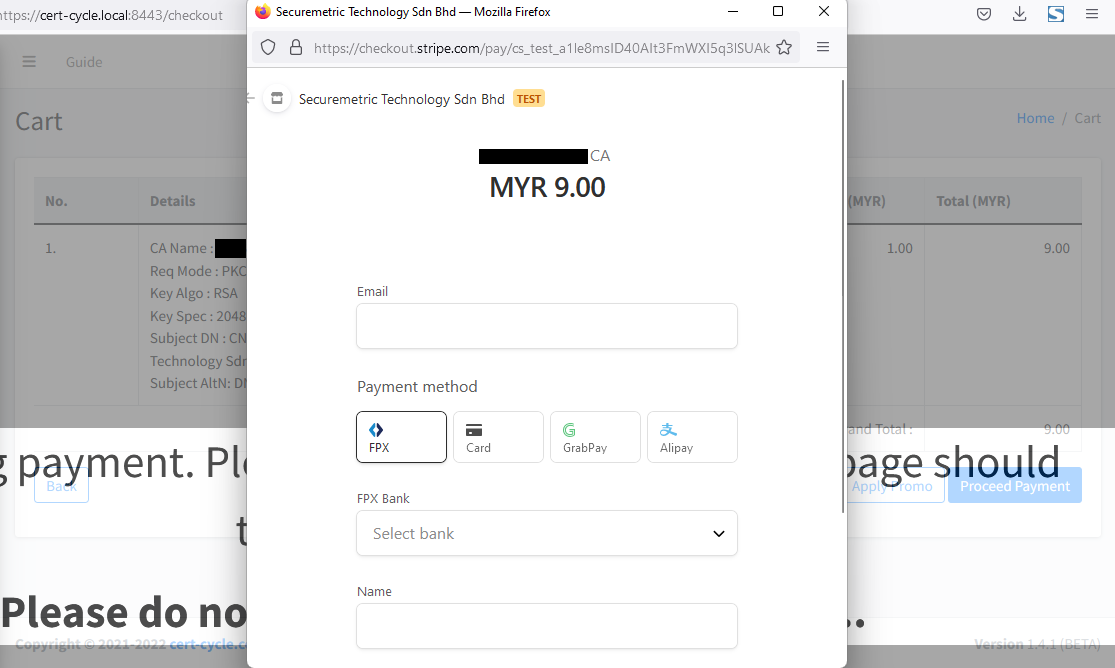
This window direct user to Cert-cycle integrated payment gateway. This windows allows user to insert payment details and complete the payment required for the certificate request.
Upon the generation of this window, a transaction record will be created. User can later refer to the transaction at Transaction List page.
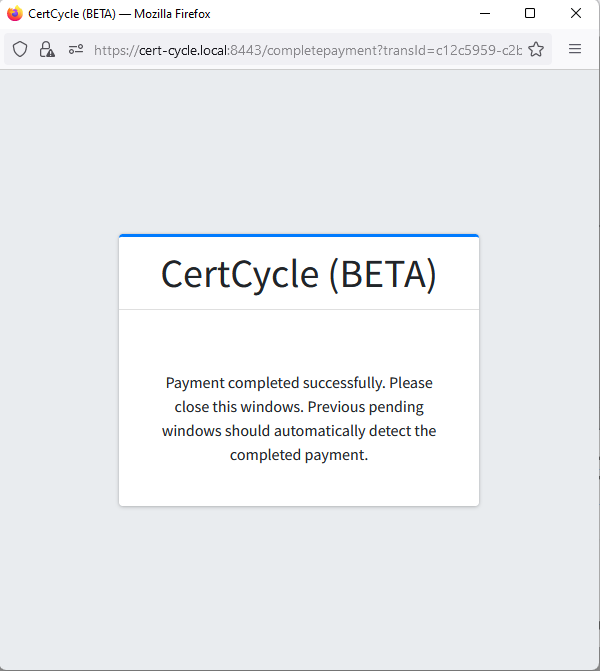
Upon completing the payment, the pop-up window will automatically redirect to a payment success page and will be closed automatically shortly. Main window will also be directed to Certificate Request List Page.
Transaction
All payment attempt during certificate request purchase regardless of the result will be recorded for audit and checking purposes.
Transaction List
| To view Transaction List, you must have Transaction History permission. |
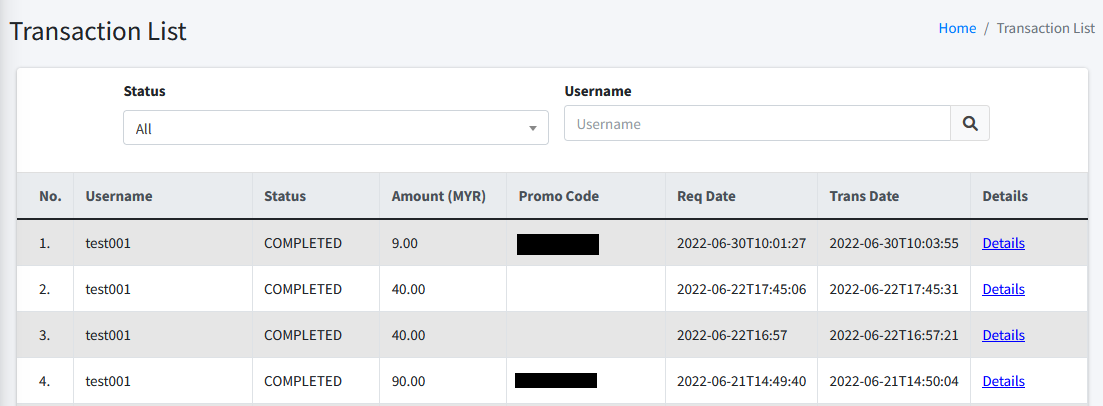
This page lists the transaction you have made at CertCycle during certificate request checkout. You can filter the list by the following criteria:
-
Status. You may filter any status of the certificate request here. Clicking on the search button will filter the list based on the status that you have selected.
-
Username. You may enter the Username of the active user during the transaction is generated. Clicking on the search button will filter the list based on the Username that you input here.
To the right of each item, you may click on Details link which will open a pop-up menu showing the details of each transaction.
Domain
This module allows you to interact with the domains that we discovered when you upload a certificate.
| We retrieve domains based on the value of the CN from the certificates that you upload. This is applicable only for SSL certificates. |
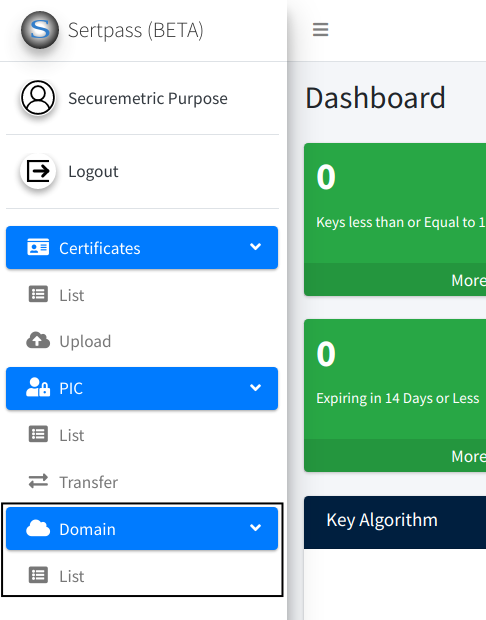
Domain List
| To access this page, you must have List Domains permission. |
In this page, you can see all the domains that we discovered.
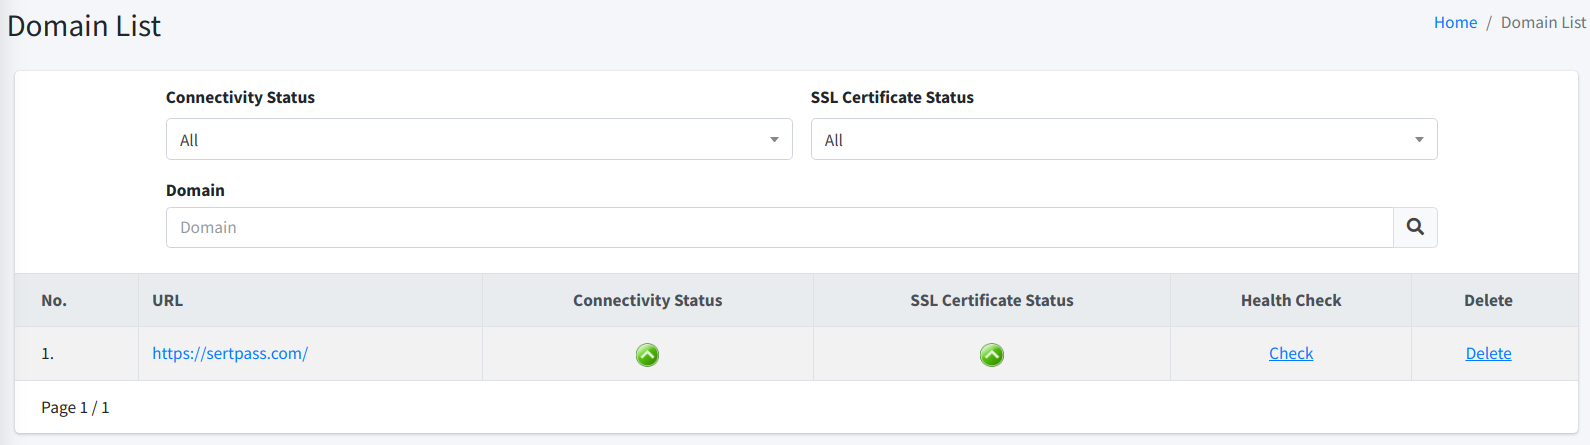
As can be seen from the above screenshot, the section 1 allows you to filter the list based on several criteria.
-
Domain. You may enter a text that is part of the domain that you want to search. Once you click on the Filter button, the list will be filtered based on the value that you entered here.
-
Connectivity Status. This status indicates whether your domain can be connected successfully or not. You can choose from several options.
-
All: It will not do any filtering to the list. This is the default option.
-
Unknown: It will filter the list to show only domains that the connectivity status is currently unknown.
-
Online: It will filter the list to show only domains that are currently online.
-
Offline: It will filter the list to show only domains that are currently offline.
-
Pending Update: It will filter the list to show only domains that is waiting for an update.
-
-
SSL Certificate Status. This status indicates whether your domain SSL certificate is valid or not. You can choose from several options.
-
All: It will not do any filtering to the list. This is the default option.
-
Unknown: It will filter the list to show only domains with an unknown SSL certificate status.
-
Valid: It will filter the list to show only domains with a valid SSL certificate status.
-
Invalid: It will filter the list to show only domains with an invalid SSL certificate status.
-
Pending for Update: It will filter the list to show only domains that is waiting for an update.
-

Manual Health Check
| To check domain health, you must have Check Domain Health permission. |
You can manually request CertCycle to check the health for a domain. Simply click on the Check link associated with a domain you want to check. It will send the request back to server and update the new status after a while.

Delete Domain
| To delete domain, you must have Delete Domain permission. |
To delete a domain, simply click on the Delete button associated with the domain you want to delete.

Bridge
Bridge is a component of CertCycle that allows connectivity between your local data centre with the CertCycle cloud.
Bridge List
| To access this page, you must have List Bridges permission. |

In this page, you can view all the bridges that you have created in the system. You can filter the list by the following criteria:
-
Initialised. You can choose among All, Yes, and No.
-
Enabled. You can choose among All, Yes, and No.
-
Build. You can choose among All, Ready, and Pending.
-
Name. You can enter the partial name of the bridge that you want to search for.
There is also an icon indicating whether or not your bridge is alive. If you hover over it, you will be able to see when was the last time the bridge connected to CertCycle cloud.
In addition to that, you can also apply one of the following operations to each of the bridges:
View Bridge
| To view Bridge, you must have View Bridge permission. |
This is used to view the details of a bridge. Click on it and you will be redirected to a new page with more detailed information on the bridge itself.
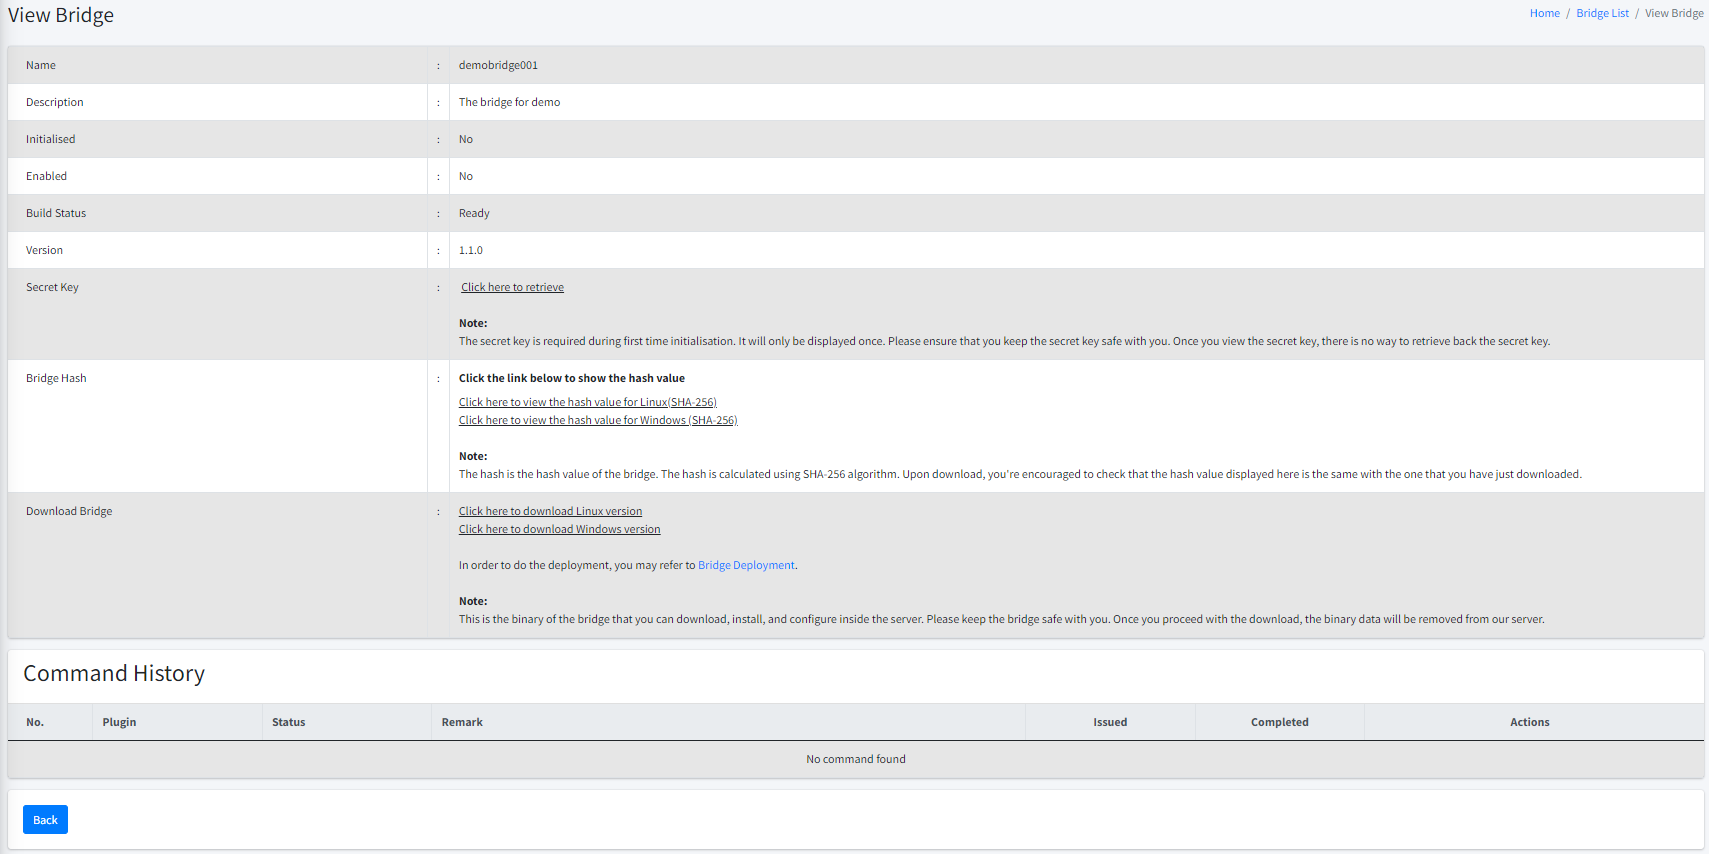
Below are some information displayed with regard to a bridge:
-
Name. The name of the bridge. This is according to the name that you put during bridge creation.
-
Description. The description of the bridge. This is according to the description that you put during bridge creation.
-
Bridge Group. The assigned bridge group of this bridge. This is according to the bridge group that you have selected during bridge creation.
-
Initialised. This flag indicates whether or not a bridge has been initialised. When a bridge is created, the default status is uninitialised. You will need the secret key to initialise your new bridge.
-
Enabled. This flag indicates whether or not a bridge is enabled. When a bridge is disabled, CertCycle will reject any connectivity from this specific bridge. You can enable the bridge back to bring it up online again based on what you deemed as appropriate. Go here on how to enable/disable a bridge.
-
Build Status. This flag indicates whether or not CertCycle has finished building the binary for this specific bridge. Once completed, the status will be changed to Ready which indicates that you can now download the binary and deploy it to your own premise.
-
Version. This is the version number of the bridge.
-
Secret Key. This key is required during first time bridge initialisation. It will only be displayed once.
| Once you have viewed the secret key, there is no way to retrieve it back. If you lose the secret key before activating your bridge, you can simply delete this bridge and create a new one. |
-
Bridge Hash. This is the hash value of the bridge’s binary computed using SHA-256. It is always a best practice to compare the hash value shown here with the hash value computed using your downloaded binary. If the values do not match, that means your download is corrupted or might have been tampered with. Since CertCycle do not store any binary once downloaded, you can simply delete this bridge and create a new one to resolve the issue.
-
Download Bridge. This part contains a link that you can click and download the bridge’s binary.
| CertCycle does not keep your bridge’s binary once you decide to download it. Please make sure that you keep the binary safely on your side. |
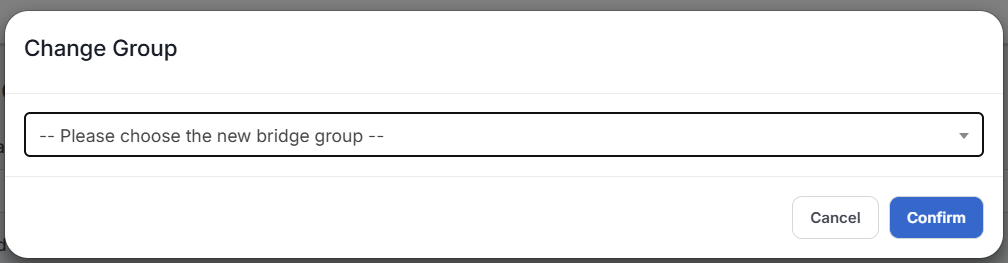
Change Bridge Group
| To change bridge group, you must have List Bridge Groups and Change Bridge Group permissions. |
This allows you to change a bridge’s group. To do so, click the Change Group button. A modal will appear, allowing you to select a different bridge group from the dropdown list. Once selected, click Confirm to apply the change.

Enable/Disable Bridge
To change the state of a bridge (enabled / disabled), you can click on either Enable or Disable on the actions dropdown list to the right of each of the bridges.


Delete Bridge
| To delete bridge, you must have Delete Bridge permission. |
To delete a bridge, click on the Delete on the actions dropdown list to the right of each of the bridges.
| This action is not reversible. Once deleted, you will need to create a new bridge. Existing bridge will no longer be able to connect to CertCycle. |

Bridge Groups
| To access this page, you must have List Bridge Groups permission. |
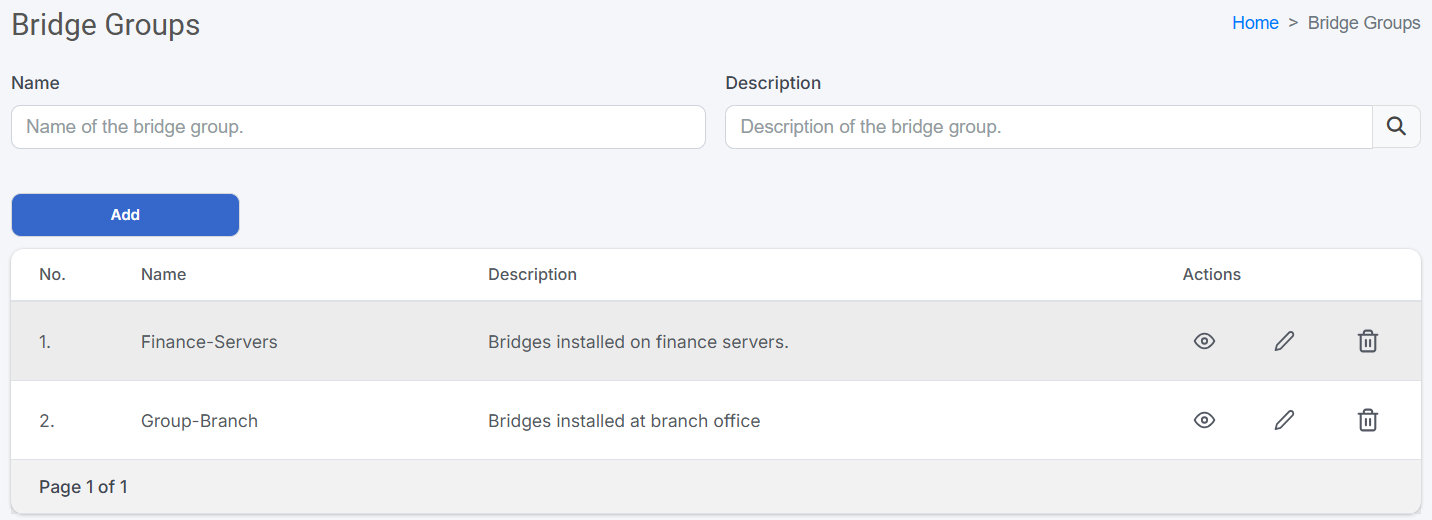
To send command you need to have a bridge group first. In this page, you can view all the groups that you have created in the system.
You can filter the list by the following criteria:
-
Name. You can enter the partial name of the group that you want to search for.
-
Description. You can enter the partial description of the group that you want to search for.
The list displays the group name, description, and the available actions you can perform on each group. For each bridge group, you can perform the following actions:
-
View (): Opens a read-only view showing the bridge group’s details, including its name, description, and assigned bridges.
| To access this action, you must have View Bridge Group permission. |
-
Edit (): Allows you to modify group name and description. Click the Save button to apply your changes.
| To access this action, you must have Edit Bridge Group permission. |
-
Delete (): Permanently removes a bridge group from Cert-Cycle.
| To access this action, you must have Delete Bridge Group permission. |
| You cannot delete a bridge group if there are still bridges assigned to it OR if it is used by a CA Connection. You must ensure the group is empty by editing the assigned bridges before proceeding with the deletion. |
Add Bridge Groups
| To access this page, you must have Add Bridge Group permission. |
To add a bridge group, simply click the Add button in the Groups list page.
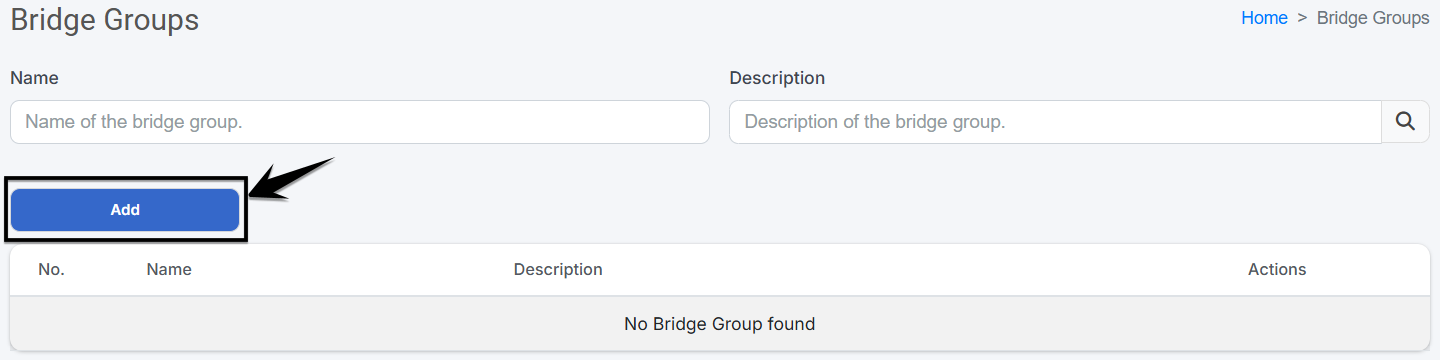

You need to fill in the following information:
-
Name: Enter a unique name for the bridge group. This field is required.
-
Description: Enter a description of the bridge group. This field is required.
Once you have filled in all the details, click on the Save button to add the group.
Send Command
| To access this feature, you must have Bridge Command and List Bridge Groups permissions. |
To send a command to a bridge, you can choose menu item Command. This will bring you to a new page from where you can put any details required based on whatever command you want to send to the bridge.
There are TWO (2) generic parameters you always have to provide before sending a command:
-
Target Bridge Group. You need to choose to which bridge group this command should be sent to. The group needs at least ONE (1) bridge available to execute the command.
| To access Target Bridge Group option, you must have List Bridge Groups permission. |
-
Type. You need to choose the type of the command that you wish to send. Currently, there are TWO (2) types of commands available:
-
Bridge Updater. This type is used to trigger the bridge to request a new build with a new version. Go here to have a more detailed discussion on this type of command.
-
Network Scanner. This type is used to trigger the bridge to do network scanning. Go here to have a more detailed discussion on this type of command.
-
JBoss Updater. This type is used to trigger the bridge to update the keystore and/or truststore of a JBoss/Wildfly. Go here to have a more detailed discussion on this type of command.
-
Apache Updater. This type is used to trigger the bridge to update the keystore and/or truststore of an Apache. Go here to have a more detailed discussion on this type of command.
-
Nginx Updater. This type is used to trigger the bridge to update the keystore and/or truststore of an Nginx. Go here to have a more detailed discussion on this type of command.
-
Tomcat Updater. This type is used to trigger the bridge to update the keystore and/or truststore of a Tomcat. Go here to have a more detailed discussion on this type of command.
-
IIS Updater. This type is used to trigger the bridge to update the keystore and/or truststore of an IIS. Go here to have a more detailed discussion on this type of command.
-
Discover EJBCA. This type is used to trigger the bridge to automatically connect with and retrieve data from your EJBCA instance. Go here to have a more detailed discussion on this type of command.
-
Discover Certificate File. This type is used to scan for certificate files inside a defined file system. Go here to have a more detailed discussion on this type of command.
-
Bridge Updater
If there is a new version of a bridge available, you can tell a bridge to trigger a new build of the bridge using the latest version available. You need to provide some mandatory information before proceeding:
-
New Bridge Name. This will be the name of the new bridge. This field is mandatory. If you wish to reuse the existing bridge’s name, you can tick on the Reuse bridge name. This will rename your target bridge by appending the current version number.. As mentioned, the existing bridge will be renamed to something else.
-
New Bridge Description. This will be the description of the new bridge. This field is mandatory. If you wish to reuse the existing bridge’s description, you can tick on the Reuse bridge description..
Network Scanner
Network scanner is the capability of the bridge to scan the network based on the pre-defined constraints. The purpose of the scanning is to find any certificate available on the network. You need to provide some mandatory information before proceeding:
-
Start Address. This is the IP address from where the scan should begin. Currently only support IPv4.
-
End Address. This is the IP address to where the scan should complete (inclusive). Currently only support IPv4.
-
Ports to Scan. Tells the server how to determine the ports to be scanned. There are TWO (2) available options here:
Use Comma SeparatedandUse Port Range. If you choose to useUse Comma Separated, you have to provide the port numbers into thePortsfields. If you choose to useUse Port Range, you have to provide theStart PortandEnd Portnumber.
Use comma separated port numbers is supported starting from Bridge version 1.4.0.
|
-
Start Port. This is the port number from where the scan should begin. The value should be between 2 and 65535 (inclusive). Displayed only if you choose
Use Port Rangein thePorts to Scandropdown list. -
End Port. This is the port number to where the scan should complete (inclusive). The value should be between 2 and 65535 (inclusive). Displayed only if you choose
Use Port Rangein thePorts to Scandropdown list.
| Please be reminded that the higher the IP and port ranges, the longer it will take for the scan to complete. |
-
Ports. This is the comma-separated port numbers to be scanned. Each port number must be between 2 and 65535 (inclusive). Example: 442, 443, 8442, 8443. Displayed only if you choose
Use Comma Separatedin thePorts to Scandropdown list. -
Timeout. This is the timeout value before the bridge gives up trying to connect to a port. The value should be between 1 and 60 seconds (inclusive).
| The higher the timeout, the longer it will take for the scan to complete, especially if you have a bigger range of ports which mostly not listening on. |
-
Concurrency. This is the number of concurrent scanning the bridge shall proceed with. The value should be between 1 and 500.
| The higher the value, the higher the load on your network will be, albeit considerably low. This is because the bridge will only try to connect to an IP and port, grab the TLS certificate, if any, and then disconnect. You will only notice a spike of network activity from the bridge server. |
JBoss Updater
JBoss updater is the capability of the bridge to update the keystore and/or truststore of a JBoss/Wildfly deployment.
To proceed, You need to provide some mandatory information:
-
Endpoint. This is the target endpoint where the JBoss/Wildfly is deployed. Please refer to here to learn more about Endpoints in Cert-Cycle.
| To access Endpoint option, you must have List Endpoints permission. |
-
SSH Private Key. This is an optional parameter. If your server requires key to perform SSH authentication, you have to select the correct key. Please refer here to learn more about SSH private keys.
| To access SSH Private Key option, you must have List Authentication Keys permission. |
| It will only show if your selected Endpoint is based on Linux. |
-
Keystore. This is the certificate to be used to update the keystore of the JBoss/Wildfly. Note that this must be a keystore format (i.e. P12 / JKS) as private key is required to be used as a keystore.
| To access Keystore option, you must have List Certificate Requests permission. |
-
Keystore Password. This is the password to protect the new keystore.
| It is a requirement that you use the same password as the one currently being used to protect your JBoss' keystore file. |
-
Confirm Keystore Password. To confirm the keystore password. Must be the same value as the one you enter in the Keystore Password field.
-
Keystore Path. This is the full path to the keystore file. It must include the name of the current keystore file as well.
| It is a requirement that you use the same file name for the keystore as the one currently being configured in your JBoss. |
| Cert-Cycle will perform password verification on the existing keystore file, hence it is imperative that the file must exist first in the system. |
Cert-Cycle performs keystore password verification using the keytool command, hence please make sure that the keytool command is in the execution path.
|
-
Update Truststore. This is the flag indicating whether or not the truststore of the JBoss should be updated. If Yes is chosen, below truststore configuration parameters must be configured.
| If you select "Yes" for the Truststore, you need to have List Certificates permission to view the Truststore. |
-
Truststore. This is the certificate to be used to update the truststore of the JBoss/Wildfly.
-
Truststore Password. This is the password to protect the new truststore.
| It is a requirement that you use the same password as the one currently being used to protect your JBoss' truststore file. |
-
Confirm Truststore Password. To confirm the truststore password. Must be the same value as the one you enter in the Truststore Password field.
-
Truststore Path. This is the full path to the truststore file. It must include the name of the current truststore file as well.
| It is a requirement that you use the same file name for the truststore as the one currently being configured in your JBoss. |
| Cert-Cycle will perform password verification on the existing truststore file, hence it is imperative that the file must exist first in the system. |
Cert-Cycle performs truststore password verification using the keytool command, hence please make sure that the keytool command is in the execution path.
|
-
Restart JBoss. This is the flag indicating whether or not the JBoss should be restarted to apply the change. If Yes is chosen, below JBoss configuration parameters must be properly configured.
-
JBoss CLI. This is the full path to the JBoss CLI. It must include the name of the CLI script as well. The default value is
/opt/jboss/bin/jboss-cli.sh. You can change the value based on your current deployment. -
JBoss CLI Username. This configuration is optional. If your JBoss CLI is protected by username/password, then you have to put the username to be used here.
-
JBoss CLI Password. This configuration is optional. If your JBoss CLI is protected by username/password, then you have to put the password to be used here.
Apache Updater
Apache updater is the capability of the bridge to update the keystore and/or truststore of an Apache deployment.
You need to run Bridge at least version 1.3.2.
|
To proceed, You need to provide some mandatory information:
-
Endpoint. This is the target endpoint where the Apache is deployed. Please refer to here to learn more about Endpoints in Cert-Cycle.
| To access Endpoint option, you must have List Endpoints permission. |
-
SSH Private Key. This is an optional parameter. If your server requires key to perform SSH authentication, you have to select the correct key. Please refer to here to learn more about SSH private keys.
| To access SSH Private Key option, you must have List Authentication Keys permission. |
-
Keystore. This is the certificate to be used to update the keystore of the Apache. Note that this must be a keystore format (i.e. P12 / JKS) as private key is required to be used as a keystore.
| To access Keystore option, you must have List Certificate Requests permission. |
-
SSL Certificate Path. This is the full path to the SSL certificate file. It must include the name of the current SSL certificate file as well.
| It is a requirement that you use the same file name for the SSL certificate file as the one currently being configured in your Apache. |
-
SSL Certificate Key Path. This is the full path to the SSL certificate key file. It must include the name of the current SSL certificate key file as well.
| It is a requirement that you use the same file name for the SSL certificate key file as the one currently being configured in your Apache. |
-
Update Truststore. This is the flag indicating whether or not the truststore of the Apache should be updated. If Yes is chosen, below truststore configuration parameters must be configured.
| If you select "Yes" for the Truststore, you need to have List Certificates permission to view the Truststore. |
-
Truststore Path. This is the full path to the truststore file. It must include the name of the current truststore file as well.
| It is a requirement that you use the same file name for the truststore as the one currently being configured in your Apache. |
-
Restart Apache. This is the flag indicating whether or not the Apache should be restarted to apply the change. If Yes is chosen, below Apache configuration parameters must be properly configured.
-
Apache Service Name. This is the name of the Apache service configured in your environment. Cert-Cycle will issue
systemctl restartcommand followed by the service name. If the service name is not listed here, you will want to restart the Apache yourself. -
Use sudo. This is the flag indicating whether or not to use sudo command when executing the Apache restart command.
To be able to use sudo properly, you need to have your SSH password configured correctly at the target endpoint.
|
Nginx Updater
Nginx updater is the capability of the bridge to update the keystore and/or truststore of an Nginx deployment.
You need to run Bridge at least version 1.3.3.
|
To proceed, You need to provide some mandatory information:
-
Endpoint. This is the target endpoint where the Apache is deployed. Please refer to here to learn more about Endpoints in Cert-Cycle.
| To access Endpoint option, you must have List Endpoints permission. |
-
SSH Private Key. This is an optional parameter. If your server requires key to perform SSH authentication, you have to select the correct key. Please refer to here to learn more about SSH private keys.
| To access SSH Private Key option, you must have List Authentication Keys permission. |
-
Keystore. This is the certificate to be used to update the keystore of the Nginx. Note that this must be a keystore format (i.e. P12 / JKS) as private key is required to be used as a keystore.
| To access Keystore option, you must have List Certificate Requests permission. |
-
SSL Certificate Path. This is the full path to the SSL certificate file. It must include the name of the current SSL certificate file as well.
| It is a requirement that you use the same file name for the SSL certificate file as the one currently being configured in your Nginx. |
-
SSL Certificate Key Path. This is the full path to the SSL certificate key file. It must include the name of the current SSL certificate key file as well.
| It is a requirement that you use the same file name for the SSL certificate key file as the one currently being configured in your Nginx. |
-
Update Truststore. This is the flag indicating whether or not the truststore of the Nginx should be updated. If Yes is chosen, below truststore configuration parameters must be configured.
| If you select "Yes" for the Truststore, you need to have List Certificates permission to view the Truststore. |
-
Truststore Path. This is the full path to the truststore file. It must include the name of the current truststore file as well.
| It is a requirement that you use the same file name for the truststore as the one currently being configured in your Nginx. |
-
Restart Nginx. This is the flag indicating whether or not the Nginx should be restarted to apply the change. If Yes is chosen, below Nginx configuration parameters must be properly configured.
-
Nginx Service Name. This is the name of the Nginx service configured in your environment. Cert-Cycle will issue
systemctl restartcommand followed by the service name. If the service name is not listed here, you will want to restart the Nginx yourself. -
Use sudo. This is the flag indicating whether or not to use sudo command when executing the Nginx restart command.
To be able to use sudo properly, you need to have your SSH password configured correctly at the target endpoint.
|
Tomcat Updater
Tomcat updater is the capability of the bridge to update the keystore and/or truststore of a Tomcat deployment.
You need to run Bridge at least version 1.3.4.
|
To proceed, You need to provide some mandatory information:
-
Endpoint. This is the target endpoint where the Tomcat is deployed. Please refer to here to learn more about Endpoints in Cert-Cycle.
| To access Endpoint option, you must have List Endpoints permission. |
-
SSH Private Key. This is an optional parameter. If your server requires key to perform SSH authentication, you have to select the correct key. Please refer to here to learn more about SSH private keys.
| To access SSH Private Key option, you must have List Authentication Keys permission. |
-
Keystore. This is the certificate to be used to update the keystore of the Tomcat. Note that this must be a keystore format (i.e. P12 / JKS) as private key is required to be used as a keystore.
| To access Keystore option, you must have List Certificate Requests permission. |
-
Keystore Password. This is the password to protect the new keystore.
| It is a requirement that you use the same password as the one currently being used to protect your Tomcat’s keystore file. |
-
Confirm Keystore Password. To confirm the keystore password. Must be the same value as the one you enter in the Keystore Password field.
-
Keystore Path. This is the full path to the keystore file. It must include the name of the current keystore file as well.
| It is a requirement that you use the same file name for the keystore as the one currently being configured in your Tomcat. |
| Cert-Cycle will perform password verification on the existing keystore file, hence it is imperative that the file must exist first in the system. |
Cert-Cycle performs keystore password verification using the keytool command, hence please make sure that the keytool command is in the execution path.
|
-
Update Truststore. This is the flag indicating whether or not the truststore of the Tomcat should be updated. If Yes is chosen, below truststore configuration parameters must be configured.
| If you select "Yes" for the Truststore, you need to have List Certificates permission to view the Truststore. |
-
Truststore. This is the certificate to be used to update the truststore of the Tomcat.
-
Truststore Password. This is the password to protect the new truststore.
| It is a requirement that you use the same password as the one currently being used to protect your Tomcat’s truststore file. |
-
Confirm Truststore Password. To confirm the truststore password. Must be the same value as the one you enter in the Truststore Password field.
-
Truststore Path. This is the full path to the truststore file. It must include the name of the current truststore file as well.
| It is a requirement that you use the same file name for the truststore as the one currently being configured in your Tomcat. |
| Cert-Cycle will perform password verification on the existing truststore file, hence it is imperative that the file must exist first in the system. |
Cert-Cycle performs truststore password verification using the keytool command, hence please make sure that the keytool command is in the execution path.
|
-
Restart Tomcat. This is the flag indicating whether or not the Tomcat should be restarted to apply the change. If Yes is chosen, below Tomcat configuration parameters must be properly configured.
-
Tomcat Service Name. This is the name of the Tomcat service configured in your environment. Cert-Cycle will issue
systemctl restartcommand followed by the service name. If the service name is not listed here, you will want to restart the Tomcat yourself. -
Use sudo. This is the flag indicating whether or not to use sudo command when executing the Tomcat restart command.
To be able to use sudo properly, you need to have your SSH password configured correctly at the target endpoint.
|
IIS Updater
IIS updater is the capability of the bridge to update the keystore and/or truststore of an IIS deployment.
You need to run Bridge at least version 1.5.0.
|
To proceed, You need to provide some mandatory information:
-
Endpoint. This is the target endpoint where the IIS is deployed. Please refer to here to learn more about Endpoints in Cert-Cycle.
| To access Endpoint option, you must have List Endpoints permission. |
-
Keystore. This is the certificate to be used to update the keystore of the IIS. Note that this must be a keystore format (i.e. P12 / JKS) as private key is required to be used as a keystore.
| To access Keystore option, you must have List Certificate Requests permission. |
-
Update Truststore. This is the flag indicating whether or not the truststore of the IIS should be updated. If Yes is chosen, below truststore configuration parameters must be configured.
| If you select "Yes" for the Truststore, you need to have List Certificates permission to view the Truststore. |
-
Truststore. This is the certificate to be used to update the truststore of the IIS.
-
Restart IIS. This is the flag indicating whether or not the IIS should be restarted to apply the change.
Discover EJBCA
Discover EJBCA is the capability of the bridge to discover certificates from EJBCA.
-
Authentication Key. Select an authentication key.
| You must have Authentication Key List permission, with registered CLIENT authentication type. |
| Please refer to here for more information on how to add an authentication key. |
-
Discovery Type:
-
New: You can select this option to provide new EJBCA REST API URL for discovery.
-
Existing: You can select this if you want to use URL from previous discoveries. You can check Incremental Discovery checkbox to continue from the last successful discovery session, or uncheck it to reset the discovery and start over.
-
-
EJBCA REST API URL. Provide the EJBCA REST API URL.
-
Page Size. Specify the number of records to retrieve per page during discovery process
Discover Certificate Files
Discover Certificate Files allows the bridge to locate and identify certificates stored directly within a file system.
-
Endpoint. The target destination where the certificate discovery process will be executed.
| You must have Endpoint List permission. |
-
SSH Private Key. Provide an SSH private key here if the endpoint requires SSH authentication for a secure connection.
| You must have List all Authentication Key permission. |
-
File Path. The specific directory path on the endpoint that the system will scan for certificate files.
-
File Extension(s). Define which file types to scan. You can list multiple extensions separated by commas (e.g., pem, cer). Alternatively, enable
Perform Heuristic Searchto allow the system to inspect all files and automatically determine if they contain certificate data, regardless of their extension. -
Scan Mode. Choose between two scanning strategies:
-
Incremental Scan: Optimizes performance by skipping files that were previously scanned and remain unchanged.
-
Full Scan: Performs a comprehensive scan of all files in the path, regardless of their previous scan status.
-
Command History
| To access this page, you must have Bridge Command permission. |
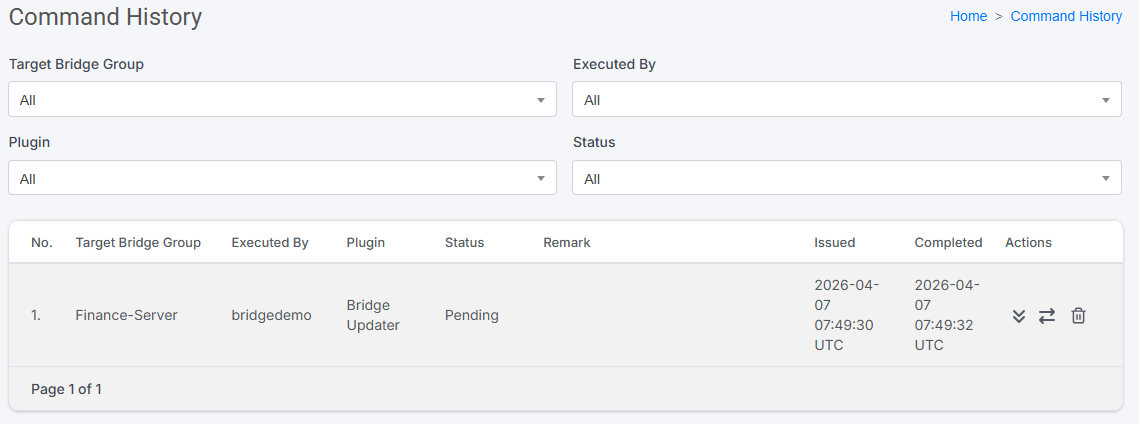
This page allows you to view the history of commands sent to bridge groups.
You can filter the list by selecting the following criteria:
-
Target Bridge Group. The bridge group to which the command was sent.
| To filter by Target Bridge Group, you must have List Bridge Groups permission. |
-
Executed By. The bridge that executed the command.
| To filter by Executed By, you must have List Bridge Groups permission. |
-
Plugin. The type of plugin used for the command.
-
Status. The current status of the command.
The list displays the following information:
-
Target bridge group: The bridge group associated with the command.
| You must have the List Bridge Groups permission to view this field. |
-
Executed By: The bridge that executed the command.
| You must have the List Bridges permission to view this field. |
-
Plugin: The plugin or type of command sent.
-
Status: The current completion status of the command.
-
Remark: Additional remarks or error messages regarding the command.
-
Issued: The date and time when the command was issued.
-
Completed: The date and time when the command was completed.
-
Actions: The actions you can perform on the command. You can perform the following actions:
Transfer Command
There might be a case where the server in which your bridge is deployed is down. In this case, you can redirect (transfer) the command to another working bridge server. Note that only commands that are in Pending status can be transferred.
To transfer a command, simply click on the Transfer button to the right of the command.
| You must have the List Bridge Groups permission to use the Transfer button. |

A popup will show from where you can choose the target bridge to execute the command. You need to have at least another active bridge to be able to serve the command.
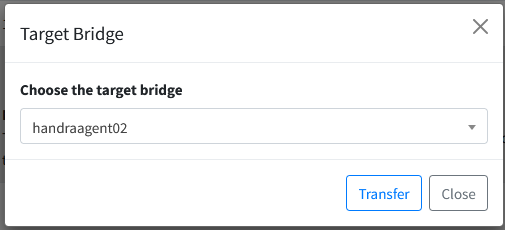
Once you select the correct target bridge, just click on the Transfer button and follow the on-screen instructions. You should be able to see a success message once the command transfer is completed.
Delete Command
If you wish to delete a command, you can simply click on the Delete button to the right of the command.

Bridge Creation
It is extremely simple to create a new bridge. To create a new bridge, click on the Create menu item on the Bridges section.
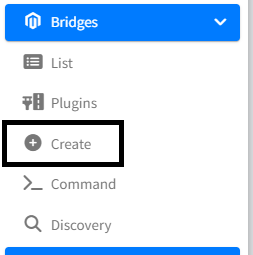
You will need to enter mandatory information below:
-
Name. The name of the bridge. This is used as an indicator or uniquely identify the bridges inside your company. We recommend that you are using the more indicative name (e.g.: hrserverbridge01) instead of some general name (e.g.: mybridge). Although, it’s up to you in the end.
-
Description. The description of the bridge to explain a little bit on what this specific bridge is about.
-
Bridge Group. Select the group to which this bridge will belong. Bridge groups are created in the Add Bridge Groups section and are used to organize and manage bridges.
| To access Bridge Group option, You must have List Bridge Groups permission. |

Once you have clicked on the Create button, you will need to wait a while until the executable is ready to be downloaded. You can check and download the binary from the view bridge page. Refer to download bridge for more information.
| As of now, the bridge can only be deployed on Linux and Windows OS. Support for other OS will be added in the future. |
Bridge Deployment
Deploying and initialising a bridge is as simple as creating a new bridge. You can follow the steps below from creation to deployment of a bridge (see Create Bridge Page.
| Wait for the binary to be ready. |
Download the bridge
Once the bridge is ready for download, you can click on the Click here to download [OS] version link to download the binary. You may download for the specific OS you would like to use. Upon first time run, the bridge will check whether or not you have the plugins ready. If you’re not, it will download and setup the plugins for you.
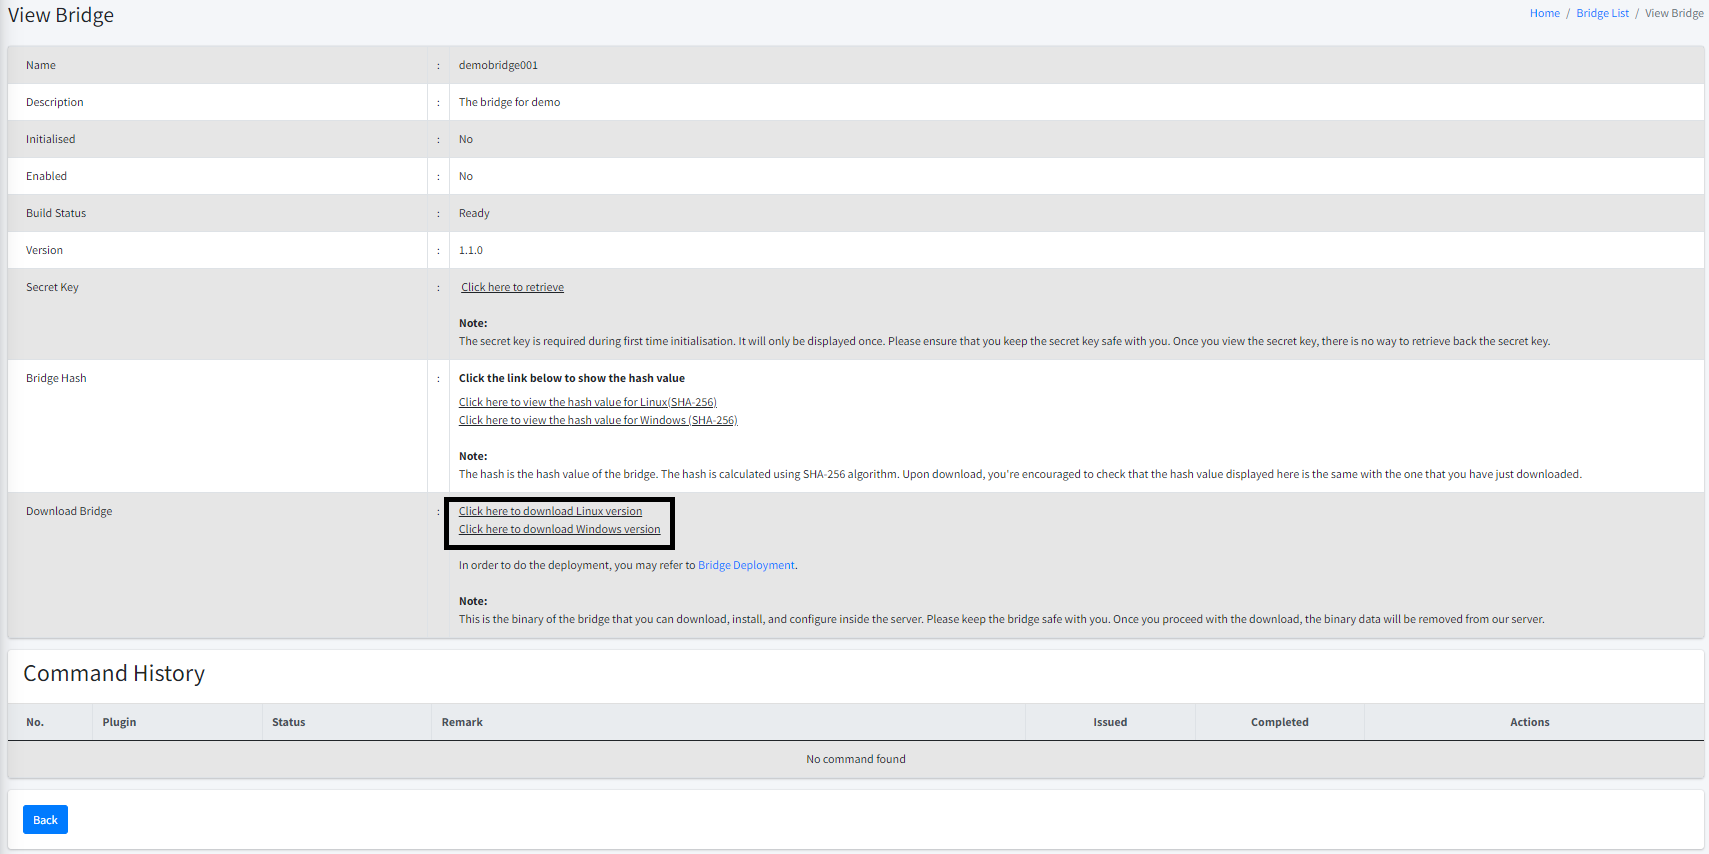
| We will retain the binary in our system for at most THREE (3) days. If you do not download the binaries within THREE (3) days, the binaries will be automatically cleared from our system. You can create a new one if necessary. |
Initialise the bridge
To initialise the bridge, you need to have the secret key first. To get the secret key, you can go to the Bridge → Actions → View on the specific bridge you would like to initialise. After that, click on the Click here to retrieve link.
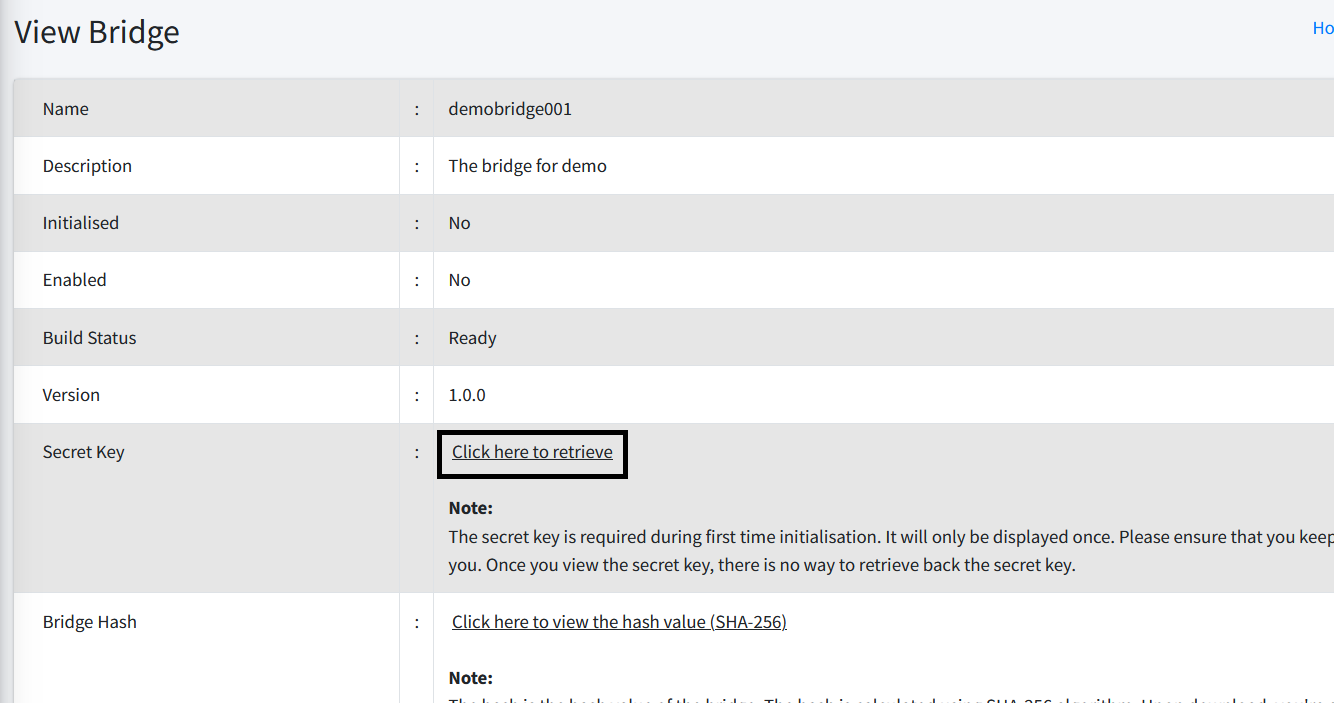
| The bridge needs to connect to bridge.cert-cycle.com to perform the necessary key exchange and grab the commands that you can send to it. Hence, it is imperative that the server where the bridge is deployed must have access to the internet. |
To initialise the bridge, run the bridge executable. It will check whether or not the bridge has been initialised. If it’s not yet initialised, it will continue with initialisation sequence, where you will need to enter the secret key.

Once initialised, the bridge will be started successfully.
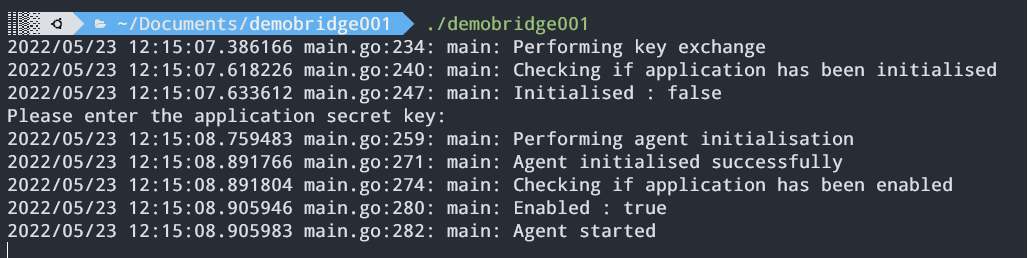
Install as a startup service
To ensure that the bridge started together with the OS so that you do not need to keep running it manually, we recommend that you install the bridge as a startup service. To do this, please refer to your specific OS documentation.
Here, we provide a guide on configuring a bridge as a systemd service and has been verified on Ubuntu 22.04. Some adjustments might be needed for different operating systems or Linux distros without systemd.
-
Go to /etc/systemd/system
cd /etc/systemd/system
-
With privileged access, create a file
ccbridge.servicewith the following content:
Remember to put correct value for the ExecStart, User, and WorkingDirectory configurations.
|
[Unit]
Description=CertCycle Bridge
After=network.target

[Service]
ExecStart=/path/to/your/bridge/binary
User=service_username
WorkingDirectory=/path/to/your/bridge/folder
Type=simple
Restart=on-failure

[Install]
WantedBy=default.target
RequiredBy=network.target-
Reload the systemd daemon using the following command.
sudo systemctl daemon-reload
-
Enable the service to run on startup.
sudo systemctl enable ccbridge
-
Run the service.
sudo systemctl start ccbridge
Bridge Update
From time to time, there will be a new release of CertCycle bridge available. When an update is available, an indicator will be showing to the right of the version number when you view the bridge.
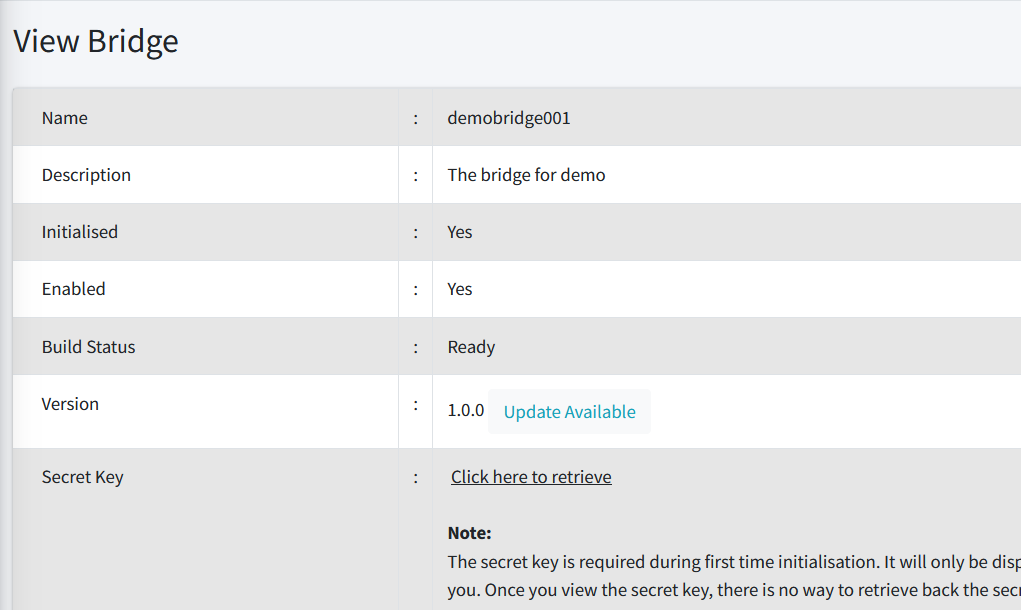
Clicking on the Update Available button shows the details of the update.
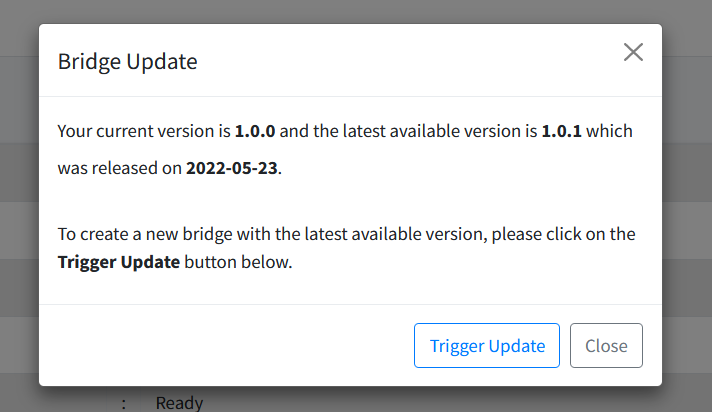
To trigger the bridge to generate an updated version, click on the Trigger Update button. It brings you to the Bridge Updater page. Once all the necessary information are submitted, a new bridge will be created in your company.
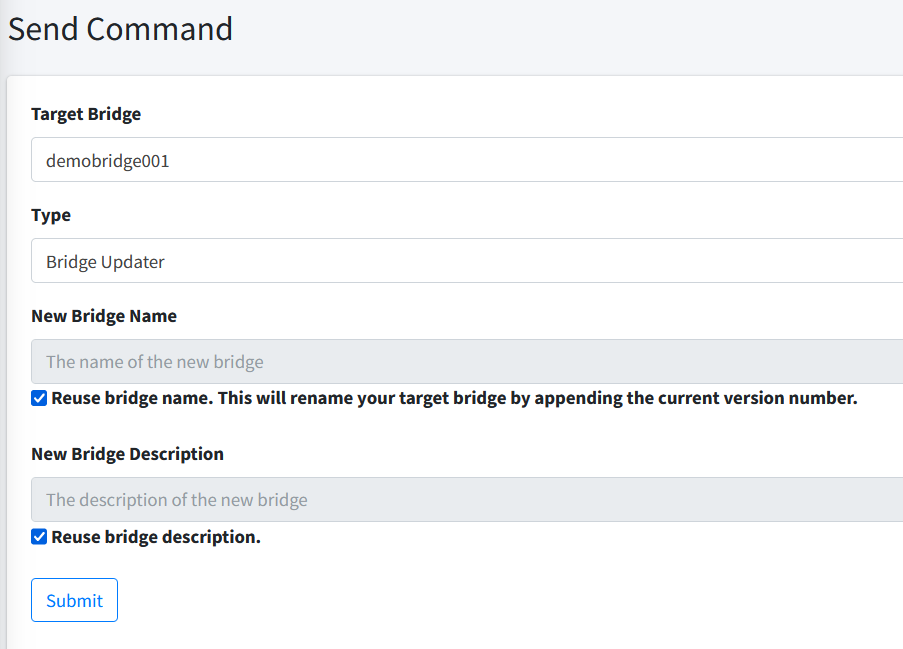
Once the bridge successfully executed the update, if you go to the List Bridges, you will see a new bridge has been created.
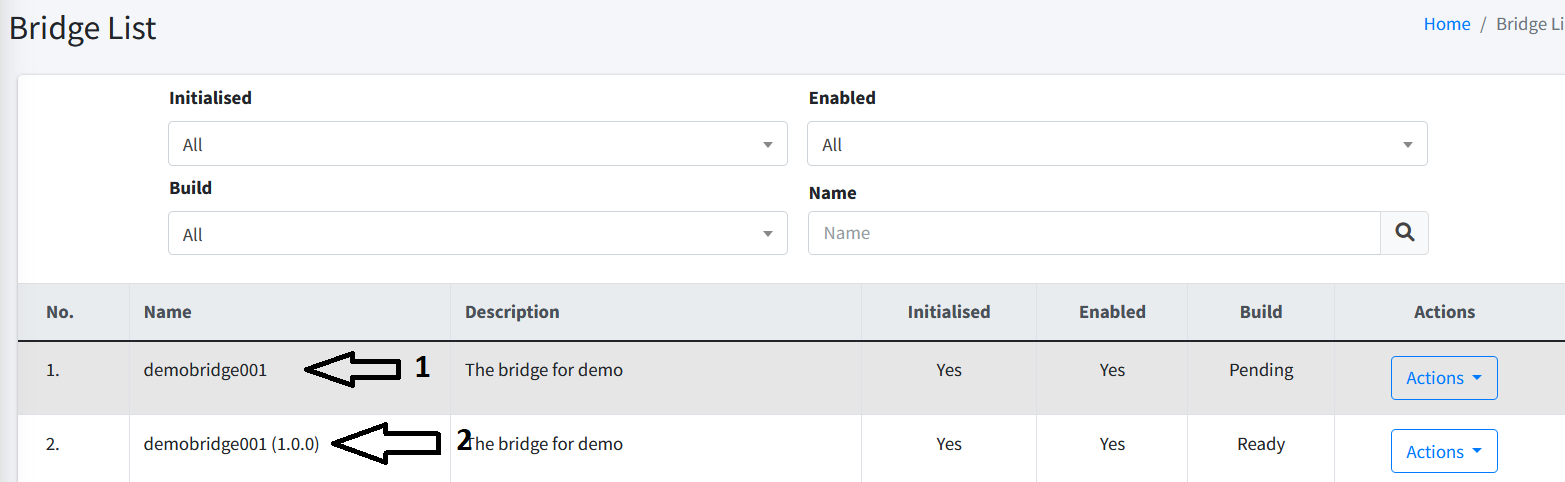
You will see that the status for the new bridge is Initialised and Enabled by default. When the new build is ready, you can download the new bridge’s binary and use it to replace the one that you already have in your server.
Discovery
By utilising the network scanning feature, Bridge will be able to tell CertCycle what are the servers that have been discovered during the scanning process.
| The discovered hosts will only be listed if there is at least ONE (1) port available and secured via TLS whereas the Bridge able to grab the SSL certificate. |
The discovered hosts list includes the Bridge Group column to indicate which group the discovery belongs to.
You can filter the list by the following criteria:
-
Target Bridge Group. Filter by selecting the bridge group that performed the discovery.
-
IP. Filter by the IP address of the host.
To the right of each of the discovered hosts, there is an Actions menu consists of the following actions:
-
Register Endpoint (): This is used to register the host as an endpoint which can be used further inside CertCycle.
| To register endpoint, you must have both List Endpoints, Delete Endpoint permissions. |
-
Delete (): This is used to delete that specific discovered host.
| To delete this, you must have both List Endpoints, Add Endpoint permissions. |
Register as Endpoint
To register a discovered host as an endpoint, you will need to enter the following information:
-
Hostname. The server’s hostname.
-
IP. The server’s IP address. This is already pre-populated by the system. You can change it if necessary.
-
Type. The type of the host.
-
OS. The OS of the host.
-
Remark. The remark or note associated with this endpoint for your own reference.
-
SSH Username. The username used to SSH to this endpoint. Available only if your selected OS is Linux.
-
SSH Password. The password used to SSH to this endpoint. Available only if your selected OS is Linux.
-
SSH Port. The port used to SSH to this endpoint. The default port number is 22 if left blank. Available only if your selected OS is Linux.
-
SSH Server Public Key. The SSH public key representing the server. Available only if your selected OS is Linux.
-
Environment Variables. This is the list of environment variables to be provided together when executing remote command against this particular endpoint. Available only if your selected OS is Linux.
-
WinRM Username. The username used to connect via WinRM protocol. Available only if your selected OS is Windows.
-
WinRM Password. The password used to connect via WinRM protocol. Available only if your selected OS is Windows.
-
WinRM Port. The port used to connect via WinRM protocol. Available only if your selected OS is Windows.
-
Use HTTPS. The flag indicating whether you want to use HTTPS to connect via WinRM protocol. Available only if your selected OS is Windows.
-
Insecure HTTPS. The flag indicating whether you want to proceed despite invalid SSL certificate presented by the target Windows endpoint, for example invalid
DNSNamevalue. This is usually more common for internal servers. Only change toYesif you know what you are doing. Available only if your selected OS is Windows andUse HTTPSisYes. -
CA Certificate. The CA certificate used to connect via WinRM protocol. This is used to validate the SSL certificate presented by the target Windows Endpoint. Available only if your selected OS is Windows and
Use HTTPSis set toYes. -
Client Certificate. The client certificate used to authenticate via WinRM protocol. This is used to authenticate yourself with the target Windows Endpoint. Available only if your selected OS is Windows and
Use HTTPSis set toYes. -
Timeout (second). The timeout to connect via WinRM protocol in seconds. Available only if your selected OS is Windows.
-
Authentication Method. The method used to authenticate via WinRM protocol. Available only if your selected OS is Windows.
-
Kerberos Configuration. The Kerberos configuration to be used when connecting via WinRM protocol. Available only if your selected OS is Windows and
Authentication Methodset toKerberos. Refer here for more information on Kerberos configuration.
Register Multiple Endpoints
To register multiple endpoints, you can select each of the host by checking the checkbox for each of it and then click on the Register Endpoint button at the below of the page.
You will be asked to enter the following details: - Type. The type of the host. - OS. The OS of the host.
| The type and OS information is shared among all the selected hosts. |
| The hostname will be populated with the IP address. You can always change it later on by editing the endpoint. |
| All other optional information will be left empty. |
Delete Multiple Discovered Hosts
To delete multiple discovered hosts, you can select each of the hosts by checking the checkbox for each of it and then click on the Delete button at the below of the page.
| Note that this action is irreversible. You will need to do another round of discovery for it to show in the list again. |
The discovered certificates list includes the Bridge Group column to indicate which group the discovery belongs to.
This page displays the list of certificates found on the discovered hosts. You can filter the list by the following criteria:
-
Target Bridge Group. Filter by selecting a specific bridge group.
-
Subject DN. Filter by the Subject Distinguished Name of the certificate.
-
Issuer DN. Filter by the Issuer Distinguished Name of the certificate.
-
Source. Filter by the source of the discovery.
-
Host. Filter by the hostname.
To the right of each of the discovered certificates, there is an Actions menu consists of the following actions:
-
View (): This is used to view some information of the certificates.
-
Make Managed (): This is used to register the certificate to Cert-Cycle, hence making it managed by the Cert-Cycle.
| To access Make Managed, you must have both List Certificate Owners, Add Certificate Owner permissions. |
-
Delete (): This is used to delete that specific discovered certificate.
| To delete this, you must have Delete Certificate permission. |
Make a Certificate Managed
To make a discovered certificate as managed, you will need to enter the certificate owner information. You can either choose from existing certificate owner that you already have in your company, or you can also add a new one by entering the new owner information. Optionally, you can also choose an endpoint or multiple endpoints to associate the certificate with.
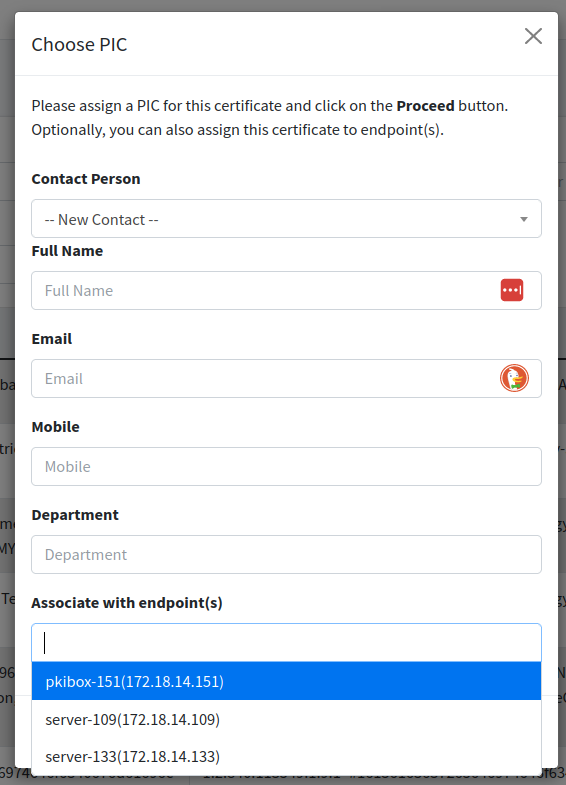
Make Multiple Certificates Managed
To make multiple discovered certificates as managed, you can select each of the discovered certificates by checking the checkbox for each of it and then click on the Make Managed button at the below of the page.
You will need to enter the owner information. You can either choose from existing certificate owner that you already have in your company, or you can also add a new one by entering the new owner information. Optionally, you can also choose an endpoint or multiple endpoints to associate the certificate with.
| The Certificate Owner and associated endpoint(s) (if any) will be shared among all the selected certificates. |

Delete Multiple Discovered Certificates
To delete multiple discovered certificates, you can select each of the certificates by checking the checkbox for each of it and then click on the Delete button at the below of the page.
| Note that this action is irreversible. You will need to do another round of discovery for it to show in the list again. |
Authentication Key
List Authentication Key
| To access this page, you must have List Authentication Keys permission. |
To connect to an endpoint securely, some organisations might enforce to use authentication keys instead of just a username and password. This module allows you to register authentication keys that can be used later to connect to an endpoint securely.
To view the list of registered SSH Private Keys, you can go to the menu Authentication Key → List.
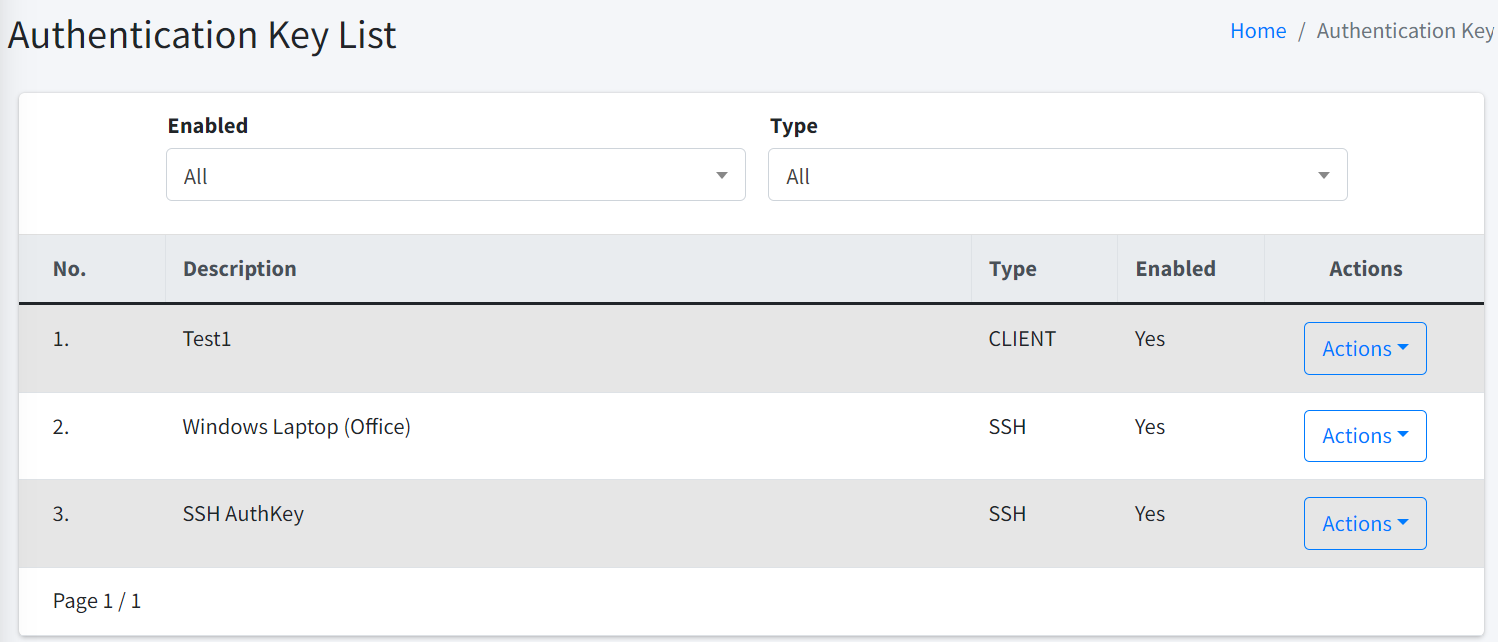
For authentication key, there are several actions can be done.
-
View Public Key. This action is used to display the public key associated with the private key.
-
View Private Key. This action is used to display the private key.
-
Edit. This action brings you to the edit key page, allowing you to update the details of the authentication key. Please refer to here for more details.
-
Enable / Disable. This action allows you to enable or disable a key. Disabled keys will not be able to be used.
-
Delete. This action is used to delete the authentication key.
| To delete authentication keys, you must have Delete Authentication Keys permission. |
| Deleting an authentication key is irreversible. You need to register again the authentication key if you need to in the future. |
Edit Authentication Key
| To edit authentication keys, you must have Edit Authentication Keys permission. |
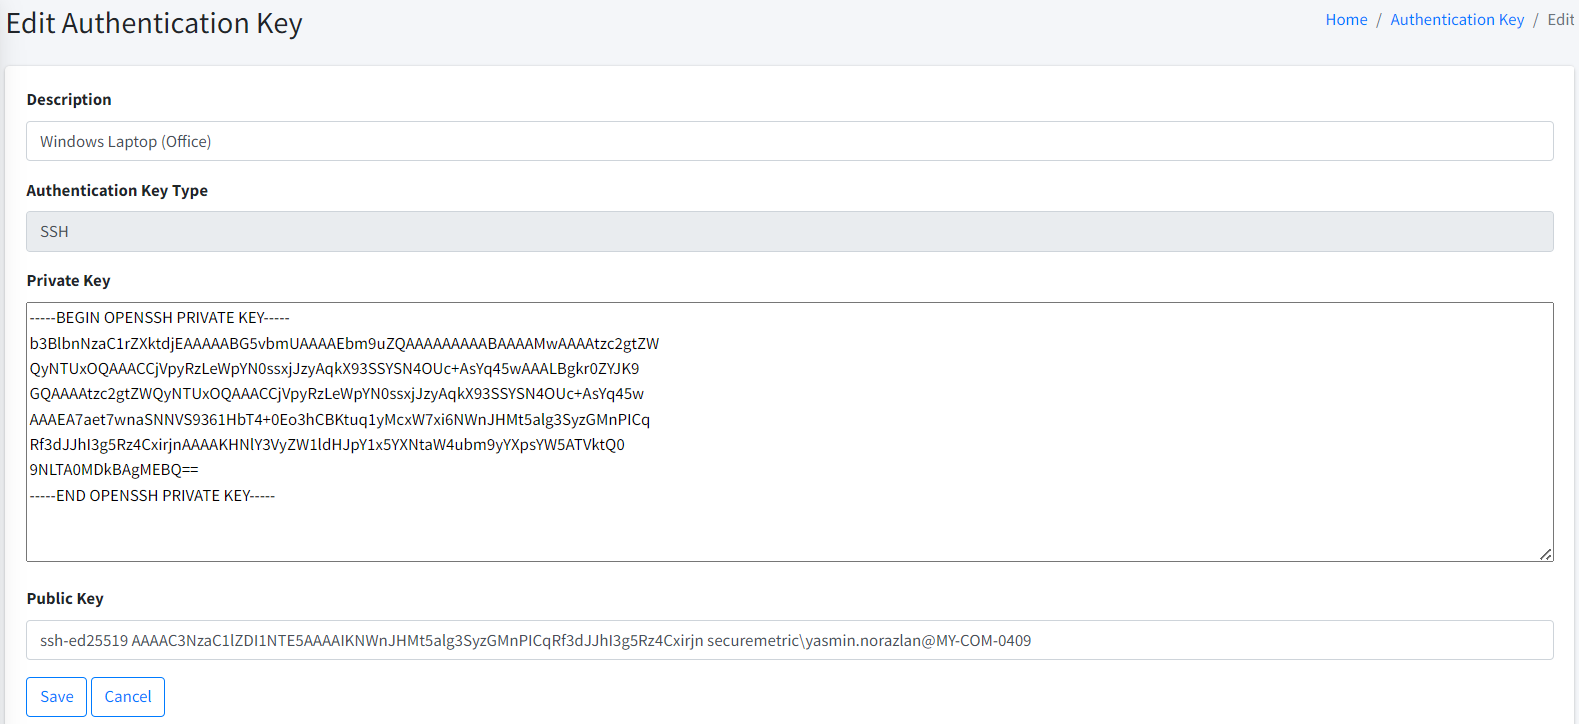
To edit SSH authentication key, you may change several information regarding the SSH private key such as the description, private key, and the public key.
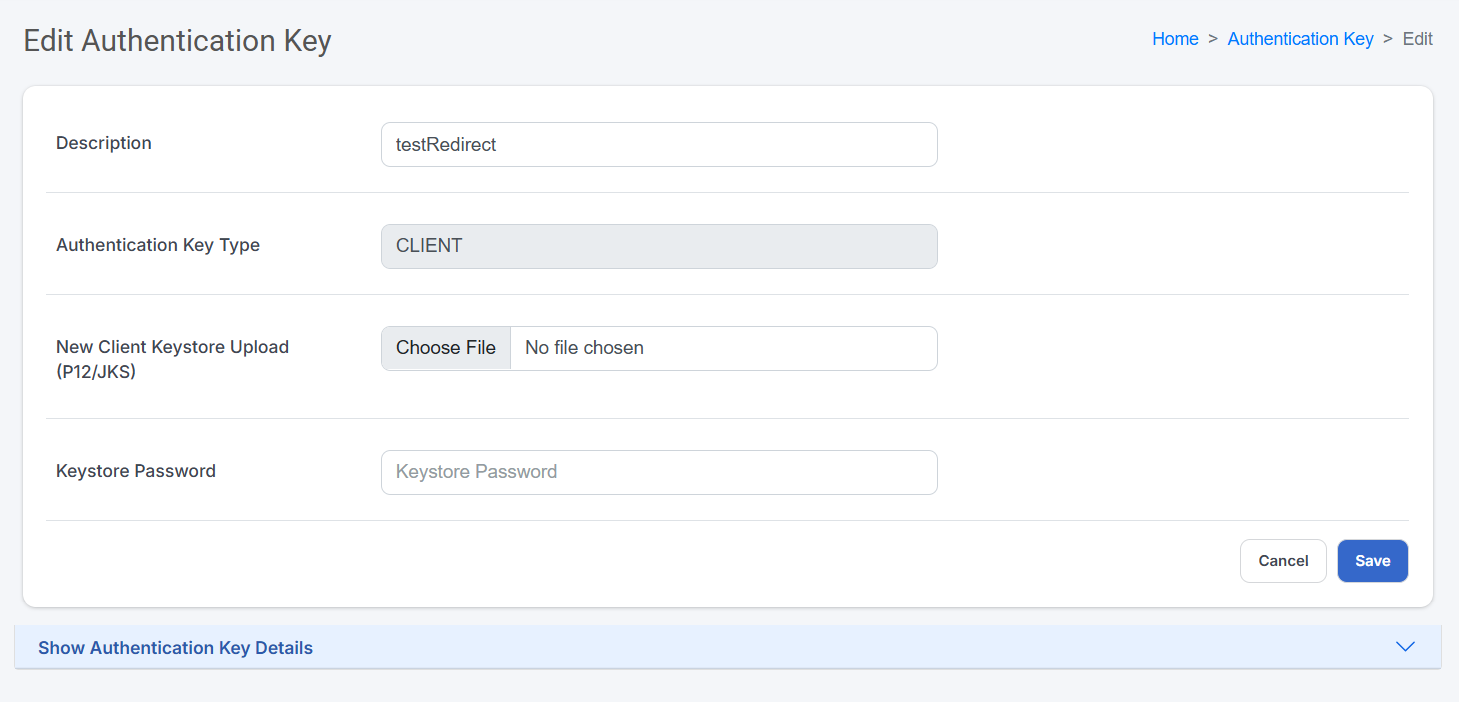
To edit CLIENT authentication key, you may change the description, upload a new client keystore file, and update the keystore password.
| Make sure the password correct and matches the uploaded keystore file. |
Add Authentication Key
| To access this page, you must have Add Authentication Keys permission. |
To add a new authentication key, you can go to the menu Authentication Key → Add.
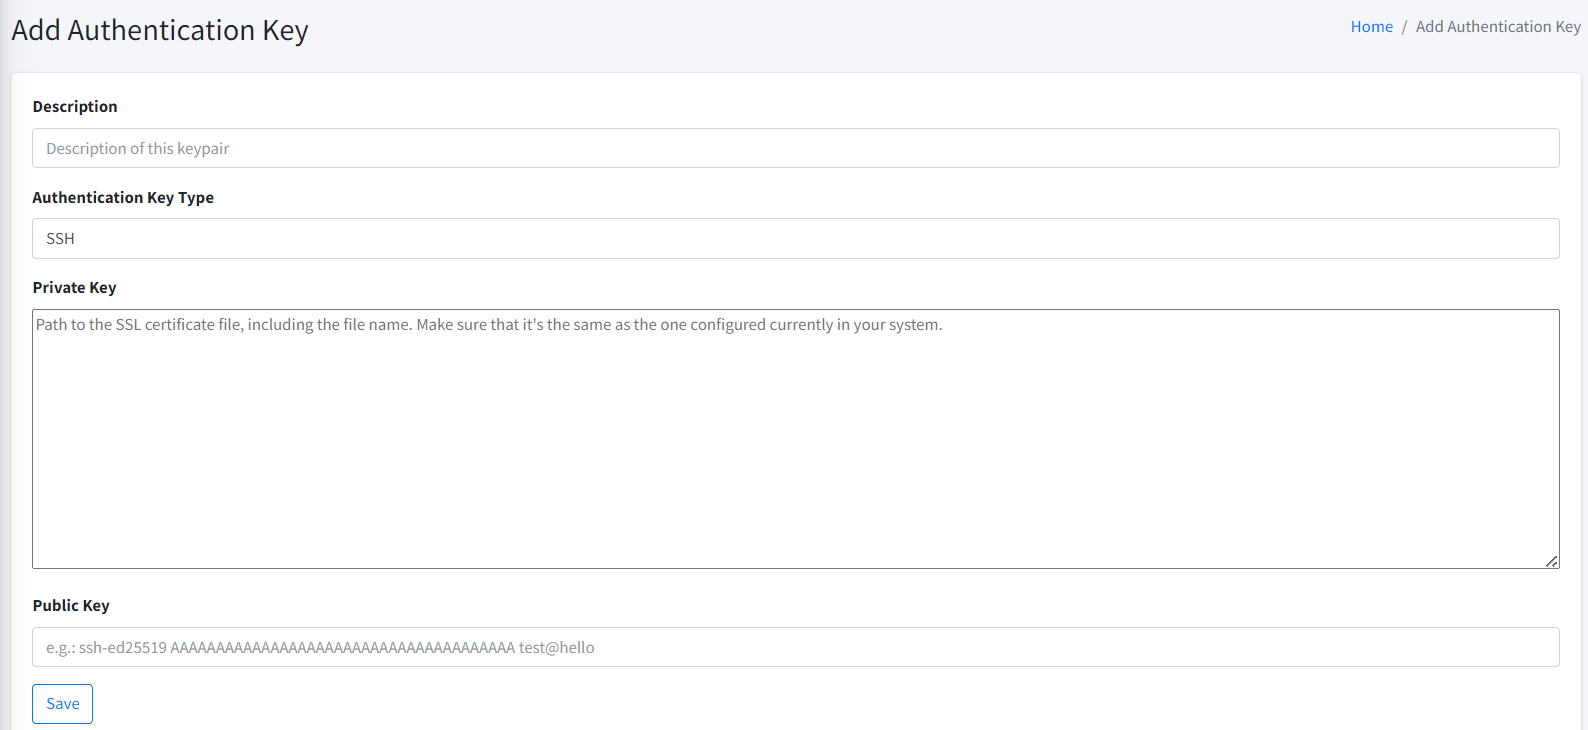
There are several mandatory information that you have to provide to be able to successfully add a new authentication key.
-
Description. This is the description of the authentication key. It is recommended to use meaningful description so that it can be easily referenced in the future.
-
Authentication Key Type. You can select the type of key that you want to authenticate with.
-
Private Key. This is the SSH private key. Only available for SSH authentication key.
SSH private key must be enclosed within -----BEGIN OPENSSH PRIVATE KEY----- and -----END OPENSSH PRIVATE KEY-----.
|
-
Public Key. This is the SSH public key associated with the private key. Only available for SSH authentication key.
-
Client Keystore Upload. You need to upload a P12 or JKS file for client authentication. Only available with CLIENT authentication key.
-
Keystore Password. You have to put the password for the keystore. Only available with CLIENT authentication key.
| The password must be correct and match the keystore file for successful authentication. |
Endpoints
An endpoint is an entity that is registered and known by CertCycle. This can be used for some operations offered by CertCycle. To add an endpoint, please refer to Register as Endpoint.
Endpoint List
| To access this page, you must have List Endpoints permission. |
In this page, you may see all the endpoints that have been registered in your company.
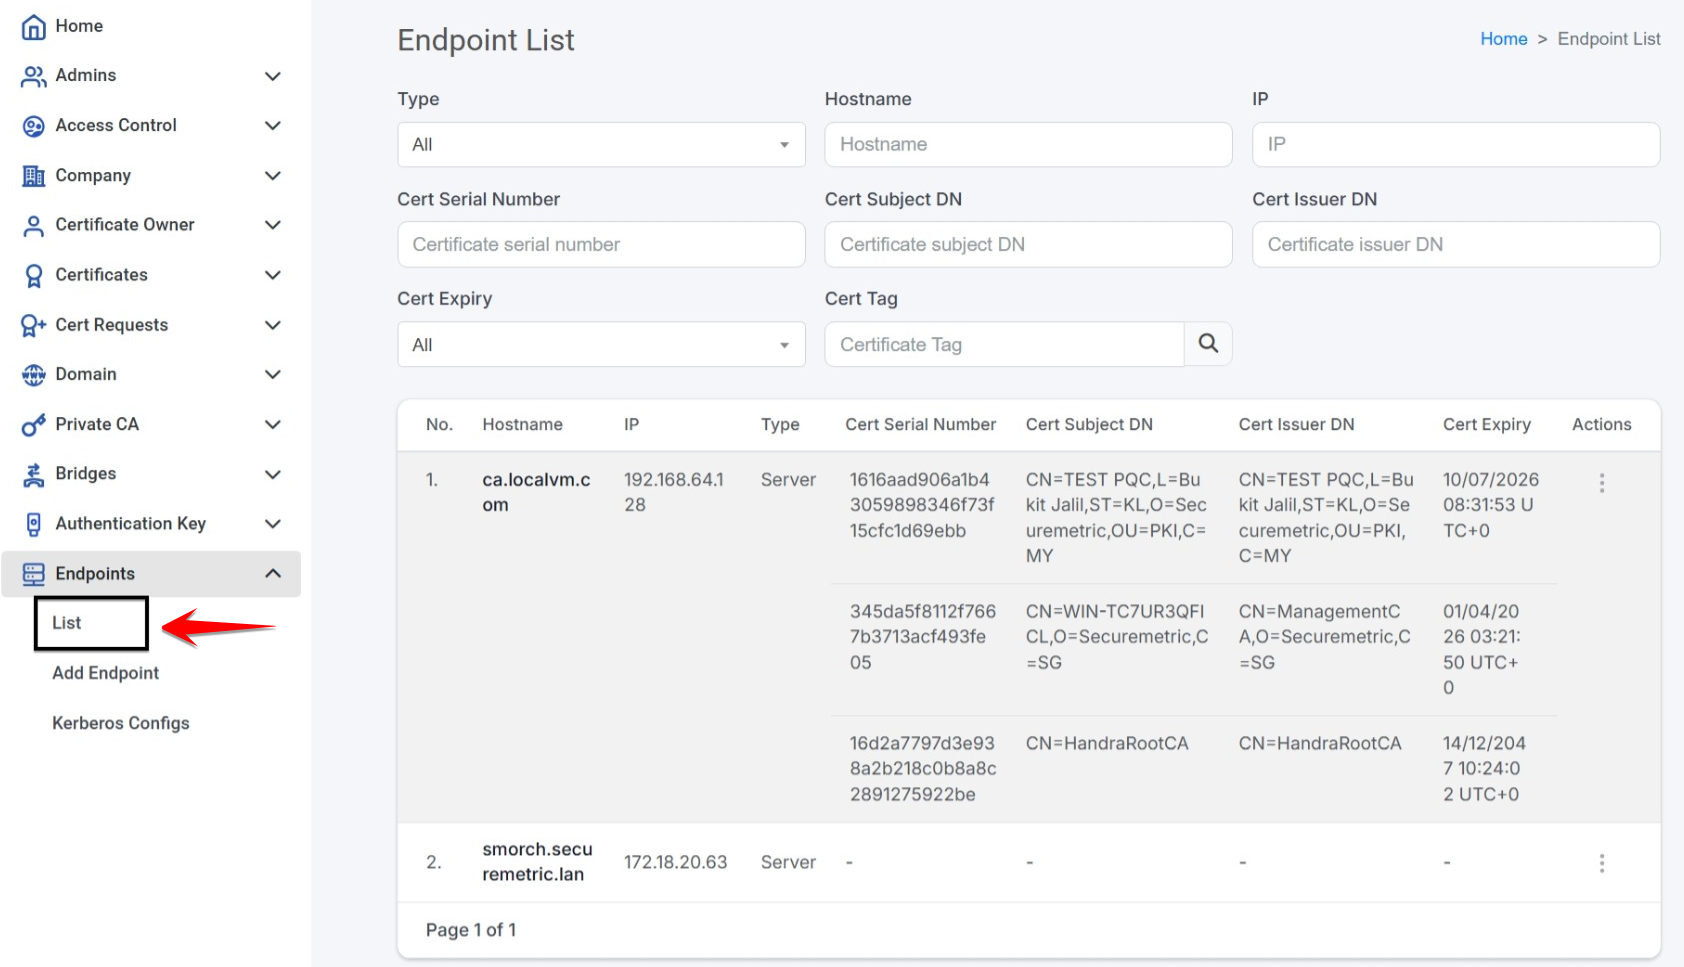
You can filter the list by the following parameters:
-
Type. The type of the endpoint.
-
Hostname. The full hostname of the endpoint.
-
IP. The full IP address of the endpoint.
-
Cert Serial Number. The full serial number of the certificate.
-
Cert Subject DN. The full subject DN of the certificate.
-
Cert Issuer DN. The full issuer DN of the certificate.
-
Cert Expiry. The date on when a certificate is going to expire.
-
Cert Tag. The full tag of the certificate.
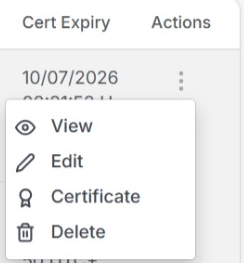
There are FOUR (4) actions available for an endpoint:
-
View. This option is used to view details of an endpoint.
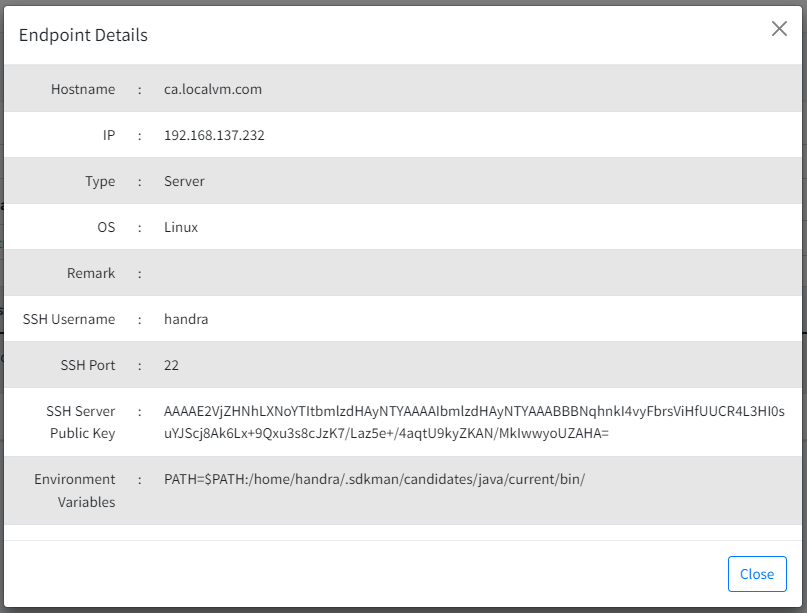
-
Edit. This option is used to edit an endpoint.
| To edit endpoint, you must have Edit Endpoint permission. |
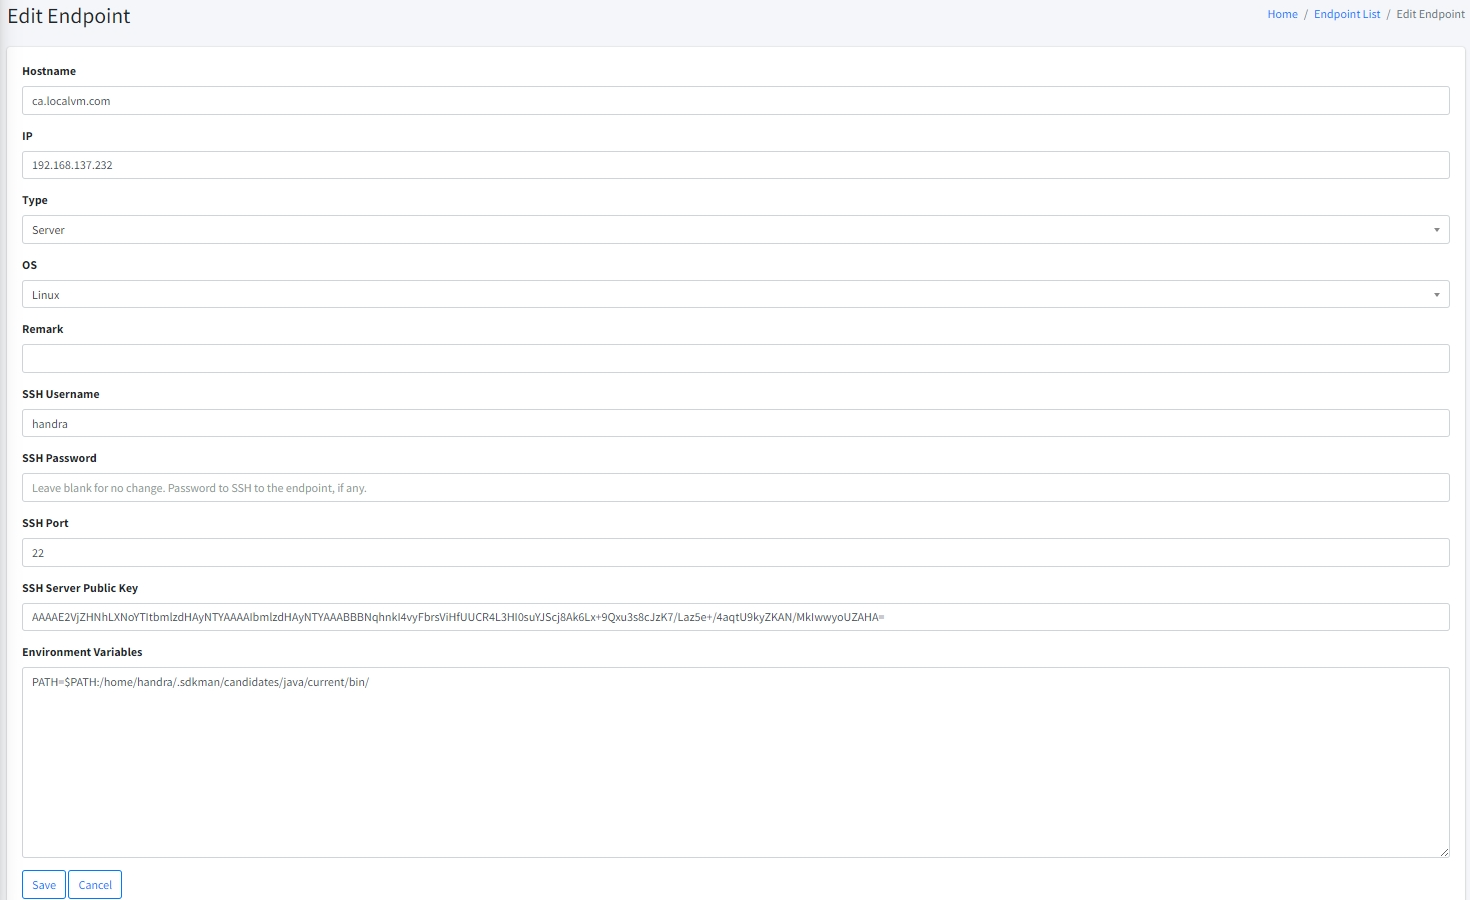
-
Certificates. This option is used to see the certificate(s) associated with this endpoint.
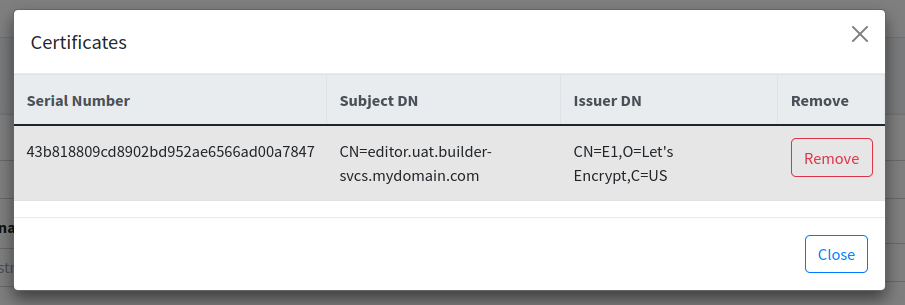
You can remove a certificate and make it no longer associated with the endpoint by clicking on the Remove button.
| To view the associated certificates, you must have List Certificates permission. |
| Removing the certificate from an endpoint association does not delete the certificate from the system. |
| This action is irreversible. You will need to re-associate the certificate if you want it in the future. |
-
Delete. This option is used to delete an endpoint.
| To delete an endpoint, you must have Delete Endpoint permission. |
| Note that this action is irreversible. You will need to register again an endpoint if you need to afterwards. |
Add Endpoint
| To add an endpoint, you must have Add Endpoint permission. |
In this page, you may see all the endpoints that have been registered in your company.
-
Hostname. The server’s hostname.
-
IP. The server’s IP address. This is already pre-populated by the system. You can change it if necessary.
-
Type. The type of the host.
-
OS. The OS of the host.
-
Remark. The remark or note associated with this endpoint for your own reference.
-
SSH Username. The username used to SSH to this endpoint. Available only if your selected OS is Linux.
-
SSH Password. The password used to SSH to this endpoint. Available only if your selected OS is Linux.
-
SSH Port. The port used to SSH to this endpoint. The default port number is 22 if left blank. Available only if your selected OS is Linux.
-
SSH Server Public Key. The SSH public key representing the server. Available only if your selected OS is Linux.
-
Environment Variables. This is the list of environment variables to be provided together when executing remote command against this particular endpoint. Available only if your selected OS is Linux.
-
WinRM Username. The username used to connect via WinRM protocol. Available only if your selected OS is Windows.
-
WinRM Password. The password used to connect via WinRM protocol. Available only if your selected OS is Windows.
-
WinRM Port. The port used to connect via WinRM protocol. Available only if your selected OS is Windows.
-
Use HTTPS. The flag indicating whether you want to use HTTPS to connect via WinRM protocol. Available only if your selected OS is Windows.
-
Insecure HTTPS. The flag indicating whether you want to proceed despite invalid SSL certificate presented by the target Windows endpoint, for example invalid
DNSNamevalue. This is usually more common for internal servers. Only change toYesif you know what you are doing. Available only if your selected OS is Windows andUse HTTPSisYes. -
CA Certificate. The CA certificate used to connect via WinRM protocol. This is used to validate the SSL certificate presented by the target Windows Endpoint. Available only if your selected OS is Windows and
Use HTTPSis set toYes.
| To access CA Certificate option, you must have List Certificates permission. |
-
Client Certificate. The client certificate used to authenticate via WinRM protocol. This is used to authenticate yourself with the target Windows Endpoint. Available only if your selected OS is Windows and
Use HTTPSis set toYes.
| To access Client Certificate option, you must have List Certificate Requests permission. |
-
Timeout (second). The timeout to connect via WinRM protocol in seconds. Available only if your selected OS is Windows.
-
Authentication Method. The method used to authenticate via WinRM protocol. Available only if your selected OS is Windows.
-
Kerberos Configuration. The Kerberos configuration to be used when connecting via WinRM protocol. Available only if your selected OS is Windows and
Authentication Methodset toKerberos. Refer here for more information on Kerberos configuration.
| To access Kerberos Configuration option, you must have List Kerberos Configs permission. |
Kerberos Configuration
Kerberos is one of the most widely used authentication mechanism used to authenticate with an endpoint. If you have Microsoft AD in your environment, you are likely have Kerberos configured by default. Cert-Cycle Bridge can utilise Kerberos to authenticate to an endpoint in a Windows based enterprise environment.
Add Kerberos Configuration
| To access this page, you must have Add Kerberos Config permission. |
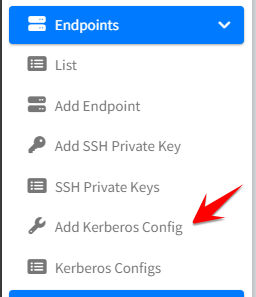
Clicking here should redirect you to the add kerberos configuration page.
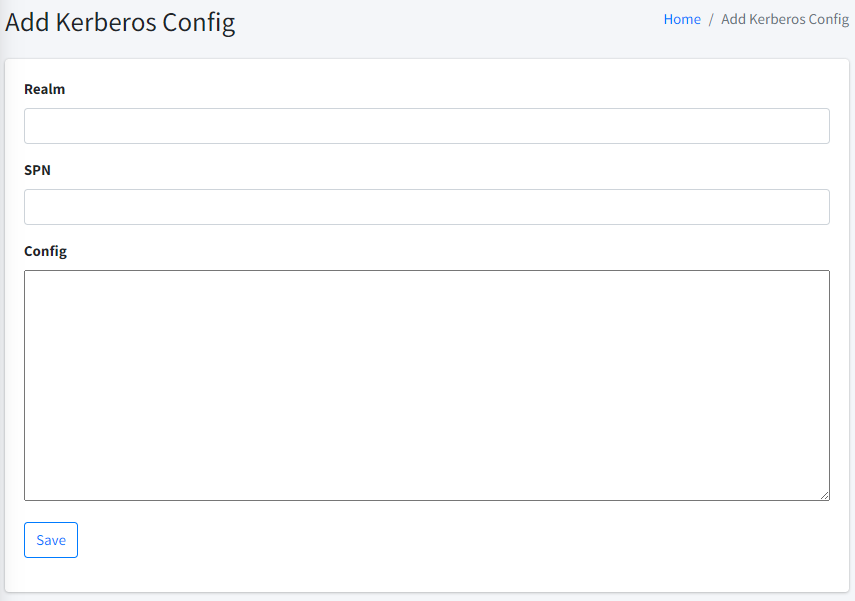
To add a new kerberos configuration, you need to enter the following details:
-
Realm. The logical grouping of resources and identities that use the Kerberos authentication protocol. Example:
SECUREMETRIC.LAN. -
SPN. The
Service Principal Name. A unique identifier for a service instance. Example:WSMAN/SMCOMMAND.SECUREMETRIC.LAN. -
Config. The Kerberos configuration. Example:
[libdefaults]
  default_realm = SECUREMETRIC.LAN

[realms]
  SECUREMETRIC.LAN = {
    kdc = sm-ad.securemetric.lan
    admin_server = sm-ad.securemetric.lan
    default_domain = securemetric.lan
  }

[domain_realm]
  .securemetric.lan = SECUREMETRIC.LAN
  securemetric.lan = SECUREMETRIC.LAN
Kerberos Configuration List
| To access this page, you must have List Kerberos Configs permission. |
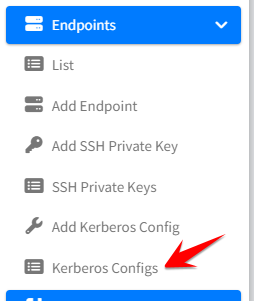
Clicking here should redirect you to the kerberos configuration list page.
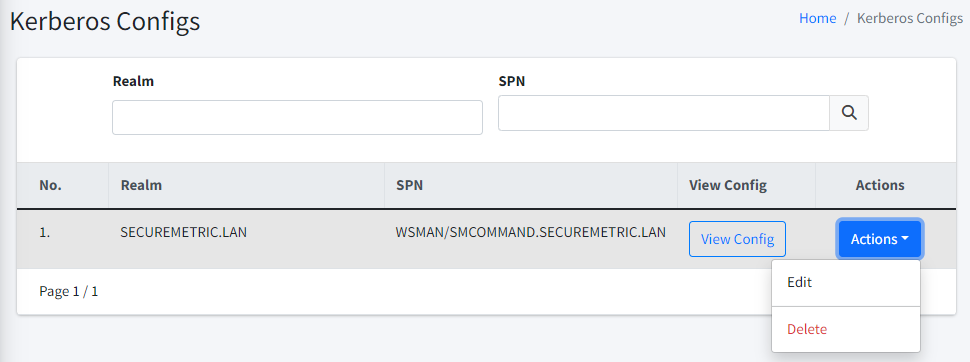
You can filter the list based on the Realm and SPN. If you click on the View Config button, you will be presented with the Kerberos configuration content, as shown in below example screenshot.
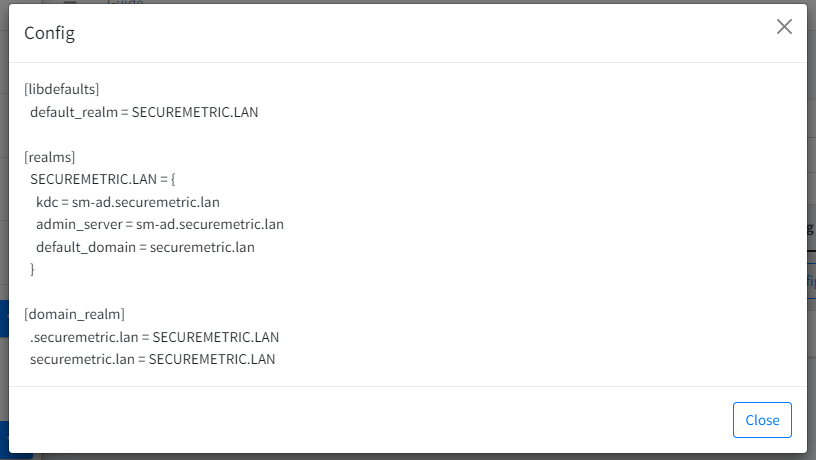
You can also Edit and Delete the configuration if you want to in this page.
| To edit Kerberos, you must have Edit Kerberos Config permission. |
| To delete Kerberos, you must have Delete Kerberos Config permission. |
| Deleting configuration is not reversible. You will need to re-add the configuration if you need it later. |
Activity
Through this module, you can observe all activities performed by the user. It is available on the navigation panel to the left.

Activity List
| To access this page, you must have List Activities permission. |
This page will show the list of activities.
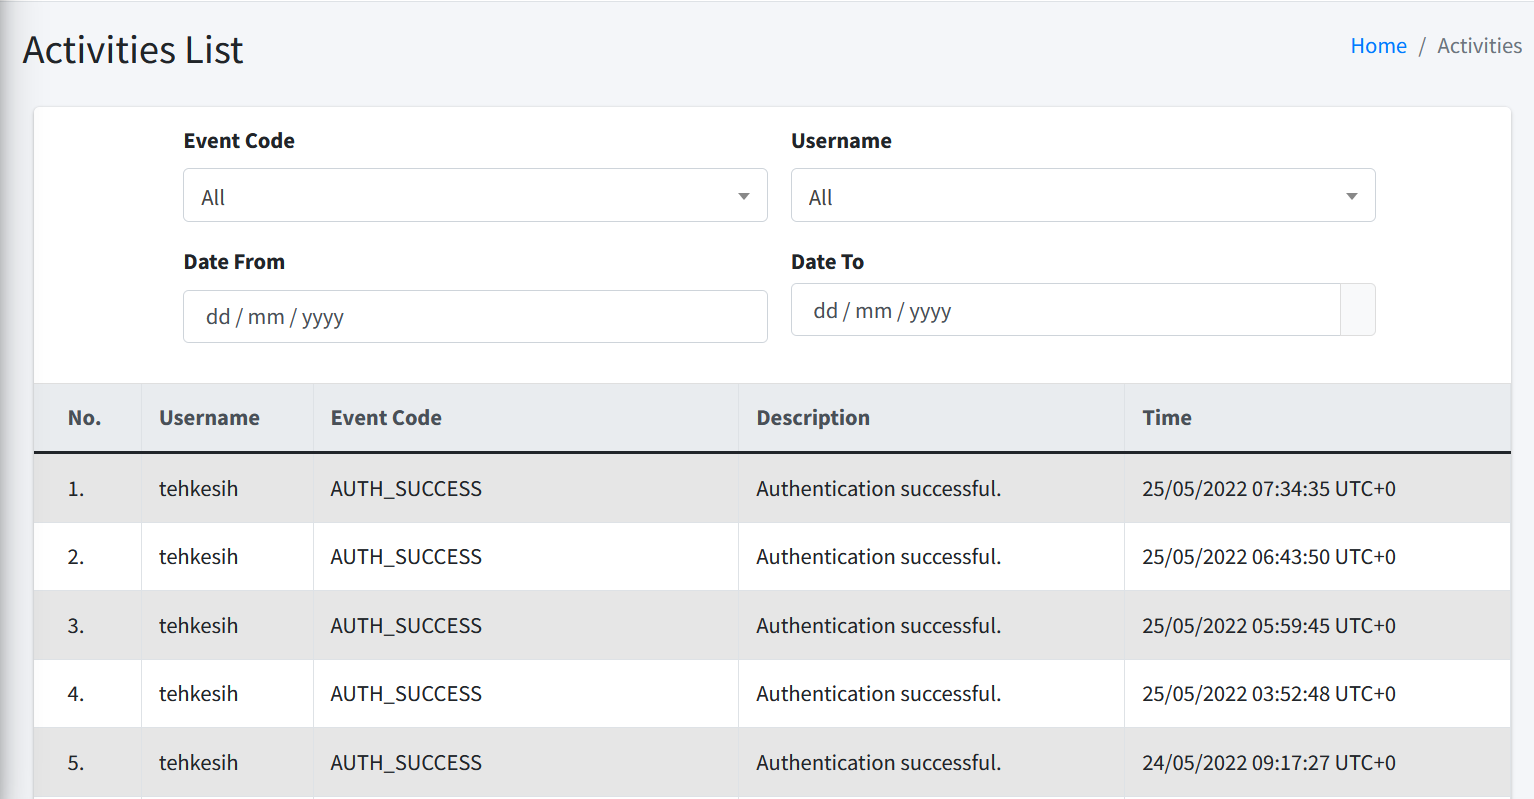
You can filter the list by:
-
Event Code. You may choose only one event code at the time.
-
Username You can choose one of the username that performed the activity.
-
Date From and Date To. Date range of the activity
Reporting
This reporting module allow user to generate Certificate Report, Certificate Risk Report, Domain Monitoring Report and Activity Report. The report supports PDF, CSV, and XLS format

Generate Report
| To access this page, you must have Generate Report permission. |
This page will show how to generate the report
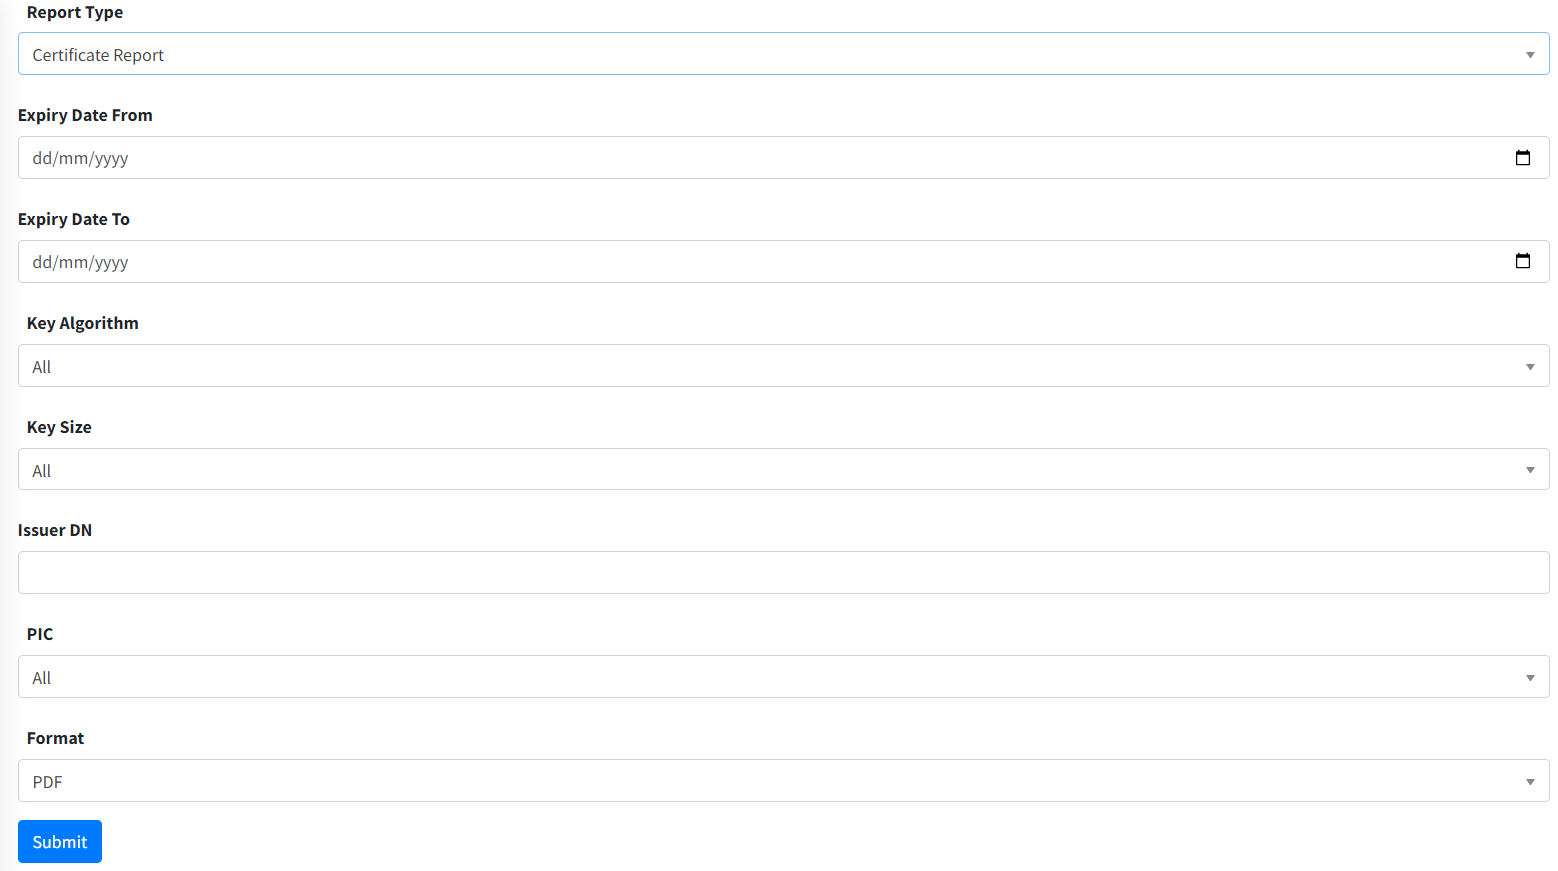
You can filter the report by:
-
Report Type. You can select the type of report that you want to generate.
| To generate Certificate Report OR Certificate Risk Report, you must have List Certificates permission. |
| To generate Domain Monitoring Report, you must have List Domains permission. |
| To generate Activity Report, you must have List Activities permission. |
-
Expiry Date From and Expiry Date To. You can choose expiry date range of the certificate. Only available for Certificate Report and Certificate Risk Report
-
Key Algorithm. You can choose available key algorithm. Only available for Certificate Report
-
Key Size. You can choose available key size. Only available for Certificate Report
-
Issuer DN. You can enter partial text from the Issuer DN of your certificates. Only available for Certificate Report and Certificate Risk Report
-
Certificate Owner. You can choose the list of available certificate owner(s). Only available for Certificate Report and Certificate Risk Report
| To filter by Certificate Owner, you must have the List Certificate Owners permission. |
-
Domain. You can choose the list of available domain. Only available for Domain Monitoring Report
-
Event Type. You may choose only one event code at the time. Only available for Activity Report
-
Username. You can choose available username. Only available for Activity Report
| To filter by username, you must have List Admins permission. |
-
Date From and Date To. You can choose date range of the activity. Only available for Activity Report
Click Submit to generate the report.